
Easy Toffee Candy is impossible to resist and is guaranteed to be one of your most requested holiday treats. Just six ingredients and no candy thermometer required!

This post may contain affiliate links. Please read our disclosure policy.
Easy Toffee Candy is an oldie but goodie that has been on countless holiday cookie trays throughout my life for as long as I can remember. It seemed whenever anyone would gift us holiday treats, some version of this completely addictive goodie was included.
I started making this saltine toffee myself decades ago and still whip up a batch every holiday season.

You’ll get that same scrumptious, “can I have 10 of these please” taste that you get from traditional toffee with half the work.
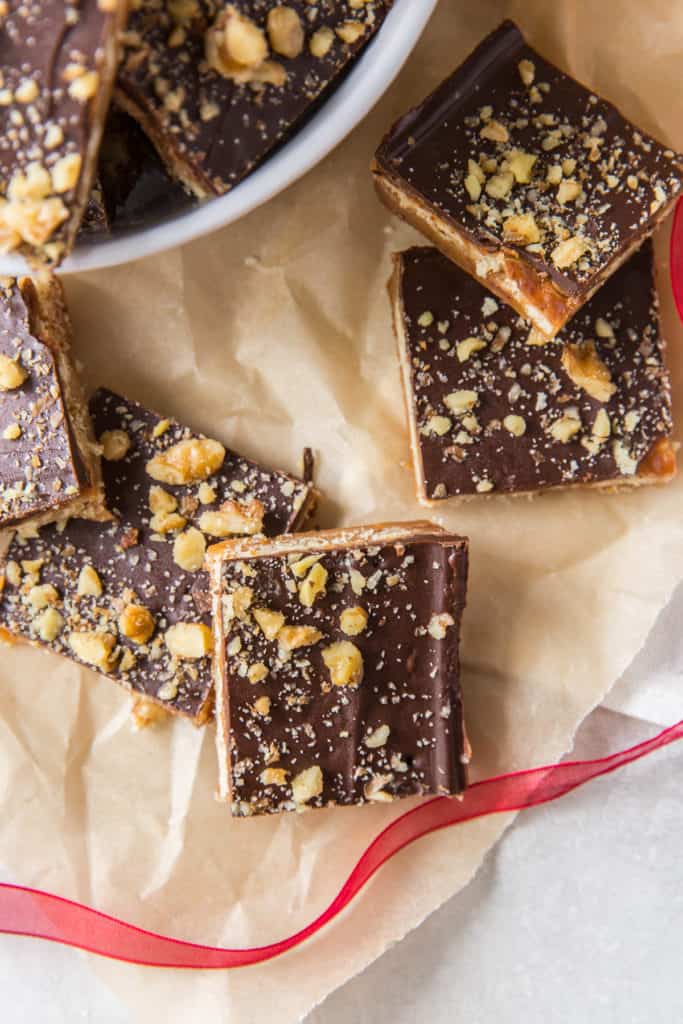
There is a reason why you may have heard this stuff referred to as “Christmas Crack”. I’ve never come across anyone who doesn’t adore this sweet and salty Easy Toffee Candy. Trust me when I say that it is an excellent choice for gift giving.
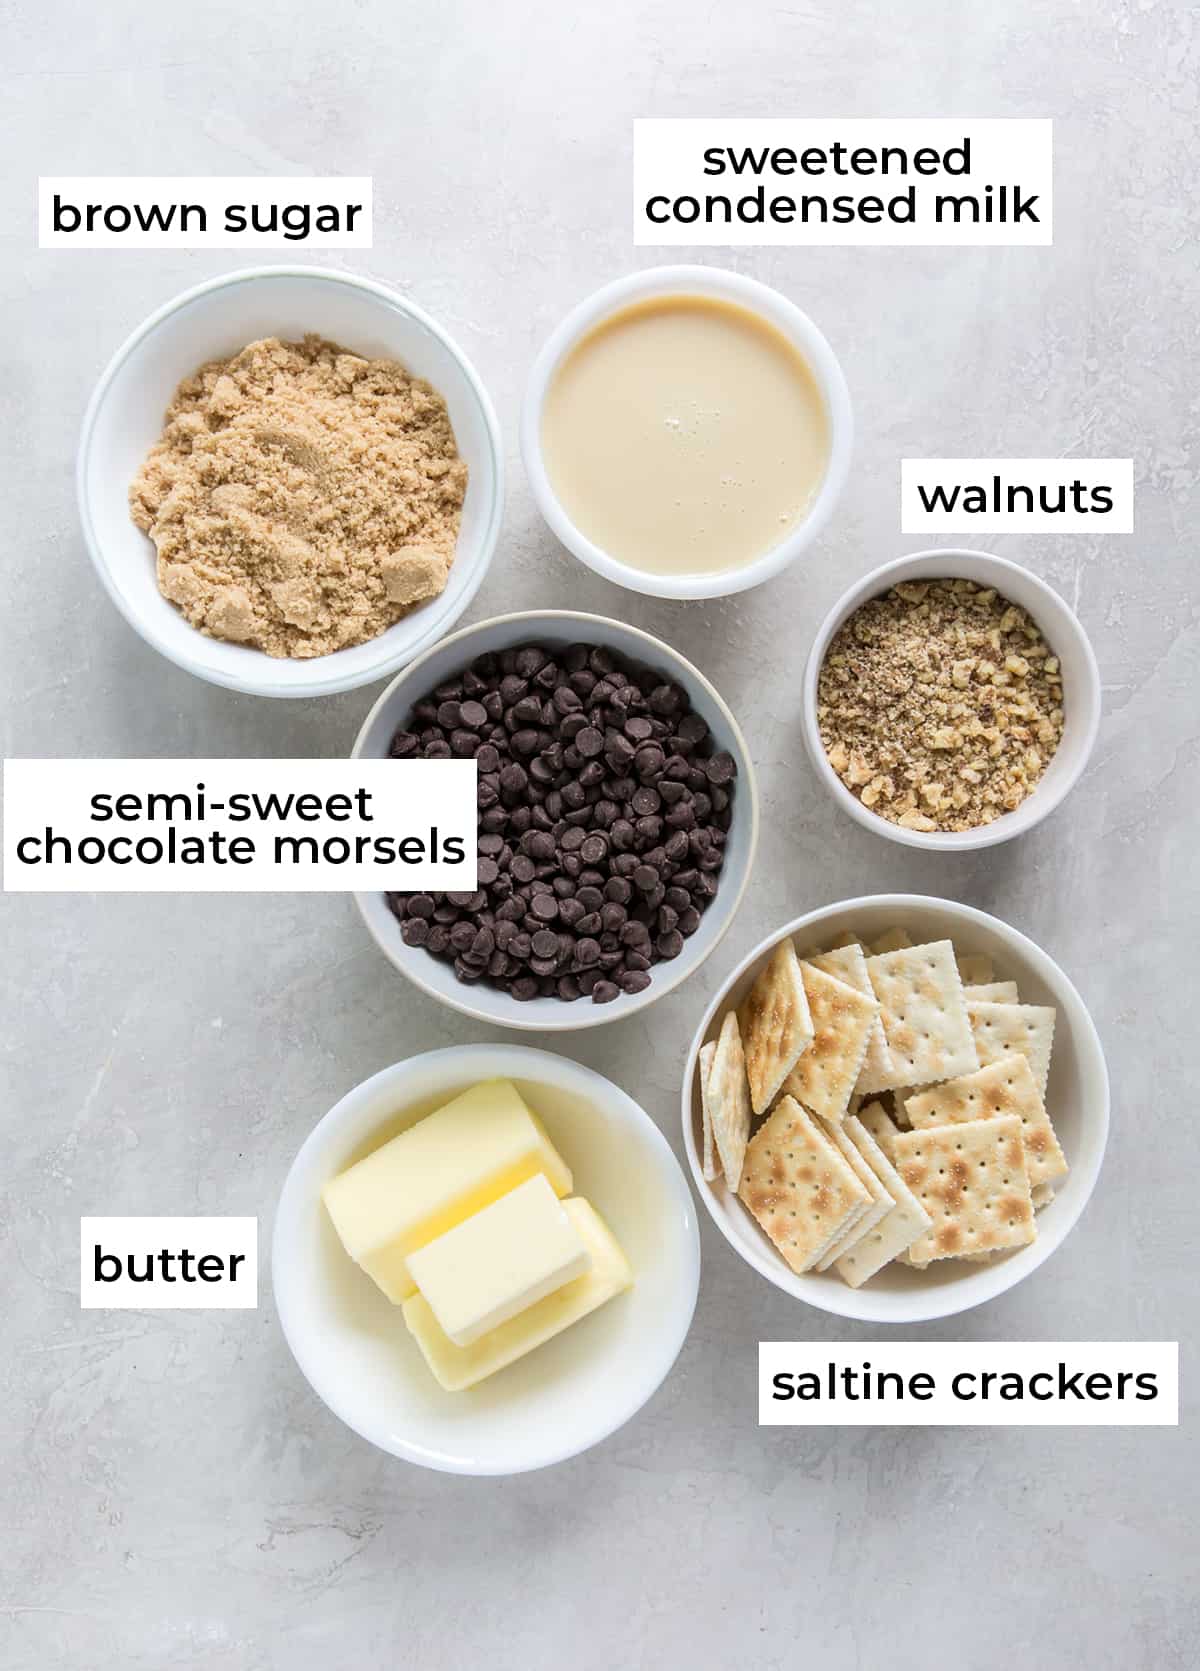
Ingredients
How to Make Easy Toffee Candy
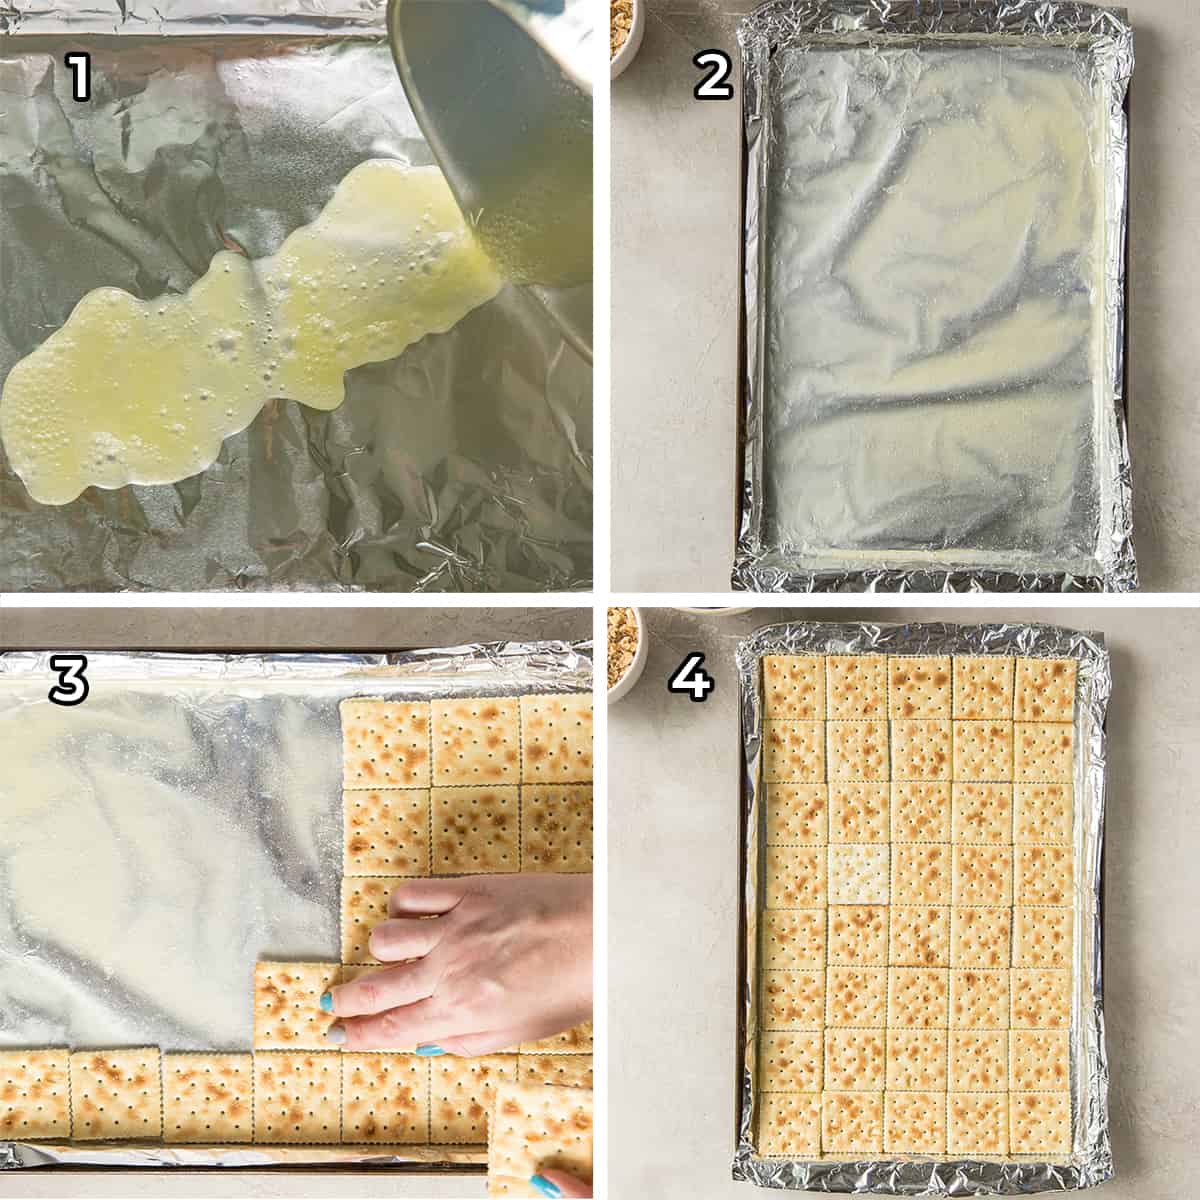
- Line a 15- x 10-inch jelly roll pan with heavy duty foil. Regular foil will be extremely hard to remove from the candy so I highly recommend heavy duty foil for this recipe. Melt the butter and pour it out over the foil.
- Tilt the pan to spread the melted butter out evenly over the foil.
- Place the saltine crackers over the melted butter
- A jelly roll pan is the perfect size to fit 30 saltine crackers. If you are using a slightly different size pan, you can trim the crackers as needed to fit.
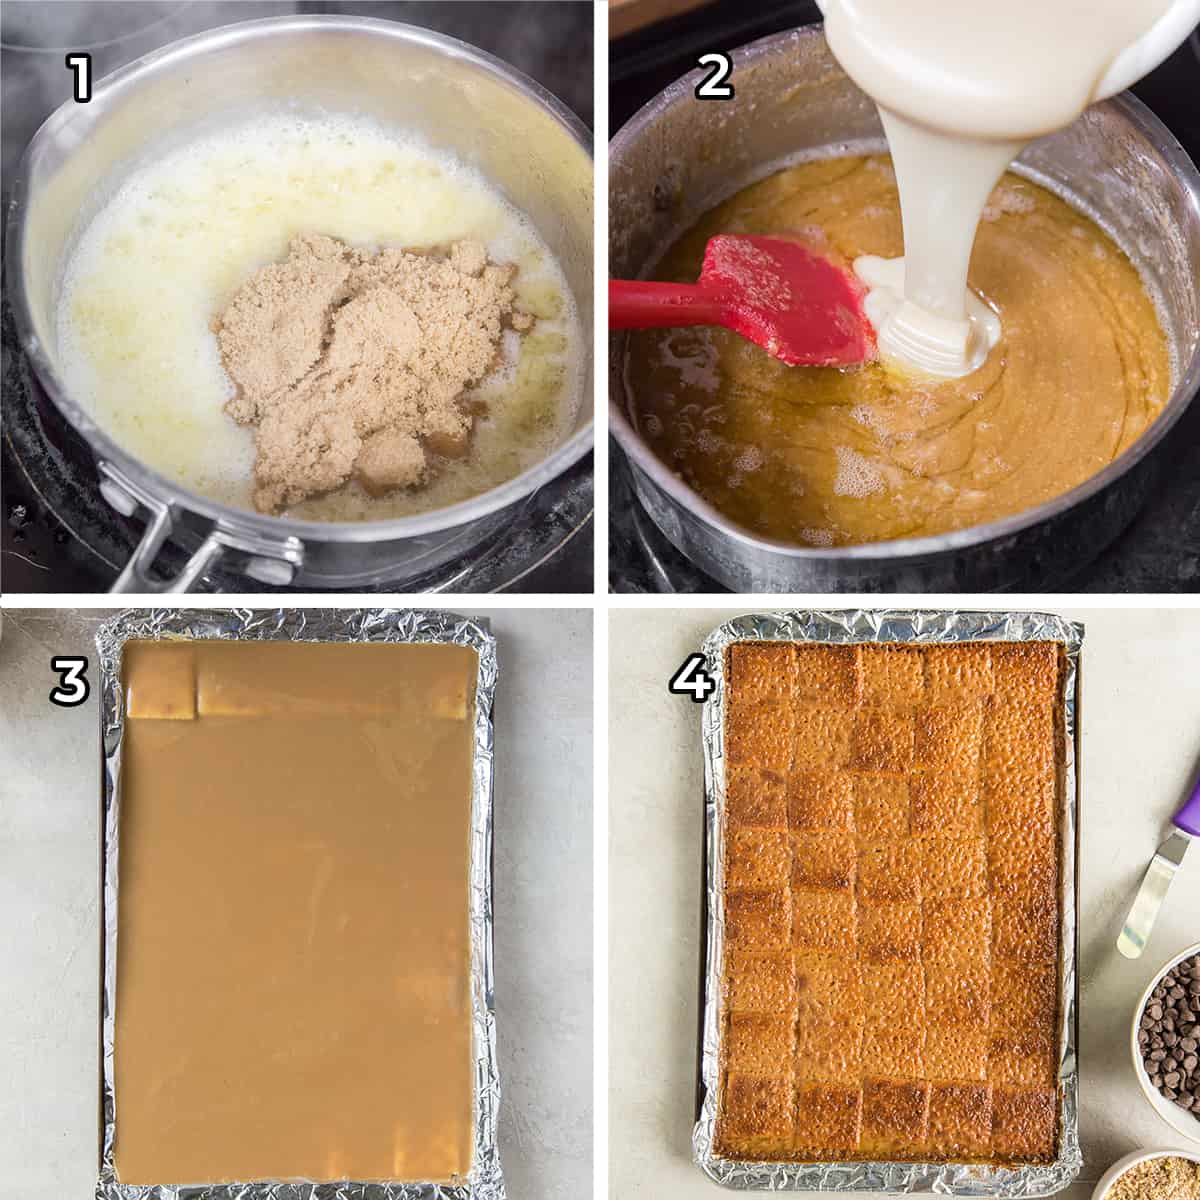
- Melt butter in a medium saucepan and add the brown sugar. Bring the mixture to a boil then reduce the heat and cook for 2 minutes, stirring occasionally.
- Stir in the sweetened condensed milk until well combined.
- Pour the toffee mixture over the saltines in the jelly roll pan.
- Bake for about 10 minutes in a 425 degree F oven, or until bubbly and golden brown.
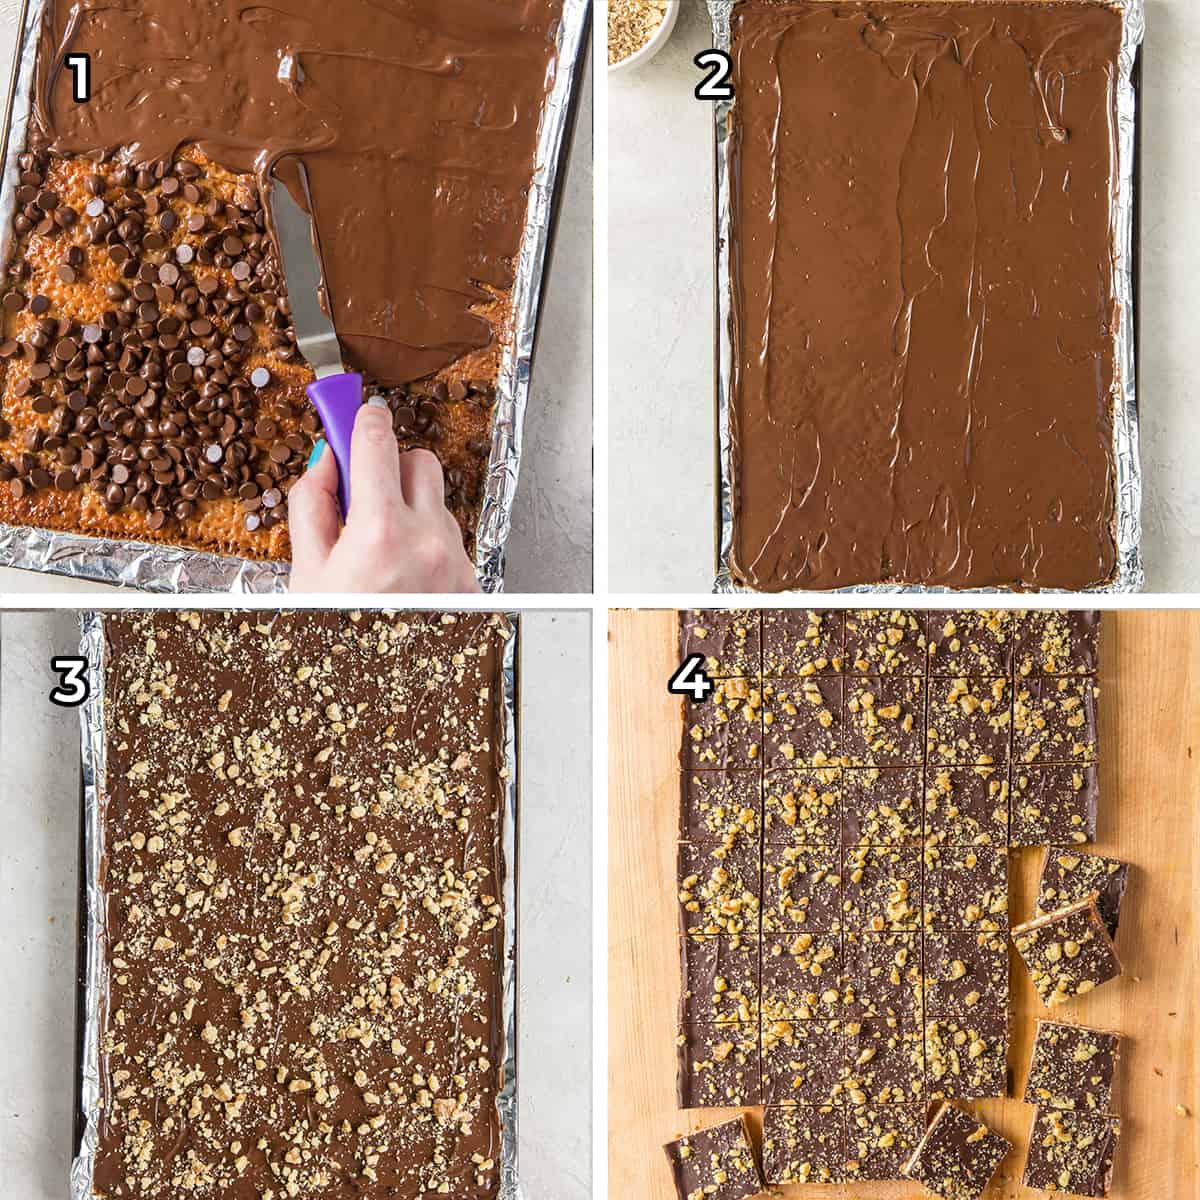
- Immediately sprinkle the chocolate morsels over the top of the hot toffee layer. Let it stand for 4 or 5 minutes to allow the heat from the toffee layer to melt the chocolate.
- Use an offset spatula or butter knife to spread the chocolate out in an even layer.
- Sprinkle the finely chopped walnuts over the top and lightly press them into the melted chocolate. Allow to cool on your kitchen counter in the pan for 30 minutes and then refrigerate until the chocolate is set, an additional 30 to 60 minutes.
- Lift the foil to remove the entire sheet of toffee candy from the jelly roll pan and transfer it to a cutting board. Carefully peel off and discard the foil. Use a sharp knife to cut the candy into squares.
How to Store Saltine Toffee
To keep the Easy Toffee Candy as fresh as possible, I recommend storing it in an airtight container in the refrigerator. It will keep nicely for up to two weeks and it’s delicious served chilled or at room temperature.

Variations
- You can make this candy all year round by using a variety of festive holiday sprinkles. Change up the colors to work for each holiday – red and green for Christmas, fall-inspired colors for Thanksgiving, or pastels for Easter.
- Not a fan of walnuts? Try finely chopped pecans, almonds, peanuts, or cashews.
- Dark chocolate fans can substitute all or part of the semi-sweet chocolate morsels for bittersweet chocolate morsels.
For more Christmas baking and gifting inspiration be sure to check some of my old favorites:
- Eggnog Thumbprints
- Chocolate Peppermint Crinkles
- Chewy Iced Molasses Cookies
- Holiday Oreo Cookie Balls
- Mom’s Pecan Sandies
This post was originally published on December 15, 2011. It has been updated with new text and images.
Easy Toffee Candy

Equipment
Ingredients
- 1 ¼ cup butter
- 30 saltine crackers, , plus a few more in case they break
- 1 cup brown sugar, packed
- 14 ounces sweetened condensed milk
- 12 ounces semi-sweet chocolate morsels
- ¾ cup finely chopped walnuts
Instructions
- Heat oven to 425 degrees F.
- Line a 15- x 10-inch jelly roll pan with heavy duty foil. In a medium saucepan melt ¼ cup butter and pour into the prepared pan. Tilt the pan as needed to spread the melted butter out in an even layer to coat all of the foil. Arrange the crackers over the butter.
- Melt remaining butter in the same saucepan and stir in the brown sugar. Bring to a boil over MEDIUM heat. Reduce heat and cook for 2 to 3 minutes, stirring occasionally.
- Remove the pan from the heat and stir in the sweetened condensed milk. Mix well. Spread the toffee mixture evenly over the crackers.
- Bake for 9 to 10 minutes until mixture is bubbly and golden brown. Carefully remove the pan from the oven.
- Immediately sprinkle with the chocolate morsels and let stand 5 minutes until the chocolate has melted. Spread the chocolate with an offset spatula or butter knife into an even layer. Sprinkle with the nuts and lightly press them into the melted chocolate. Allow to cool on your kitchen counter in the pan for 30 minutes and then refrigerate until the chocolate is set, an additional 30 to 60 minutes.
- Lift the foil to remove the entire sheet of candy from the pan. Carefully peel off and remove the foil. Use a sharp knife to cut the candy into squares.
- Store the toffee candy in an airtight container in the refrigerator for up to 2 weeks. It's delicious served chilled but can also be served at room temperature.
Notes
Nutrition
Nutrition information is automatically calculated using generic ingredients, and is an estimate not a guarantee. For more accurate results, please refer to the labels on your ingredients at home.
Like this? Please rate & comment below!
Adapted from VeryBestBaking.com


Same issue as everyone else, the caramel doesn’t set up and it’s sticky and gooey, even after lengthy cooling period in the refrigerator. Just ended up serving it upside down and treating the caramel like icing. If so many people are having this identical issue, the problem is with the writer and not with the users. Either way, I’ll probably keep making this because it’s easy and tasty!
Hi Neels. This is a Nestle recipe from way back that I’ve made countless times. It turns out for me just like you see in the photos. I can’t say for sure what the problem is. It could be the size of the pan or something else but it’s hard to know. I wish I could be of more help long distance. I’m glad that at least you enjoy how it tastes.
Unfortunately, the caramel never set and ended up making a sticky mess. Tastes good, but not presentable.
Sorry it didn’t work out for you!
Just made this, followed the recipe exactly. I put it in the fridge overnight to set up, but it is still very soft and it is hard to get the foil off. I have now put it in the freezer hoping it will get hard enough to cut and put in containers as right now it is way to sticky. It does look and taste good.
There are many, many similar recipes all over the web but I was interested in this one because it had one additional ingredient those did not – sweetened condensed milk. Since I had a few cans on hand and this got great reviews, I made this on the eve of a Candy Walk in my community. I signed up to provide treats.
I followed the recipe EXACTLY as written. I made two batches, using up all the ingredients from my pantry. What I ended up with was a gooey mess. The bottom layer never set up; it resembled the sauce you’d pour on icecream and so the “bars” could not be cut. I was embarrassed and ended up making a monetary donation to the event. I learned my lesson: NEVER trust an untested recipe if time and resources are tight. In this case, I wasted both. I’d love to know how you achieved a crispy crust with the addition of that condensed milk!
First, I’m really sorry you had a bad experience with the recipe. It is always best to test new recipes in advance for important occasions. I wish I could help to troubleshoot what went wrong for you. This is a very old recipe from Nestle Baking Co. that I’ve made for over 25 years and I’ve never experienced what you are describing. In order to set up properly, the candy must be refrigerated after baking and cooling. It should be easy to peel off the foil and slice at that point.
Followed this recipe exactly and bottom layer stuck to the extra heavy aluminum foil. It was sticky and , although it looked great , it was impossible to get off the foil. Had to throw out. Very disappointed and have no idea why it didn’t come out right!
Loved all your other recipes that I have tried .
I’m so sorry this happened, Tina. If you buttered the foil as directed, I’m surprised you had this issue. I make this candy every holiday season and while a few edges might stick a little, it’s never a problem.
Just made a patch and the husband didn’t want to wait for it to cool and settle. Hope it turned out.
This is a great recipe and easy! Too easy. It tastes like almond roca. The only change I made was more nuts. Thank you and Merry Christmas!
Just made a patch and the husband didn’t want to wait for it to cool and settle. Hope it turned out.
I made this last night 3/2/14….is it suppose to be soft and chewy or did I mess it up? I make something similar without the condensed milk and its crunchier, so does the milk make it chewy?
Hi Julie. I’m not sure I’d describe the texture as soft and chewy, although, it does soften quite a bit if not refrigerated. I recommend storing the toffee in an airtight container in the fridge for the best texture.