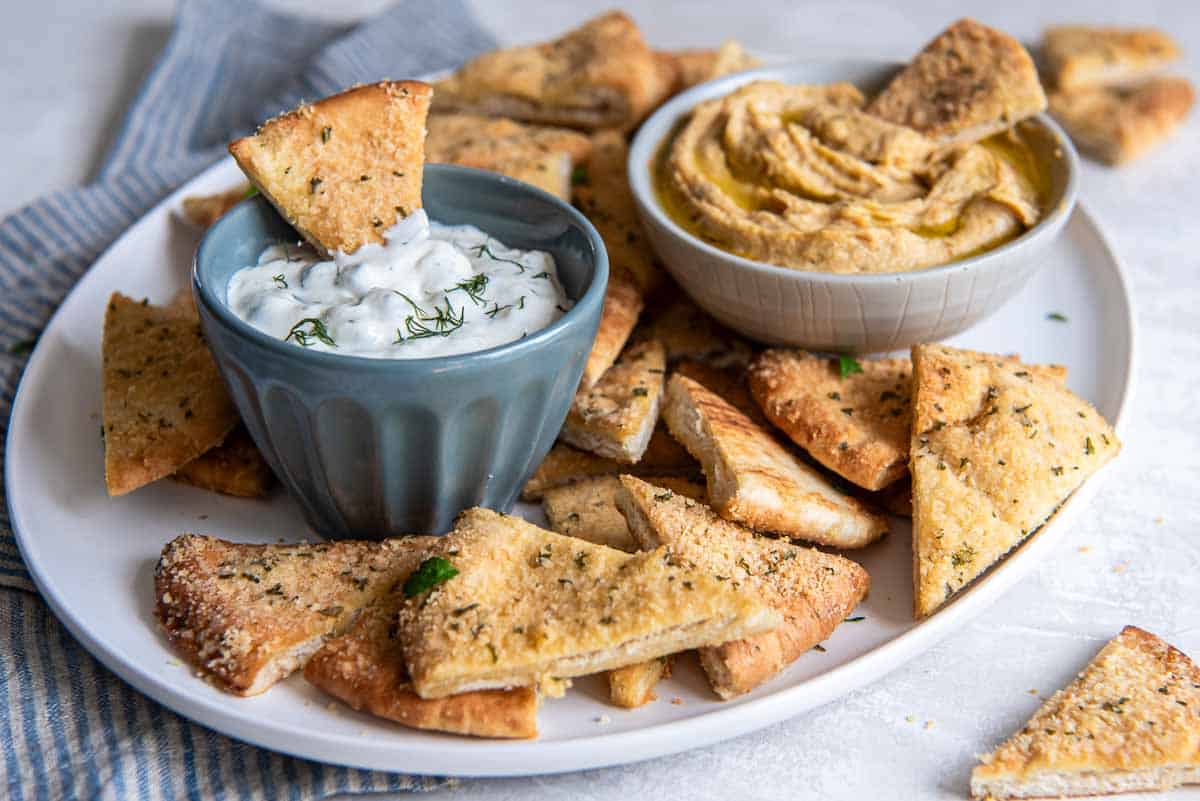
Transform your leftover pita bread into crispy, golden-brown Homemade Pita Chips with this simple recipe. Perfect for dipping or snacking and so much better than the store-bought variety.
Serve them on a platter with bowls of Tzatziki Sauce and hummus for an easy, healthy party snack.

This post may contain affiliate links. Please read our disclosure policy.
Isn’t it weird how we go through food phases? Is it just me? I have a tendency to out of the blue start craving random things for weeks in a row until I eventually get over it and move on.
I’m currently in the midst of an intense craving for all things Greek.
Give me a plate of Grilled Greek Chicken Kabobs with some of these Homemade Pita Chips and a side of hummus and I’m a happy girl.
While store bought pita chips are dry and crisp, these come out of the oven toasted with a slight chewy bite. Grated Parmesan and a little seasoning add enough flavor to make them delicious all on their own. They’re also perfect for dipping into soup or stew or serving with salads.

Ingredient Notes

- Pita bread: You can make baked pita chips with your favorite brand of white or whole wheat pita bread. Both pita pockets or flatbread style pitas will work. I use Papa Pita brand for this recipe and for my Chicken Pitas (which are unbelievably delcious and you should try them immediately!).
- Extra virgin olive oil: For brushing the pitas before seasoning.
- Parmesan cheese: The cheese should be grated to an almost granular consistency, like the stuff from the green canister. Can you use the stuff from the green canister? Sure, but I recommend going with freshly grated Parmesan for the best flavor. Shred it finely with a box grater. Then, use your fingers to work it into a ground consistency like you see in the ingredient image above.
- Seasoning: The Parmesan is combined with a little granulated garlic (or garlic powder), dried parsley, and sea salt.
How to Make Homemade Pita Chips

- Lightly brush both sides of pita rounds with olive oil.
- Sprinkle the top side of each piece with the Parmesan garlic spice mixture. Use a pizza cutter or sharp knife to cut each round into 8 wedges. Spread the pita triangles out in an single layer on an ungreased or parchment paper lined baking sheet.
- Bake in a preheated 375 degree F oven for 6 to 8 minutes, until golden brown. Remove from the oven and allow them to cool on the sheet pan for about 5 minutes.
Crispness Tip
You can bake them a little longer for super crispy chips but I like to pull them out of the oven when they are still have a slight chewy bite to them and serve them warm. The Pita Chips will crisp even further as they cool.

Variations
Classic Sea Salt: For simply seasoned pita chips, brush them with olive oil and sprinkle them with a touch of sea salt.
Mediterranean: Mix granulated garlic or garlic powder with dried herbs like oregano, thyme, and rosemary for a Mediterranean-inspired flavor.
Cinnamon Sugar: For a sweet treat, coat the pita chips with a mixture of cinnamon and sugar before baking.
Ranch Seasoning: Toss the pita chips with a little ranch seasoning powder for a tangy, herby taste that’s perfect for dipping.
Storage Tips
Transfer the cooled pita chips to a zippered plastic storage bag or other airtight container. Homemade Pita Chips will stay fresh for several days if stored at room temperature in a dry place, like a pantry.

Sign up for my free newsletter for all the latest recipes and join me on Facebook, Instagram and Pinterest for more cooking inspiration!
Homemade Pita Chips

Ingredients
- 4 slices pita bread, white or whole wheat (I use Papa Pita brand)
- ¼ cup Parmesan cheese, finely grated
- ½ teaspoon granulated garlic or garlic powder
- ½ teaspoon dried parsley
- ½ teaspoon finely ground sea salt
- 3 tablespoons olive oil, or as needed
Instructions
- Preheat oven to 375 degrees F.
- In a small bowl, combine the Parmesan, granulated garlic (or garlic powder), parsley, and salt. Set aside.
- Lightly brush both sides of pita rounds with olive oil. Sprinkle the top side of each piece with the Parmesan garlic seasoning mixture. Use a pizza cutter or sharp knife to cut each round into 8 wedges. Place the wedges on an ungreased, rimmed baking sheet and bake for 6 to 8 minutes, until golden brown.
- Remove from the oven and allow them to cool on the baking sheet for about 5 minutes. The Pita Chips will continue to crisp up after being removed from the oven. Serve while still slightly warm.
- When completely cooled, pita chips can be stored in an airtight container or zippered plastic storage bag.
Nutrition
Nutrition information is automatically calculated using generic ingredients, and is an estimate not a guarantee. For more accurate results, please refer to the labels on your ingredients at home.
Like this? Please rate & comment below!
This recipe was published on April 19, 2018. It has been updated with new text and images.