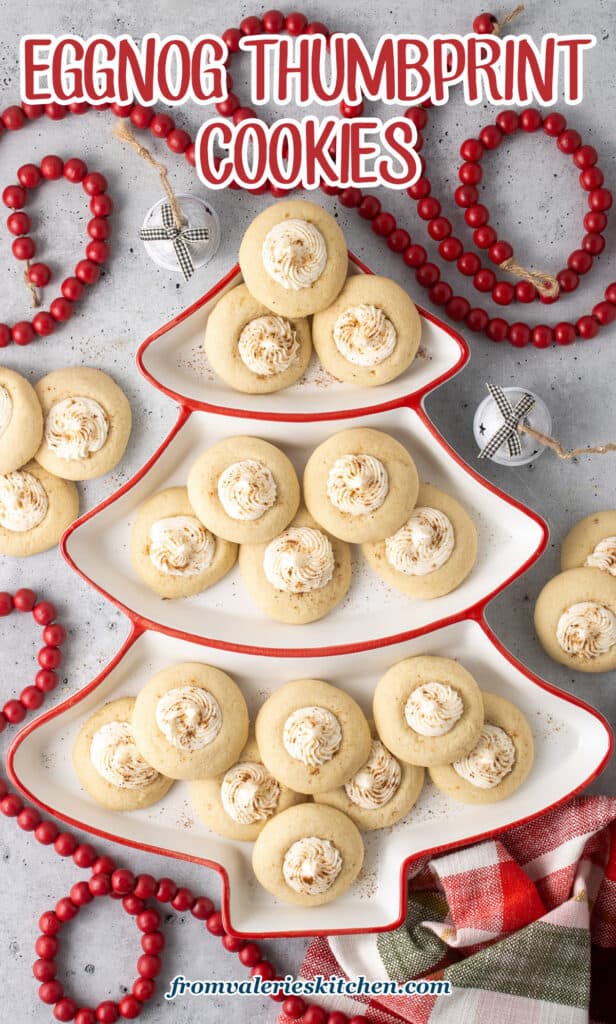
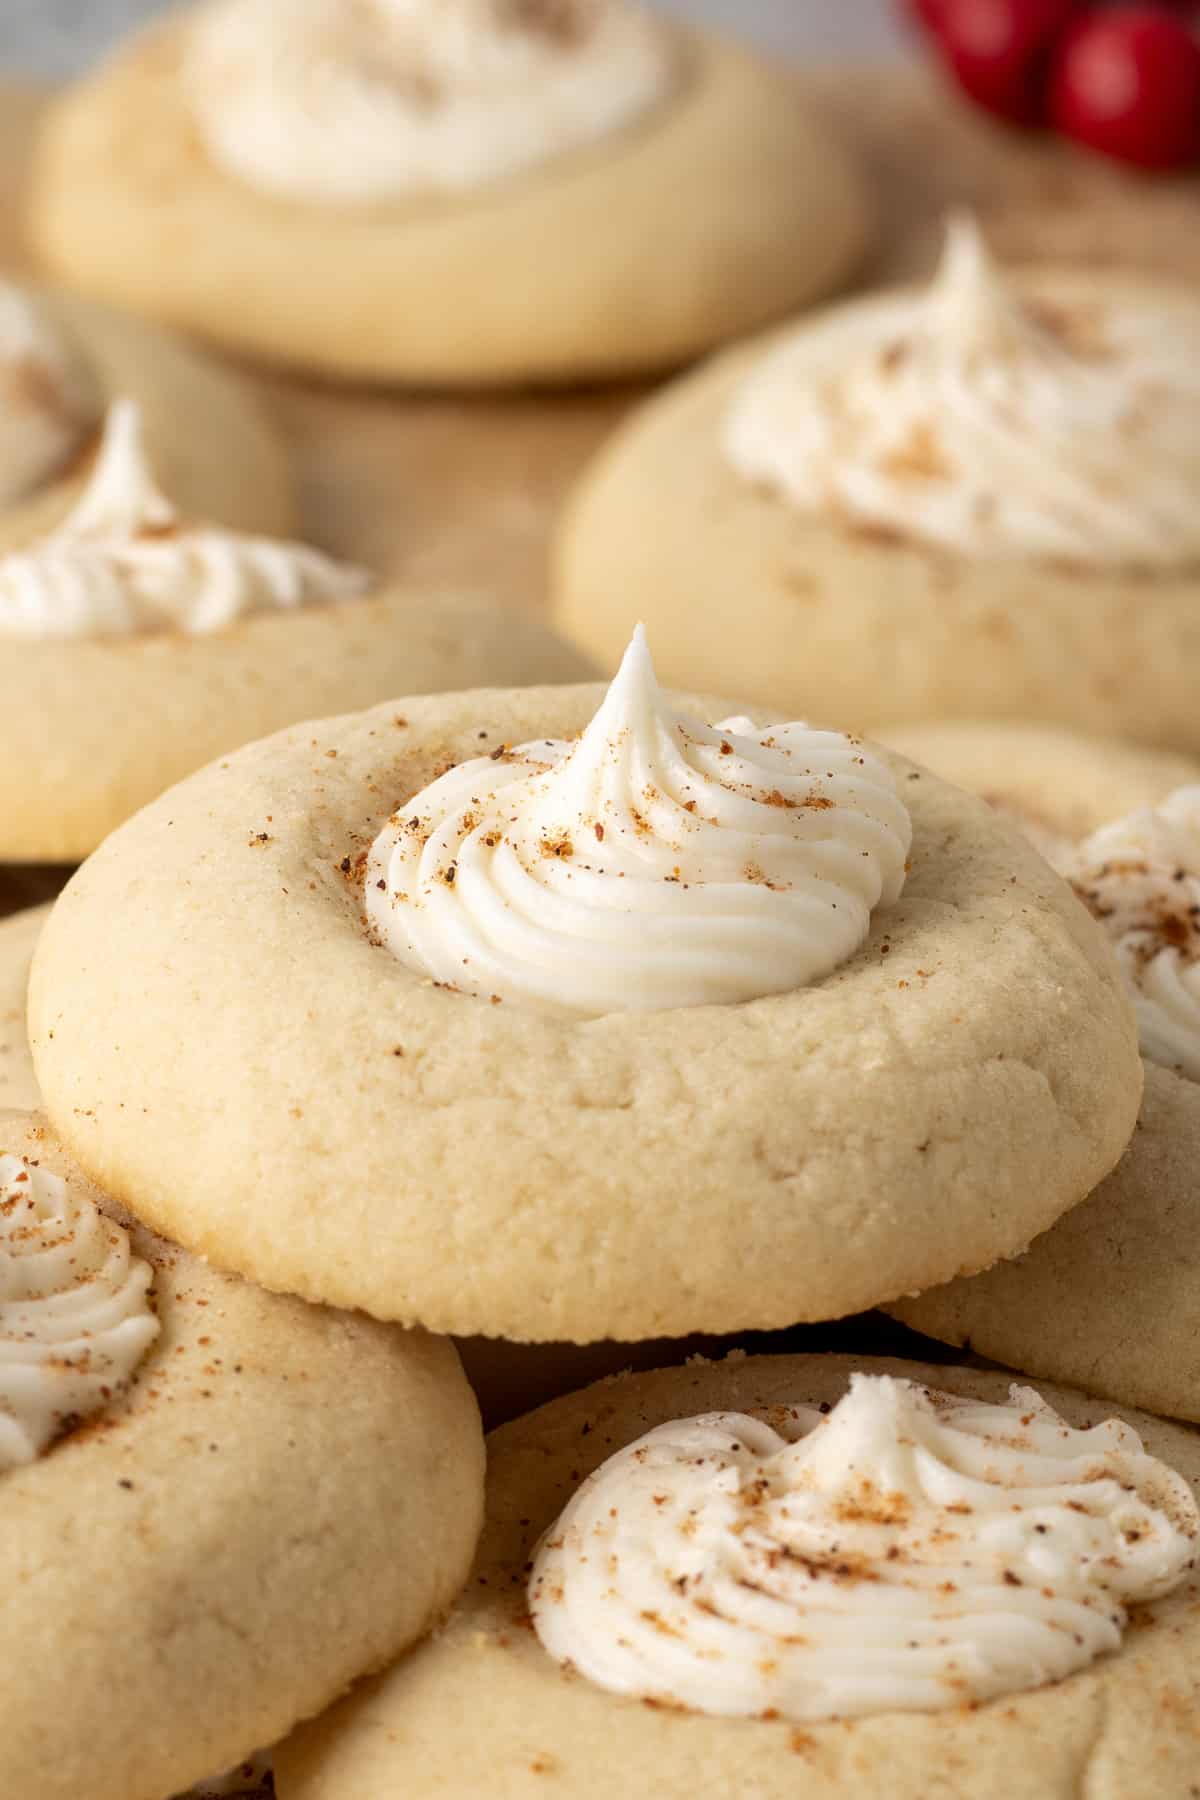
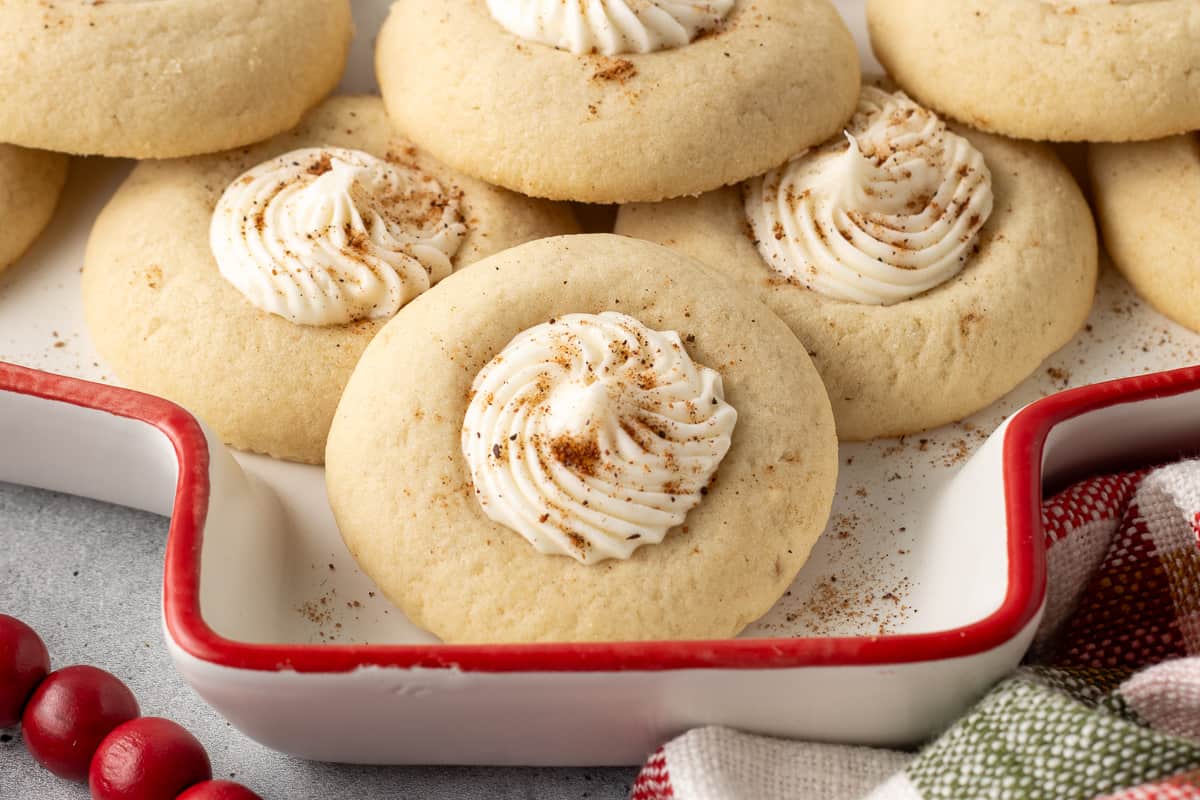
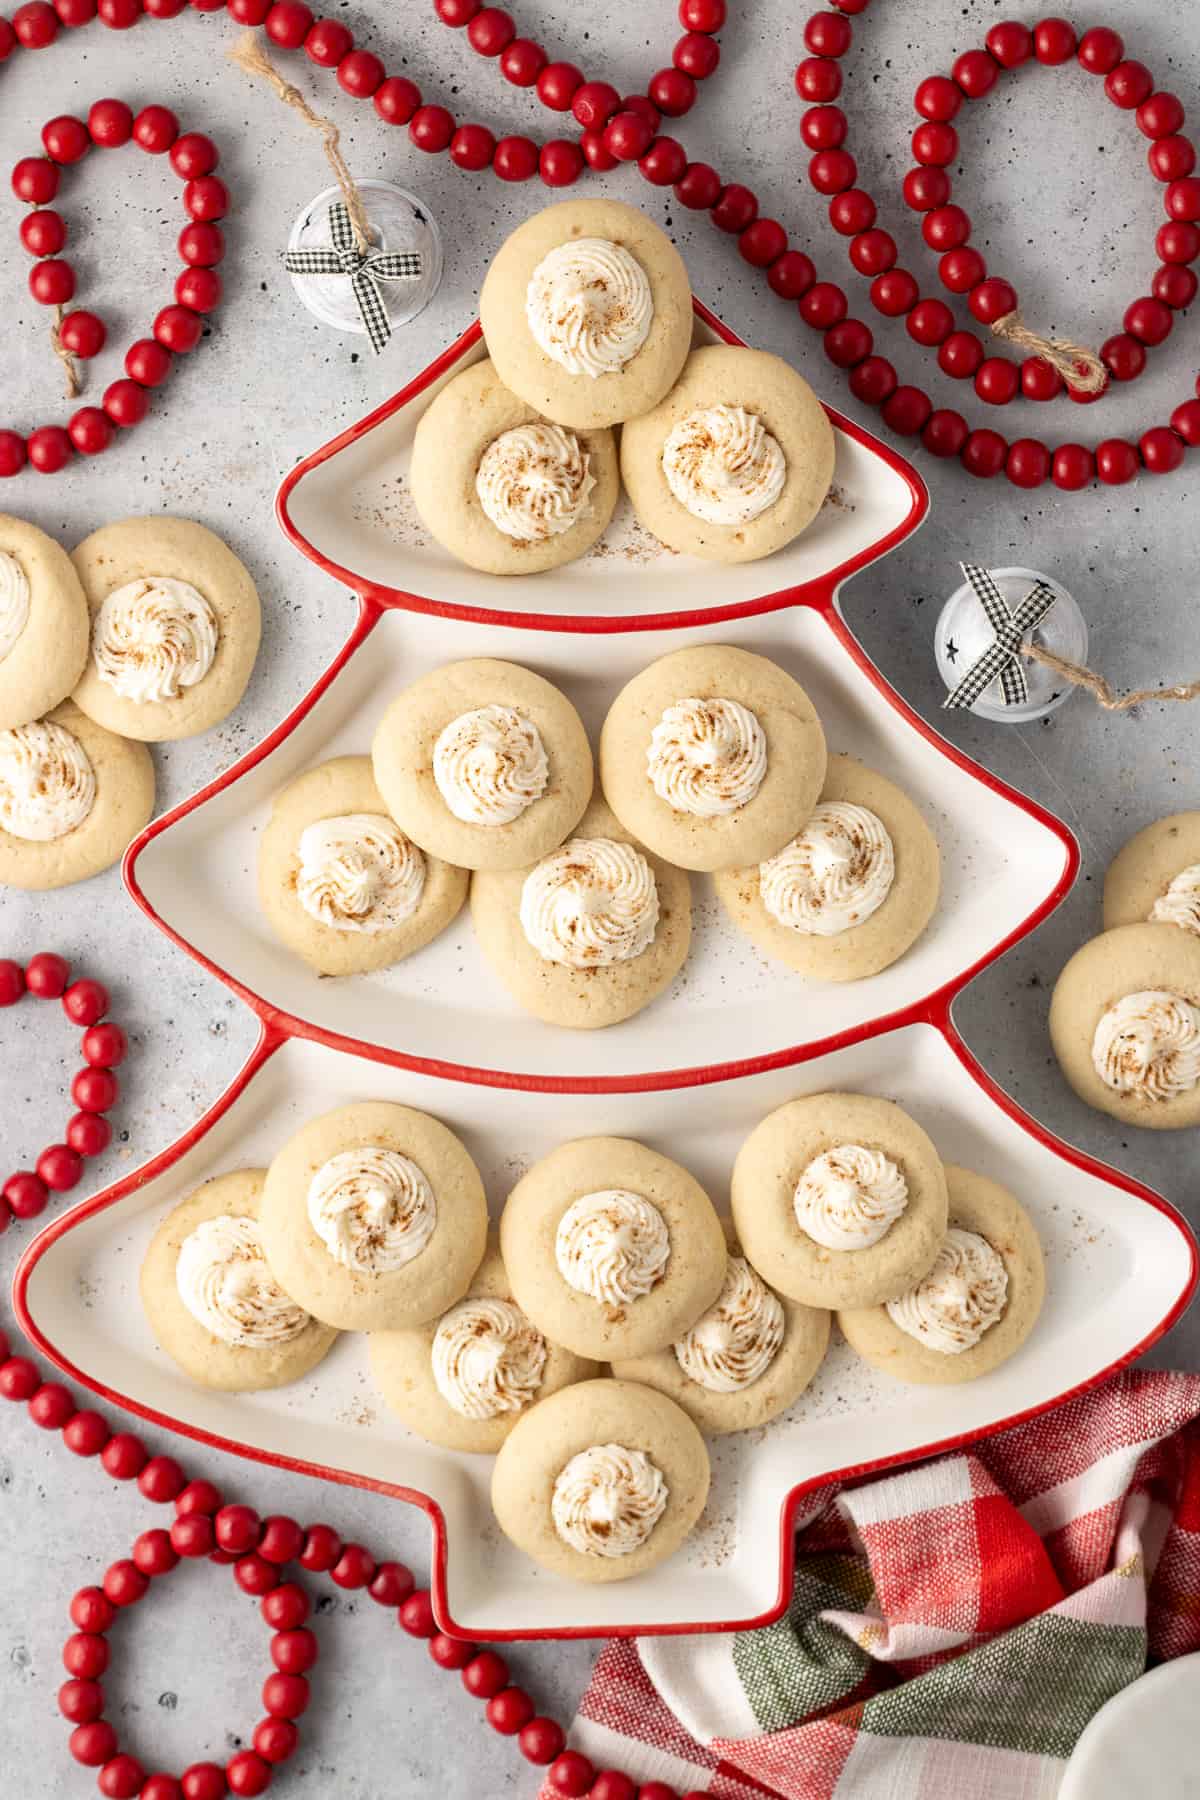
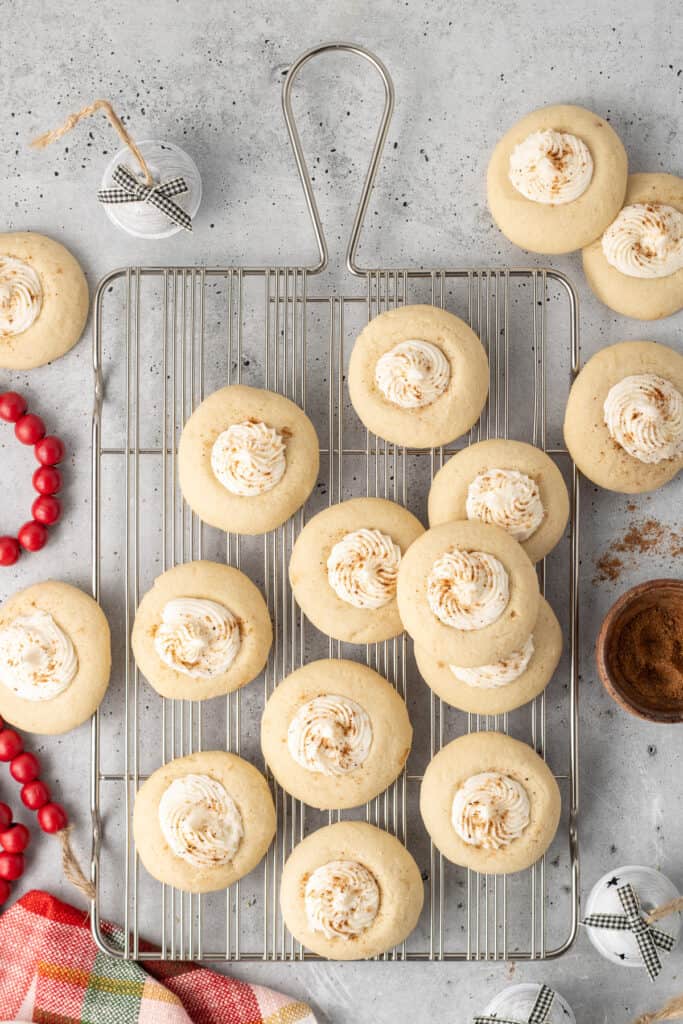
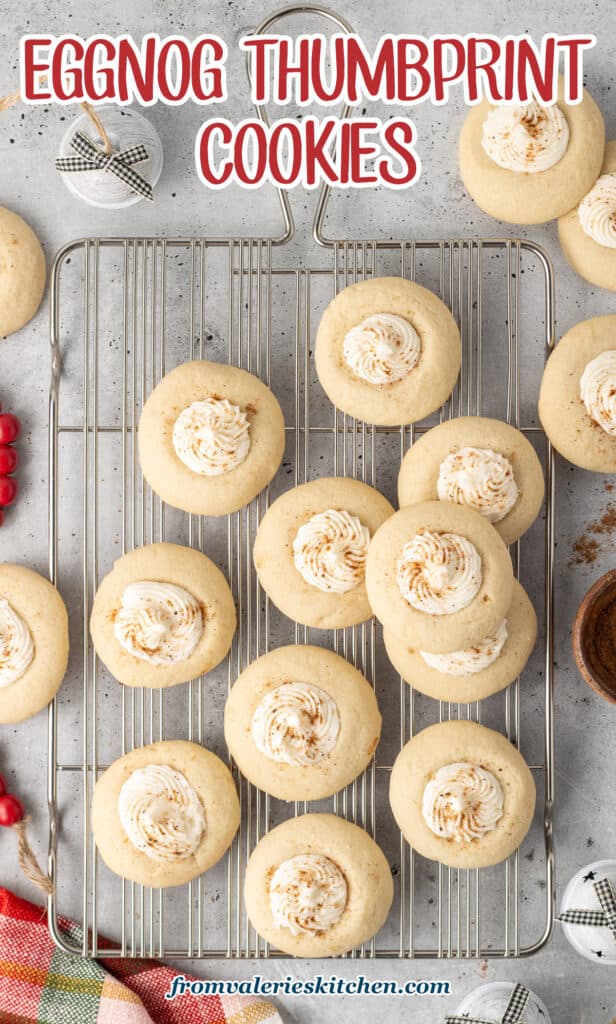
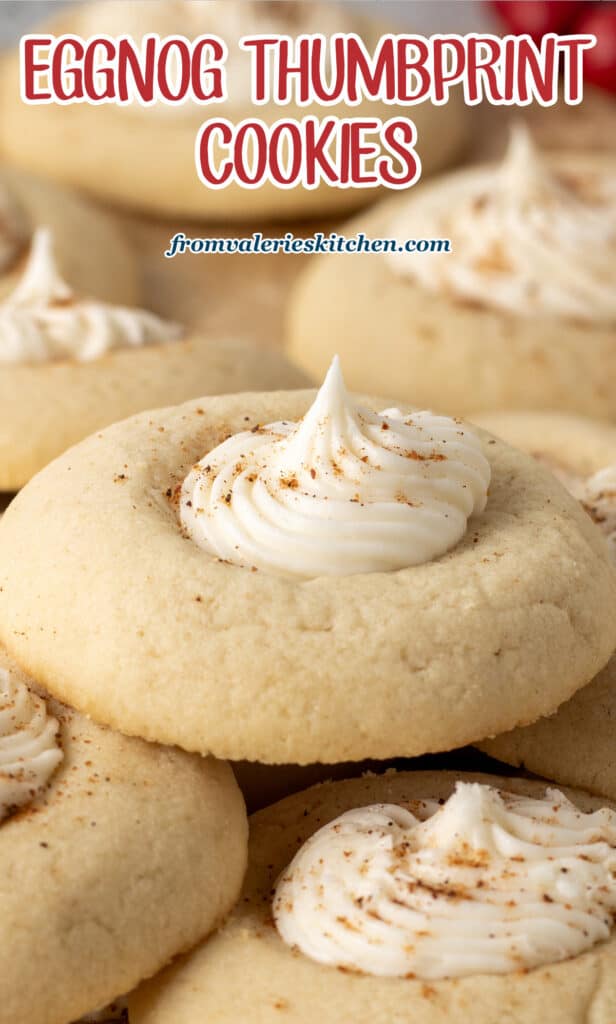
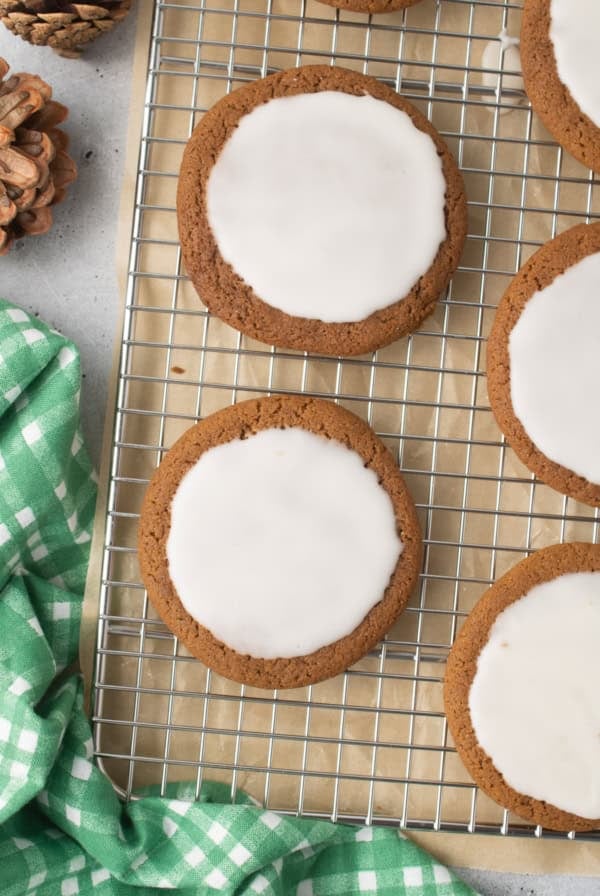
Buttery thumbprint cookies filled with a sweet, slightly boozy icing and dusted with nutmeg. These festive Eggnog Thumbprint Cookies should be on your holiday baking list!
Looking for more Christmas cookie recipes? Check out my Chewy Iced Molasses Cookies and pretty Italian Cookies.

This post may contain affiliate links. Please read our disclosure policy.
Eggnog Thumbprint Cookies are always one of the first cookies to disappear from my Christmas cookie trays. They are festive, sweet, and a bit boozy. Everything you want at the holidays!
This recipe includes the best thumbprint dough I’ve ever made. It doesn’t require chilling, tastes amazing, and holds its shape well when baked. It’s the same base recipe I use for my Jam Thumpbrint Cookies and Pecan Pie Thumbprint Cookies.
These holiday thumbprint cookies are so pretty on Christmas cookie trays and are a great choice for gifting.
Table of contents
Ingredient Notes
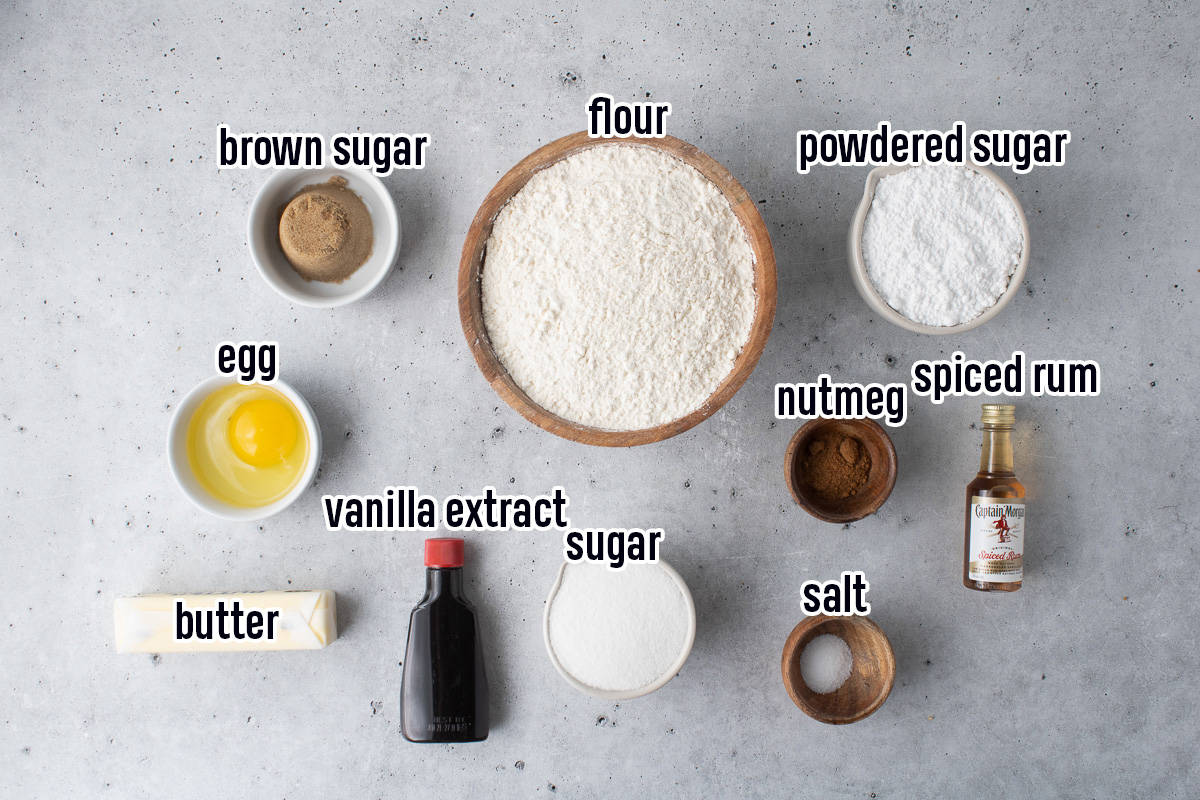
Wet ingredients: Softened butter, granulated sugar, packed brown sugar, an egg, and pure vanilla extract.
Dry ingredients: All-purpose flour and salt.
Eggnog filling: Softened butter, powdered sugar, and spiced rum, like Capatain Morgan (see notes below).
Garnish: Ground nutmeg.
The spiced rum is what lends a bit of boozy eggnog flavor to these cookies. I pick up mini airline-size bottles of Captain Morgan from the liquor store for this recipe, and my Christmas Bread Pudding, and Jamaican Banana Bread recipes. If you have another type of rum on hand, it will do the trick. And, if you’d prefer not to add the rum at all, feel free to substitute rum extract.
How to Make Eggnog Thumbprint Cookies
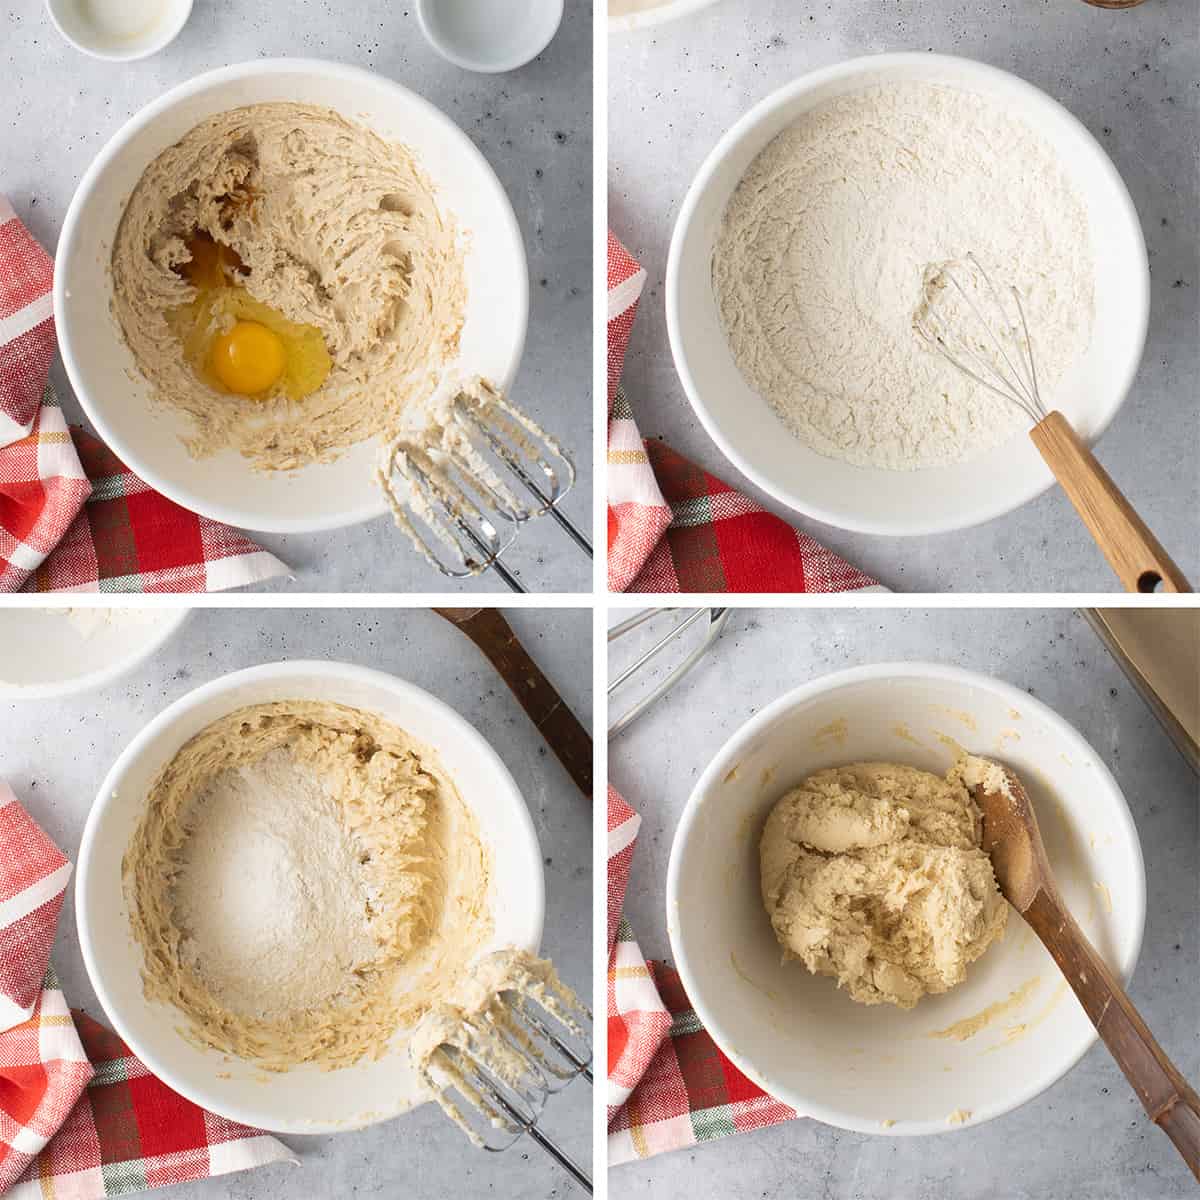
- Wet ingredients: In a large bowl, use an electric hand mixer to cream together the butter and sugars until smooth. Then, beat in the egg and vanilla.
- Dry ingredients: In a separate bowl, combine the flour and salt.
- Combine: Beat the dry mixture into the creamed mixture just until moistened.
- Finish: Mix with a wooden spoon to form a soft dough.

- Shape: Roll dough into 1-inch balls and place them 2-inches apart on parchment paper lined baking sheets.
- Create wells: Make an indentation in the center of each cookie using your thumb or index finger.
- Bake: Bake for 12 minutes in preheated oven. Remove from the oven and allow the cookies to cool on the baking sheet for about 3 minutes, then transfer a wire rack to cool completely before filling.
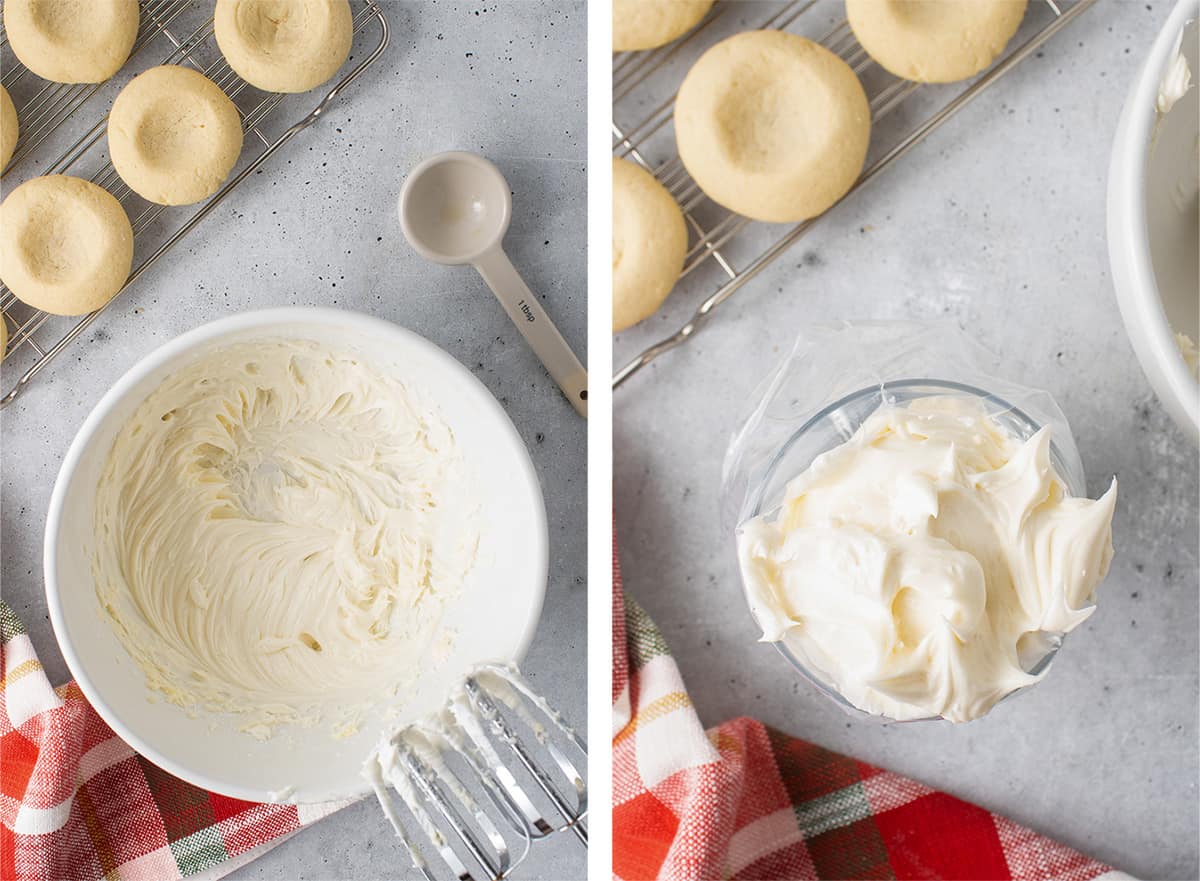
- Make icing: In a small bowl, use an electric hand mixer to combine the butter, powdered sugar, and rum.
- Pastry bag: Transfer the icing to a pastry bag with a decorative tip (see helpful tips below).
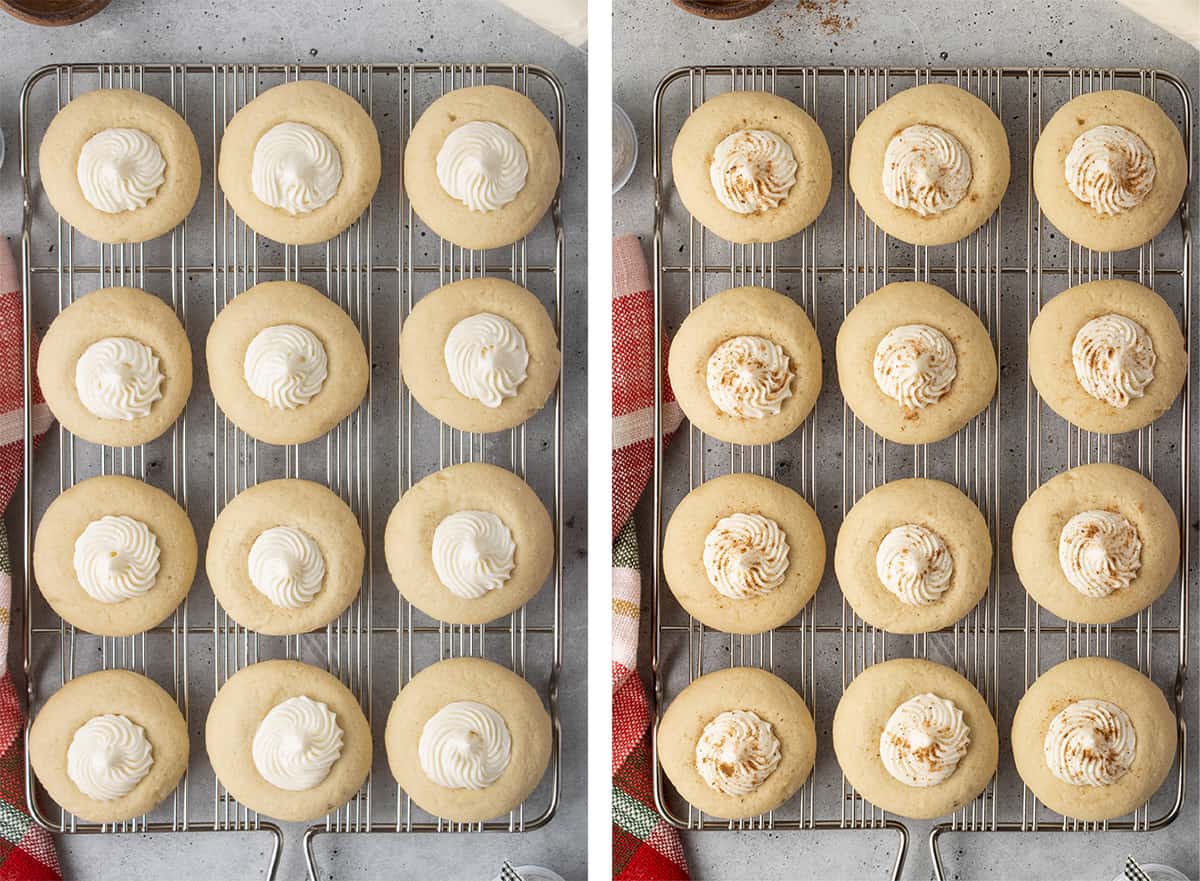
- Fill: Pipe icing on to the completely cooled cookies.
- Garnish: Dust the cookies with ground nutmeg and let them rest until the icing has set before storing.
Tips for the Best Eggnog Thumbprint Cookies
Even-sized cookies: Use a small cookie scoop to ensure your thumbprint cookies will be the same size and bake evenly. I do heaping (very full) scoops for the size you see in this post.
Chilling the dough: There is no need to chill this thumbprint dough before baking. However, you can cover and chill it if you’d like to make the dough a day in advance to save time.
Use a pastry bag: I like to spoon the icing into a disposable piping bag fitted with a decorative tip to fill the Eggnog Thumbprint Cookies with icing. This is about as fancy as I ever get with decorating baked goods but I have to say, it does add a nice touch. To make it easy to spoon the icing into your pastry bag, place the bag in a mason jar or drinking glass and fold the edges of the bag over the top.
Pastry bag hack: Don’t have any pastry bags on hand? You can put the icing in a regular plastic sandwich bag and snip the bottom corner to use as a homemade pastry bag or just spoon it right on to the cookies.
Garnish: The final touch is a dusting of nutmeg. Don’t skip this step! It adds that unique holiday flavor and completes the cookies in a delicious way.
Storage Tips
Room Temperature: Allow the filled thumbprint cookies to rest at room temperature for an hour or two for the icing to firm up a bit. To speed up this process, you can place them on a baking sheet and transfer them to the refrigerator for about 30 minutes. Then, store the cookies in an airtight container at room temperature for 3 to 4 days. If you’d like to layer the cookies, set a sheet of wax paper or parchment paper over the first layer and gently stack a second layer of cookies on top.
Refrigrator: Store as directed above and refrigerate for up to a week.
Freezer: For longer storage, the baked cookies can be frozen before they are filled. Flash freeze them on a baking sheet for about an hour, or until frozen solid. Then, transfer them to a freezer-safe plastic storage bag, press out as much air as possible, and freeze for up to 2 to 3 months. Thaw the cookies completely before filling with icing as directed in the recipe.
More Holiday Baking Ideas
- Chewy Iced Molasses Cookies
- Chocolate Peppermint Crinkles
- Butterscotch Gingerbread Cookies
- Easy Toffee Candy

Sign up for my free newsletter for all the latest recipes and join me on Facebook, Instagram and Pinterest for more cooking inspiration!
Eggnog Thumbprints
Video
Ingredients
For the Cookies
- ¾ cup butter, softened
- ½ cup granulated sugar
- ¼ cup packed light brown sugar
- 1 large egg
- 1 teaspoon pure vanilla extract
- 2 cups all-purpose flour
- ½ teaspoon salt
For the Icing
- ¼ cup butter, softened
- 1 cup powdered sugar
- 1 tablespoon Captain Morgan Spiced Rum, (see recipe note for substitution)
- ground nutmeg, as needed
Instructions
For the Cookies
- Preheat the oven to 350 degrees F. Line a baking sheet with parchment paper.
- In a large bowl, use an electric mixer to cream together ¾ cup butter, granulated sugar, and brown sugar until smooth. Beat in the egg and vanilla.
- In a separate bowl, combine the flour and salt. Beat the dry ingredients into the creamed mixture just until slightly combined. Finish by mixing with a wooden spoon to form a soft dough.
- Use a small cookie scoop to the scoop the dough then roll into 1- to 1 ½-inch balls. Place them 2-inches apart on the prepared baking sheet. Make an indentation in the center of each cookie using your thumb or index finger.
- Bake for 12 minutes in the preheated oven. Remove from the oven and allow the cookies to cool on the baking sheet for about 3 minutes, then transfer to a wire rack to cool completely.
For the Icing
- In a small bowl, use an electric mixer to combine ¼ cup butter, powdered sugar, and rum.
- Transfer the icing to a pastry bag with a decorative tip and pipe it on to completely cooled cookies. Sprinkle with nutmeg.
Notes
Nutrition
Nutrition information is automatically calculated using generic ingredients, and is an estimate not a guarantee. For more accurate results, please refer to the labels on your ingredients at home.
Like this? Please rate & comment below!
This post was originally published on December 9, 2011. It has been updated with new text and images.
Adapted from Allrecipes


I make your eggnog thumbprints for my Holiday cookie/candy trays every year. WINNER!!!!
So happy to hear this! Thanks, Julie. 🙂
if you have people who don’t like the rum in them can you use eggnog instead for the icing and cookies themselves instead?
The amount of eggnog you would have to add to achieve any flavor would throw off the consistency. An extract is a better way to add a similar flavor.
I love how these cookies look and seems to be easy to make. The problem is that I don’t like rum. Do you think I could use maple extract or another extract in the place of the rum? Thanks for the recipe.
Hi Barbara. Take a look at the Notes section of the recipe card for my suggestions on this.