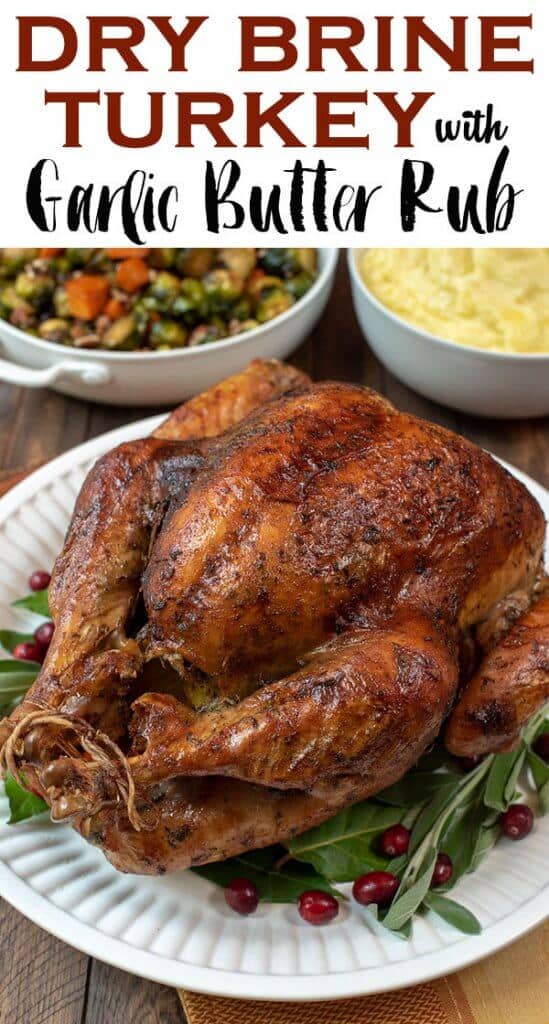
This Dry Brine Turkey recipe creates an incredibly tender, juicy turkey with beautifully browned, crispy skin. Dry brining is an easy method that transforms your turkey into a gorgeous, flavorful centerpiece for your holiday table.
This post may contain affiliate links. Please read our disclosure policy.
I’ve been roasting turkeys pretty much the same way for most of my life, but I was completely blown away by this dry brine method. The flavor, the tenderness, and that perfectly crisp skin make it a total game changer. This recipe has become an annual tradition in my kitchen.
I love make-ahead recipes for my holiday menus, and one of the best things about this one is that you can get all the messy turkey prep out of the way days before Thanksgiving.
Table of contents
What is Dry Brining?
Dry brining is the process of applying a dry rub consisting of coarse salt and seasonings to a cut of meat, in this case a whole turkey, and then allowing it to rest in the refrigerator for two or three days.
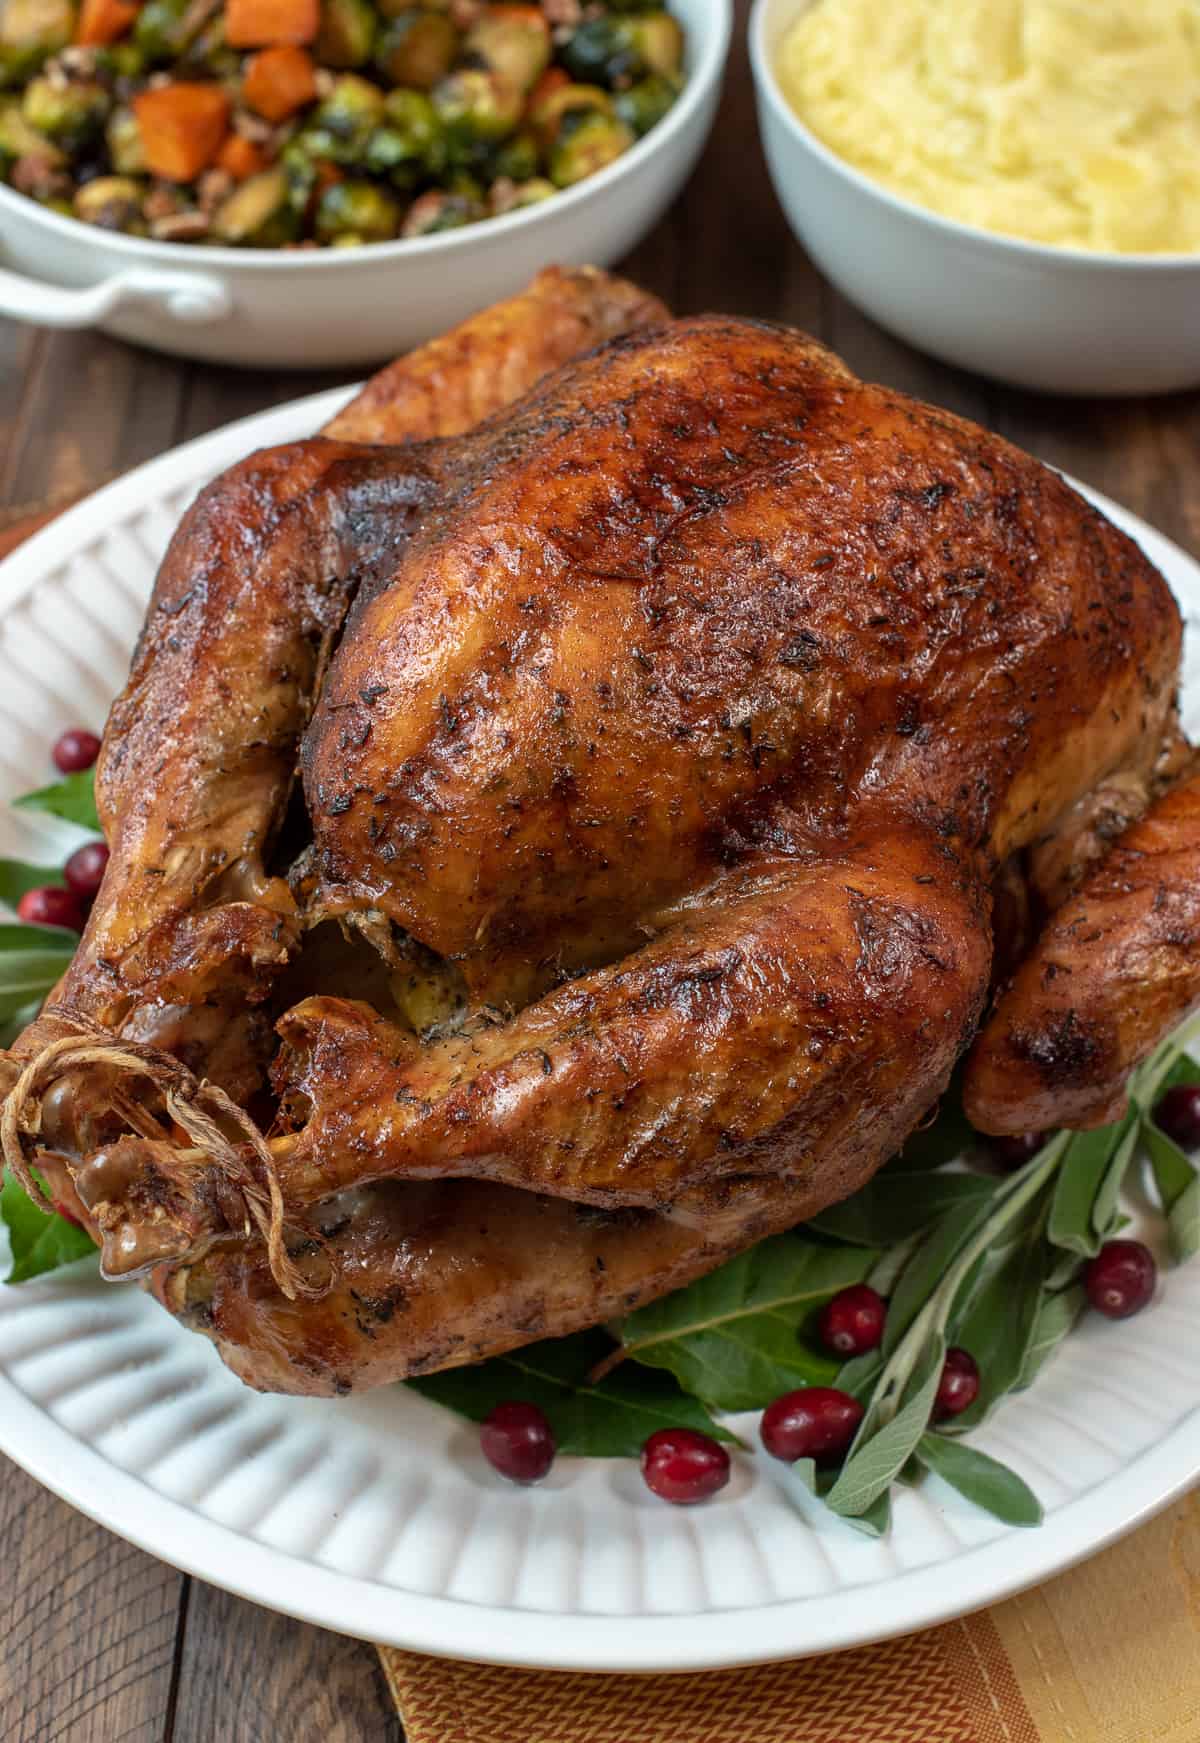
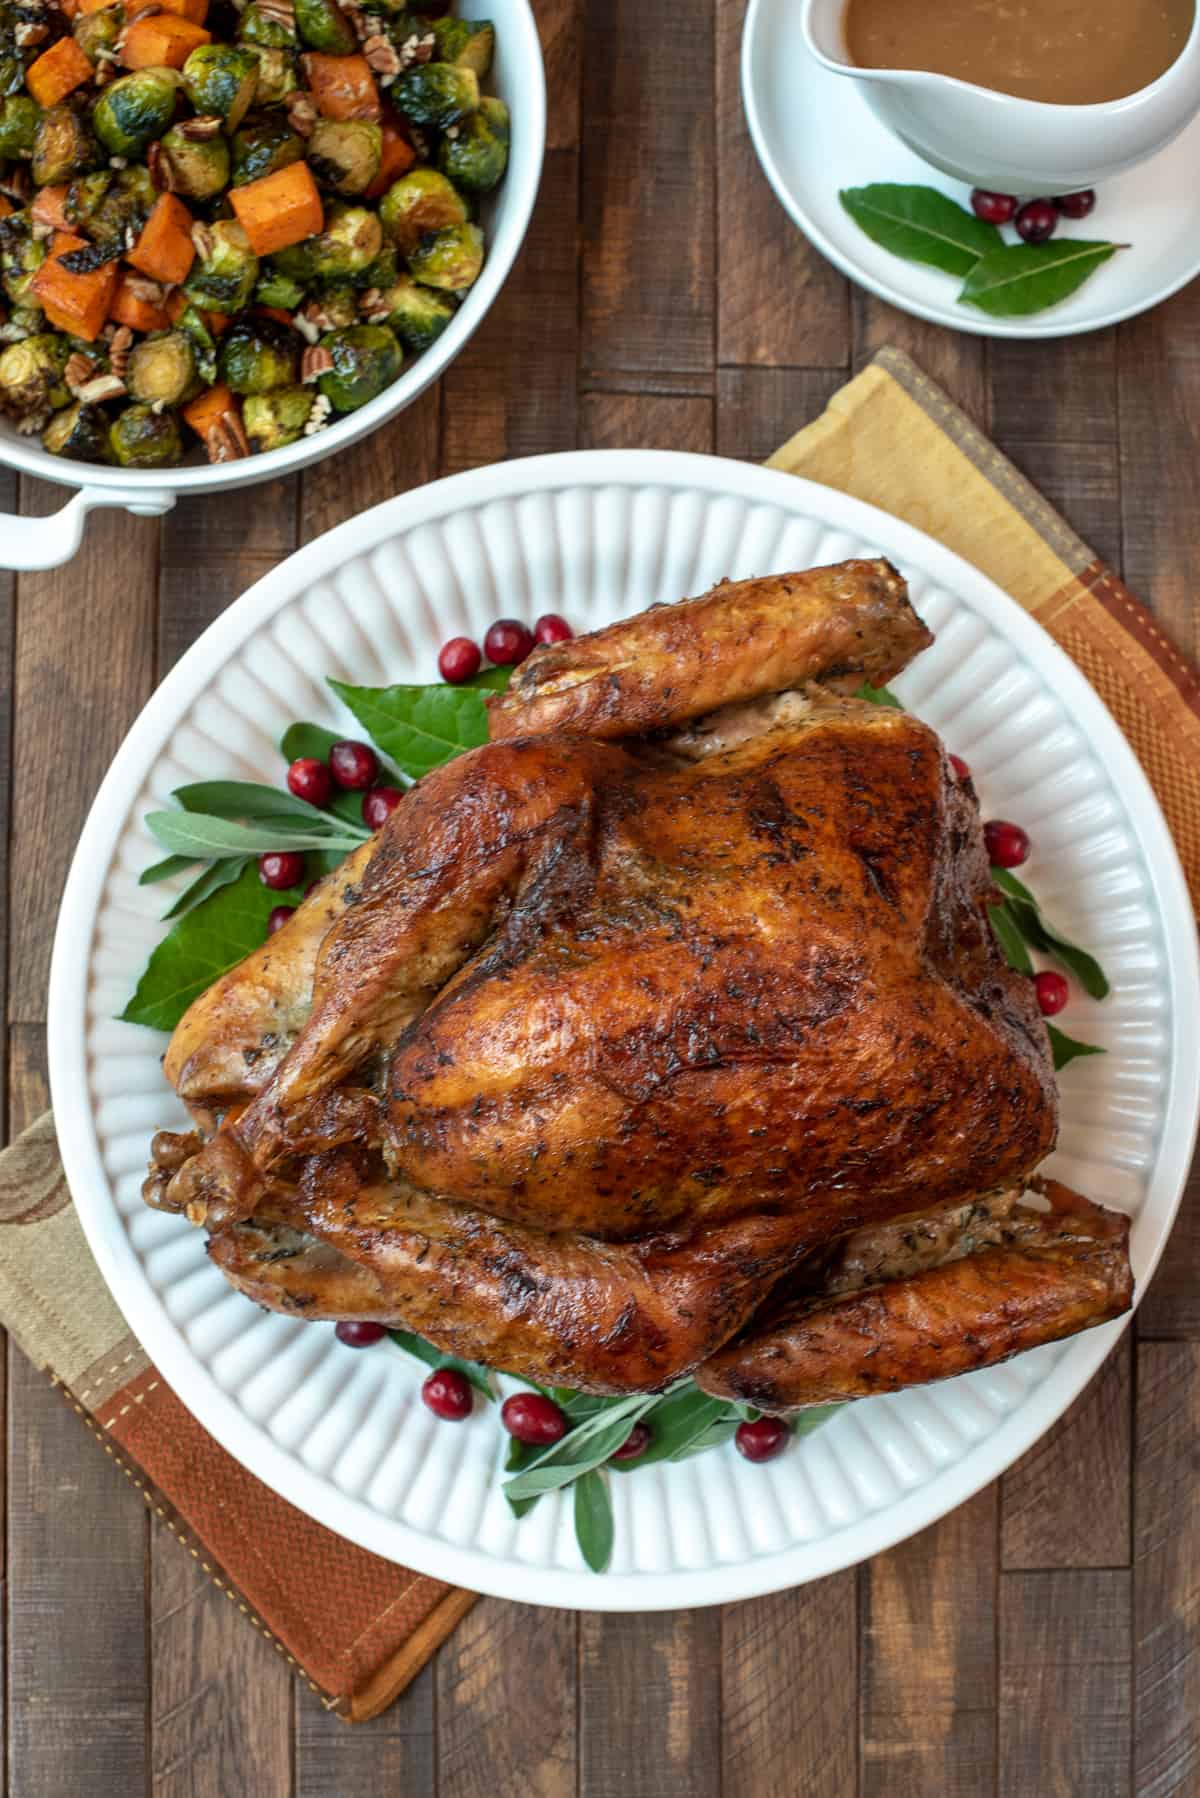
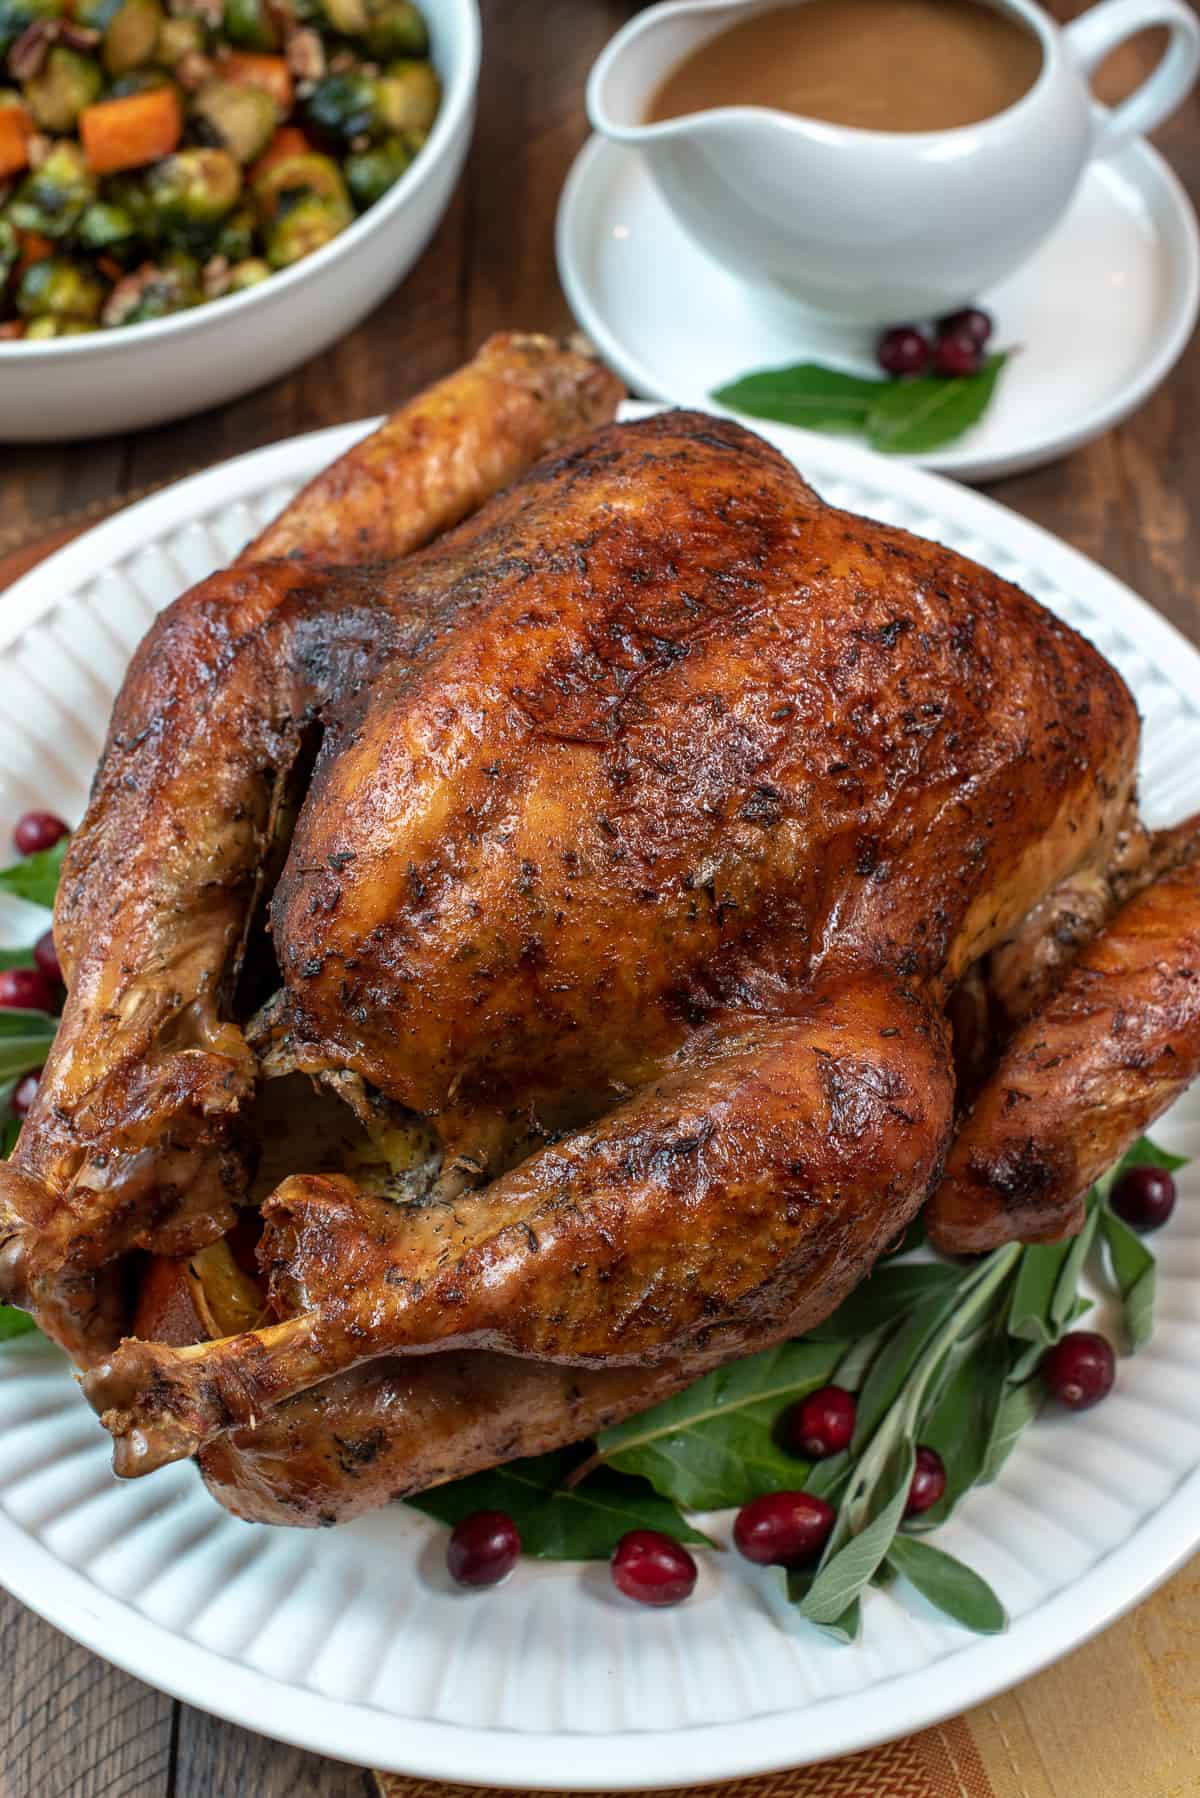
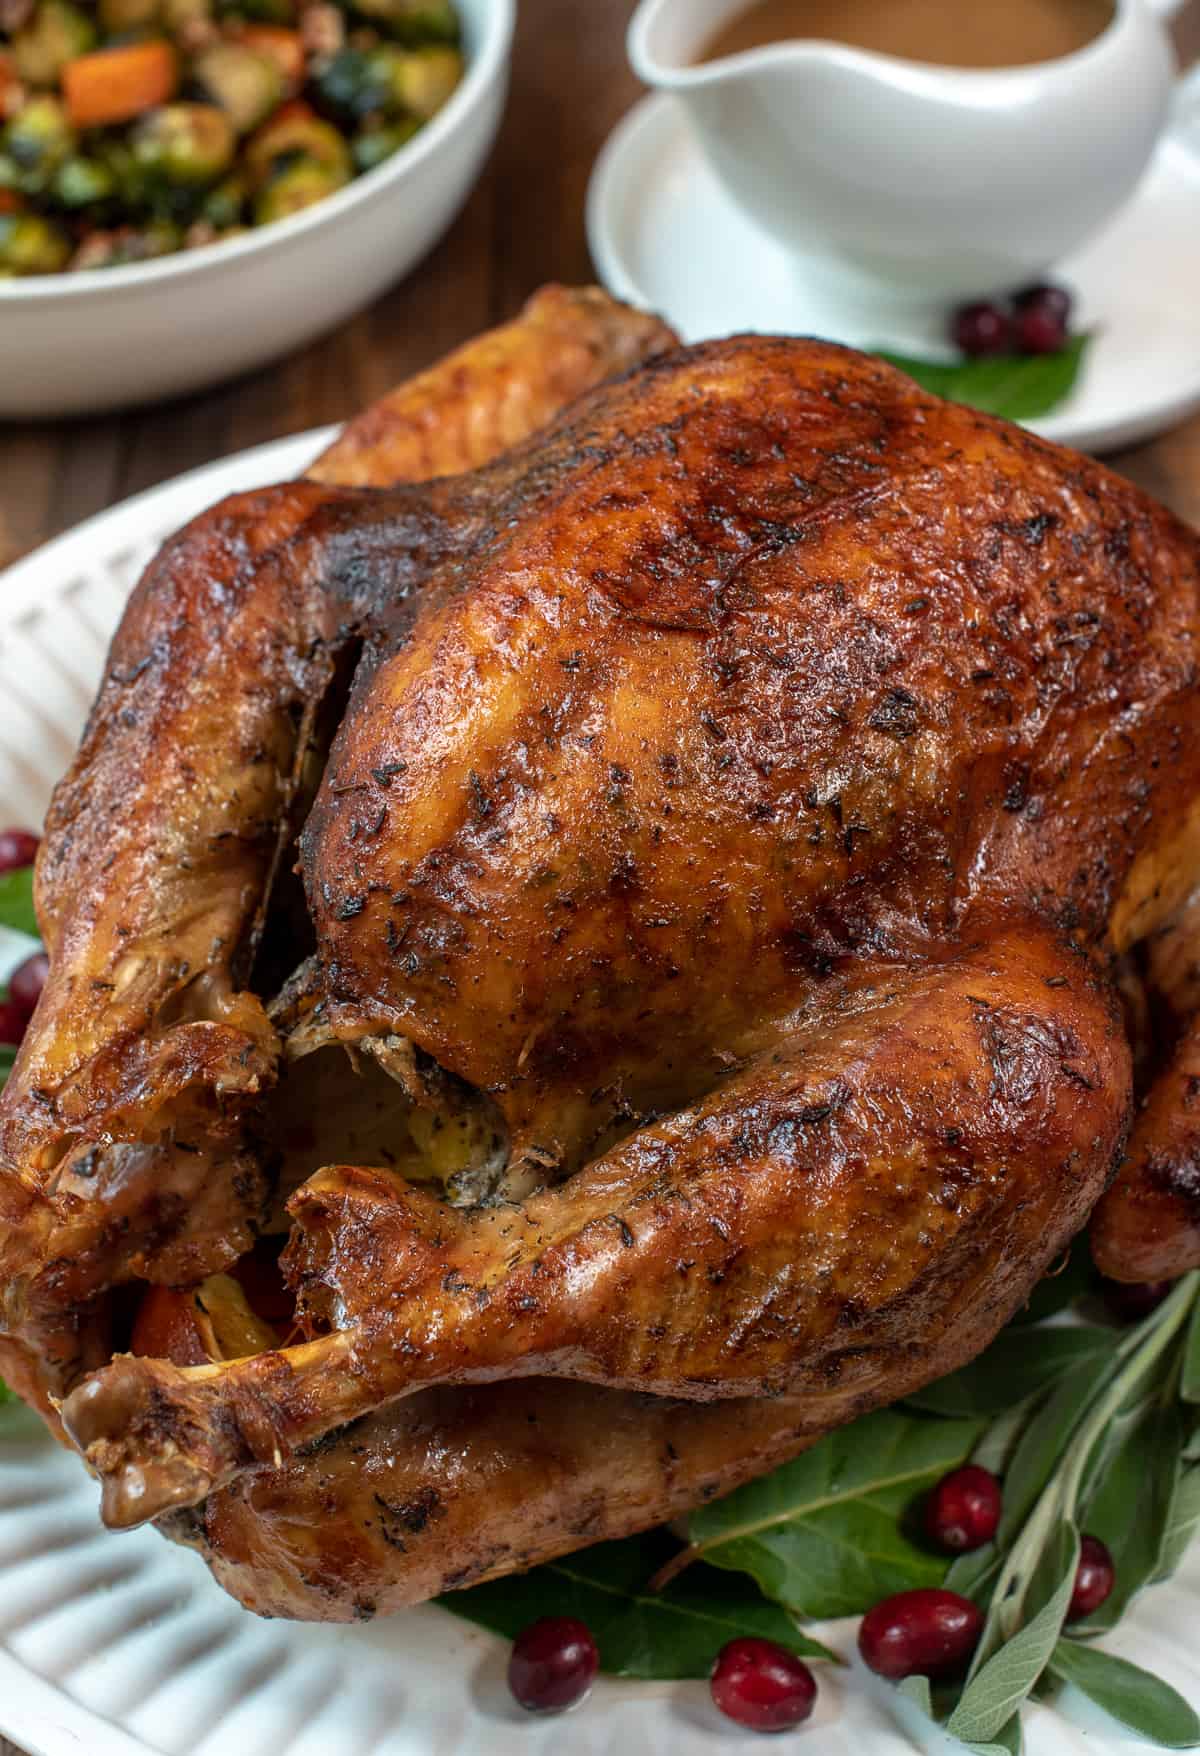
The salt works to draw out the turkey’s juices and then the salt dissolves in the juices. It’s all reabsorbed back into the turkey to help break down the tough muscle proteins. A little scientific but a lot AMAZING. The result is a bird that is succulent, juicy, tender, and flavorful. Resting uncovered for at the last part of the chilling time dries out the skin a bit, resulting in that beautifully browned, crispy skin you see in the images in this post.
The dry brine method is SO much cleaner and easier than a wet brine and I believe the result is at least as good if not better. Plus, it eliminates the need to hunt down a container large enough to accommodate gallons of water and a big turkey. Not to mention the refrigerator space.
Prep-Ahead
You can start the dry brine process up to 3 days in advance of Thanksgiving and when the big day arrives, your turkey will require only a minimal amount of remaining prep before you pop it in the oven to roast.
Ingredient Notes
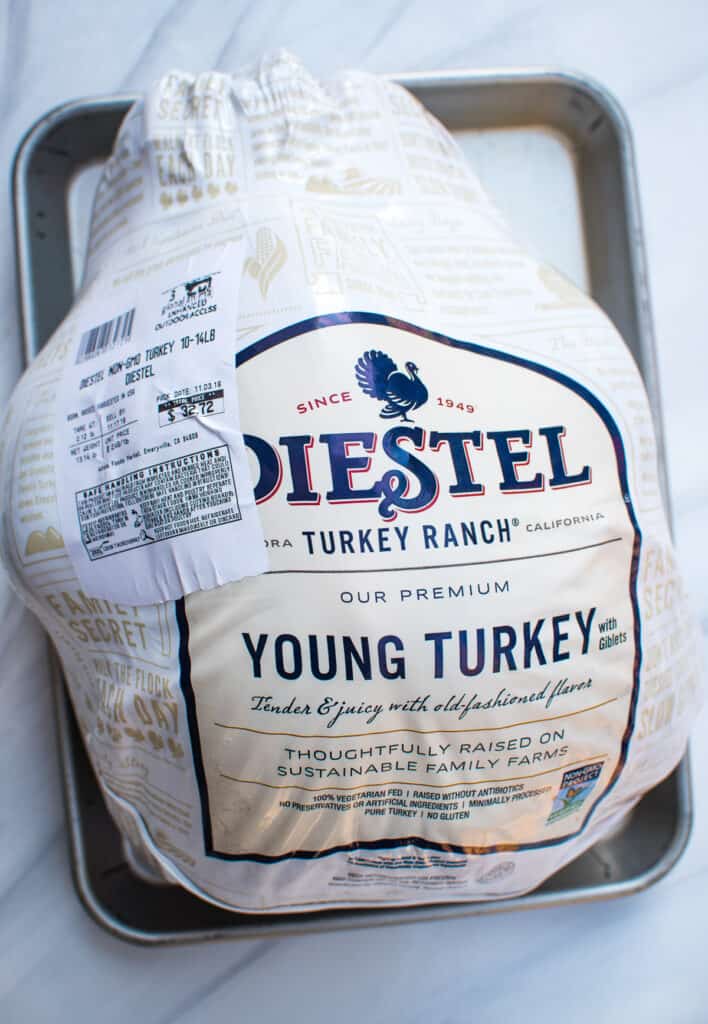
- Turkey: Choose a 12- to 16-pound natural, minimally processed turkey. Either fresh or frozen works fine, but it’s important that the bird has not been injected with a salt solution. Avoid brands like Butterball or any Kosher turkeys that have already been pre-salted, since they can become too salty once brined. Check the label and avoid any that list salt as an ingredient. I picked up my 13-pound turkey from Whole Foods. They had the best selection of minimally processed turkeys in my area.
- Low-sodium chicken or turkey broth: Used to add moisture to the roasting pan and infuse the drippings with flavor. Stick with low-sodium so you can control the salt content.
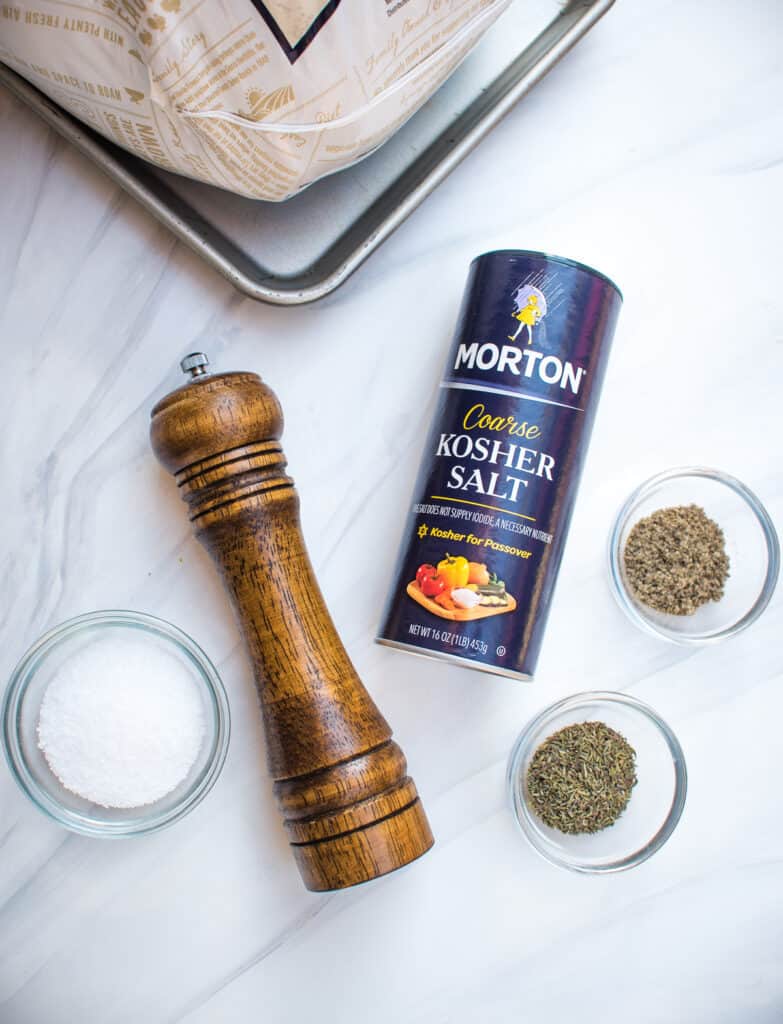
- Coarse kosher salt and freshly ground black pepper: The most crucial component of any dry brine. Its larger crystals draw moisture from the turkey, which then gets reabsorbed to season the meat throughout.
- Dried thyme and dried rubbed sage: These herbs infuse the turkey with subtle savory flavor as it rests under the brine.
- Softened butter and olive oil: Combined with garlic, it adds richness and helps the skin brown and crisp beautifully as the turkey roasts.
- Granulated garlic or garlic powder: Blended into the butter mixture for an extra layer of buttery garlic flavor.
- Aromatics: Add any variety of you’d like to the cavity of the turkey before roasting. I went with onion, carrot, and a quartered orange. Lemon, fresh herbs, and celery are also wonderful options. The aromatics add wonderful flavor to the drippings, especially important if you plan to make gravy.
How to Safely Thaw Turkey Before Brining
It takes approximately 1 day (24 hours) per 4 pounds to thaw in the refrigerator, so, for instance, if you have a 16 pound turkey, it will take 4 full days to thaw completely. Place it on a rimmed baking sheet before placing it in your fridge in case any juices escape the packaging while thawing. You can get more safe thawing tips on the USDA website.
Approximate Turkey Thawing Times
- 4 to 12 pounds — 1 to 3 days
- 12 to 16 pounds — 3 to 4 days
- 16 to 20 pounds — 4 to 5 days
- 20 to 24 pounds — 5 to 6 days


How to Dry Brine a Turkey
- Prep the turkey.
Two to three days before roasting, remove the completely thawed turkey from its packaging and take out the giblets. Don’t rinse it with water — it’s not recommended for food safety reasons. Pat the cavity and exterior dry with paper towels. I like to work on a foil-lined board for easy cleanup. - Mix and apply the brine.
In a small bowl, combine the dry brine ingredients. Sprinkle a little inside the cavity, then gently lift the skin covering the breast and rub some directly onto the meat underneath. Coat the outside of the turkey with the rest of the mixture. - Refrigerate, covered.
Place the turkey on a rack in a roasting pan or large rimmed baking sheet and cover it tightly with plastic wrap. Refrigerate for one to two days (two is best for larger birds). - Air-dry before roasting.
Remove the plastic wrap and refrigerate the turkey uncovered for at least 8 hours, or up to 24. This helps the skin dry out so it roasts up gorgeously golden and crisp.
Set a Reminder
If you are like me, you’ll need to set a reminder on your phone to remove the plastic wrap. I am seriously overloaded the day before Thanksgiving so my brain is not exactly running on all cylinders!
How to Roast a Dry Brined Turkey
- Let the turkey come to room temperature.
When the big day arrives, remove the turkey from the refrigerator and let it rest on your counter for 45 minutes to 1 hour before roasting. This takes the chill off so it cooks evenly. - Don’t rinse!
Seriously, don’t do it! Rinsing will undo all the drying magic that creates that beautifully crisp skin. The salt has already been absorbed and done its job. Your turkey won’t taste salty, it’ll just be seasoned perfectly throughout. - Add aromatics.
Before roasting, fill the cavity with the aromatics (onion, carrot, and orange) to add flavor to the meat and drippings. - Apply the garlic butter rub.
In a small bowl, mix softened butter, olive oil, and granulated garlic. Gently lift the skin covering the breast meat and spread some of the mixture underneath, then slather the rest all over the outside of the turkey. This step helps the skin brown beautifully and adds rich, buttery flavor. - Add broth and roast.
Pour about 2 cups of low-sodium chicken or turkey broth into the bottom of your roasting pan. Brined turkeys release less liquid as they cook — that’s a good thing, because it means the juices stay in the meat. Roast the turkey at 325°F for about 12 to 15 minutes per pound, or until the internal temperature reaches 165°F when measured in the thickest part of the thigh. Keep an eye on it toward the end — brined turkeys can cook a little faster than expected. - Baste often.
Baste the turkey several times as it roasts to encourage even browning and crisp, golden skin. Add more broth as needed — I usually go through an entire 32-ounce carton of chicken broth. - Rest before carving.
Once it’s done, tent the roasting pan loosely with foil and let the turkey rest for 30 minutes before carving. This gives the juices time to redistribute so every slice is moist and flavorful.
Serving and Storing
Once your turkey has rested, carve it and serve it alongside classic Thanksgiving favorites. You’ll find detailed carving instructions with step-by-step photos in my Herb Roasted Turkey post.
This Dry Brine Turkey pairs perfectly with my
- Easy Turkey Gravy
- Make-Ahead Mashed Potatoes
- and the most delicious Crock Pot Stuffing ever!
For more menu inspiration, browse my full collection of Thanksgiving recipes to round out your feast.
Leftover turkey can be refrigerated for up to 4 days or frozen for up to 3 months. Store carved meat in an airtight container with a little broth drizzled over the top to help keep it moist when reheated.

More Thanksgiving Turkey Recipes
If you don’t have time to brine this year take a gander at my detailed instructions for my Herb Roasted Turkey. It has a more traditional method of preparation that works wonderfully with the beloved Butterball Turkey.
Serving a small group? My Roasted Turkey Breast with Gravy is the perfect choice!
For more general turkey info, check out my post on How To Choose, Prep, and Roast your Turkey.
I wish you all a festive Thanksgiving and a fabulous feast. I’d love to hear what you’re making so feel free to comment or drop me a line. Happy cooking and Happy Thanksgiving!
Sign up for my free newsletter for all the latest recipes and join me on Facebook, Instagram and Pinterest for more cooking inspiration!
Dry Brine Turkey

Equipment
Ingredients
- 12 to 16 pound natural turkey, safely thawed
- 32 ounces low-sodium chicken or turkey broth
- kitchen twine, for tying legs together
Dry Brine (per 5 pounds of turkey weight)
- 1 tablespoon coarse ground kosher salt, (per 5 pounds of turkey)
- 1 teaspoon dried thyme, (per 5 pounds of turkey)
- 1 teaspoon dried rubbed sage, (per 5 pounds of turkey)
- ½ teaspoon freshly ground black pepper , (per 5 pounds of turkey)
Garlic Butter Rub
- ½ cup butter, softened
- 2 tablespoons olive oil
- 1 tablespoon granulated garlic or garlic powder
Aromatics
- 1 carrot, scrubbed clean and cut into chunks
- 1 small onion, peeled and cut into chunks
- 1 small unpeeled orange, sliced into wedges
Instructions
Brine the Turkey
- Remove the packaging (in or next to sink) and remove the giblets. Transfer the turkey to a large sheet of heavy duty foil for easy cleanup. Pat the cavity and exterior of the turkey dry with paper towels.
- Combine the Dry Brine ingredients in a small bowl. Sprinkle a few teaspoons of the dry brine inside the cavity and use your hand to spread it around. Gently lift skin on breast portion and carefully reach inside and coat as much of the breast meat as possible with a couple of teaspoons of the brine. Sprinkle the remaining brine all over the outside of the turkey.
- Transfer the seasoned turkey to a rack in your roasting pan (or a rimmed baking sheet). Cover it securely with plastic wrap – I used 5 or 6 sheets to cover my big roasting pan. Transfer the turkey to the refrigerator and forget about it for 24 to 48 hours.
- Remove the plastic wrap and let the bird sit uncovered in the refrigerator for an additional 8 to 24 hours.
- Remove the turkey from the refrigerator about an hour before you are ready to roast it. Stand the turkey up to pour out and discard any liquid that might have collected in the cavity and pour off or blot up any juices that have collected in the pan. Place the turkey back on the roasting rack. If you chilled your turkey on a baking sheet, transfer it to a rack in a roasting pan now.
Roast the Turkey
- Preheat oven to 325 °F. Combine the butter, olive oil, and granulated garlic in a small mixing bowl. Set aside.
- Stuff the turkey cavity with the carrot, onion, and orange.
- Scoop up some of the garlic butter mixture with your hand and spread it under the skin of both turkey breasts. Spread the remaining butter mixture over the outside of the turkey, being sure to get into all the nooks and crevices of the wings and legs. Tuck wings securely under the body and use kitchen twine to tie the legs together. Pour about 2 cups of broth into the bottom of the roasting pan.
- Transfer the roasting pan to the preheated oven. Allow the turkey to roast for about 45 minutes and then baste it once every 20 to 30 minutes or so throughout the remainder of the roasting time, adding additional broth if it begins to evaporate from bottom of pan. Rotate the pan in the oven about halfway through the cooking time to ensure even browning. Tent with foil once skin is browned to your liking.
- Roast until the internal temperature of the meatiest portion of the thigh registers a solid 165 °F. The roasting time should range from approximately 3 to 4½ hours if your turkey is between 12 to 16 pounds.
- Remove the turkey from oven, tent it loosely with foil, and allow it to rest for about 30 minutes before carving.
Notes
- 3 tablespoons coarse kosher salt
- 1 tablespoon dried thyme
- 1 tablespoon dried rubbed sage
- 1 ½ teaspoons freshly ground black pepper
Nutrition
Nutrition information is automatically calculated using generic ingredients, and is an estimate not a guarantee. For more accurate results, please refer to the labels on your ingredients at home.
Like this? Please rate & comment below!


Making this Turkey for Easter, is the butter for the rub Salted or Unsalted?
Salted. Hope you love it!
You say to cover it with plastic wrap, would using a brine bag be good enough. If I use the wrap are you just wrapping the bird or the whole pan?
A brine bag would be fine, but maybe a bit messy with the garlic butter rub. The point is to cover the bird, not necessarily the pan. Just be sure to remove it from the bag for the last bit of the drine brine process as described in the recipe. Hope you love it!
Wondering if you’ve ever tried this recipe using a cast iron Dutch oven using coals (outside)? I usually do my Thanksgiving turkey using this method but, have never tried the dry brine. Just curious what you may think.
A dry brine works no matter what cooking method you use, so it will still do its job even if you cook the turkey outdoors in a cast iron Dutch oven with coals. The main difference is just managing heat and timing with your usual method. As long as the turkey reaches a safe internal temperature, the dry brine will give you the same great seasoning and moisture boost. I haven’t tested it specifically with the Dutch-oven-and-coals setup, but it should translate well.
We loved this recipe! Our turkey came out perfect. We will definitely save this recipe to make again. Thanks for sharing!
I’m so happy to hear this! Thanks so much for taking the time to leave a comment and rating. 🙂
Do you have to rinse or wipe off the dry brine before roasting?
Hi Kristina. There is no need to wipe or rinse the turkey after the brining process. The goal is to dry out the skin so it will crispy nicely when roasting.
Can I smoke this with a turkey breast?
Sure!
If I don’t use garlic butter when roasting (not a fan) what would you recommend?
Hi Debbie. If it’s the garlic you don’t like, you could just leave it out of the butter/olive oil mixture and it will still be delicious.
I made this recipe followed to the tee took to friends Thanksgiving. He also made his special turkey recipe. Turned out my turkey was gone, everyone was amazed. Besides it being time consuming it’s easy to do and I recommend to try.
I loved this recipe sooo much!! I will never ever ever make a turkey any other way!!
So happy it worked out so well for you! My dry brined turkey is resting in my fridge as I type this. Looking forward to roasting it tomorrow! Thanks, Ashley. 🙂
I just made this turkey for a late holiday dinner and WOW. I didn’t add any aromatics inside as that isn’t our taste; and unfortunately, I found this recipe too late for a full brine per the recipe. I had it in the fridge for 24 hours and uncovered it from the saran wrap only for the last 2. Even with these exceptions, this was easily the best turkey I have ever had. I mean it was incredible. This is the only recipe I will ever use from now on. I will absolutely find the time for a full brine next year, but if you are like me and short on time (or fridge space for too long) the above “short cuts” still resulted in a turkey that garnered a round of applause from the family!
Fantastic! Thanks, Sara. 🙂
I have been making your recipe for the last 4 Thanksgiving and Christmas dinners and my whole family loves it. My husband, who normally doesn’t like turkey, will only eat my turkey, and my dad, who is a French trained chef, thinks my turkey is perfection! The only two things I’ve added are sherry to the chicken stalk while roasting, and I stuff the bird with my families traditional cheese dressing. The turkey always comes out juicy, flavorful, and beautifully browned. Thank you!!!
I meant stock!
Best. Turkey. EVER! I used my free turkey from the grocery store WITH an 8% solution added. It turned out great. Will definitely use this recipe again.