
Simple ingredients and a special method make this Old Fashioned Banana Cream Pie easy to make at home. It’s a creamy, delicious, nostalgic dessert choice.
If you love creamy desserts, you’ll love my Chocolate Cream Pie and Easy Cream Puff Dessert.
This post may contain affiliate links. Please read our disclosure policy.
I’ve been craving the classics lately. And, it doesn’t get more classic than Old Fashioned Banana Cream Pie.
When you walk into a diner or coffee shop and see those fabulous pies on display in their dessert case, it’s no wonder that Banana Cream Pie is almost always front and center. It is truly irresistible and has stood the test of time. I’m happy to be sharing my method for creating this classic pie today.
If you’re looking for a special dessert for Easter, you can’t go wrong with a classic!
Table of contents

Ingredients for Banana Cream Pie
I almost always have most of the ingredients for this pie in my kitchen. Another great reason to stash this recipe away for a rainy (or not so rainy) day.
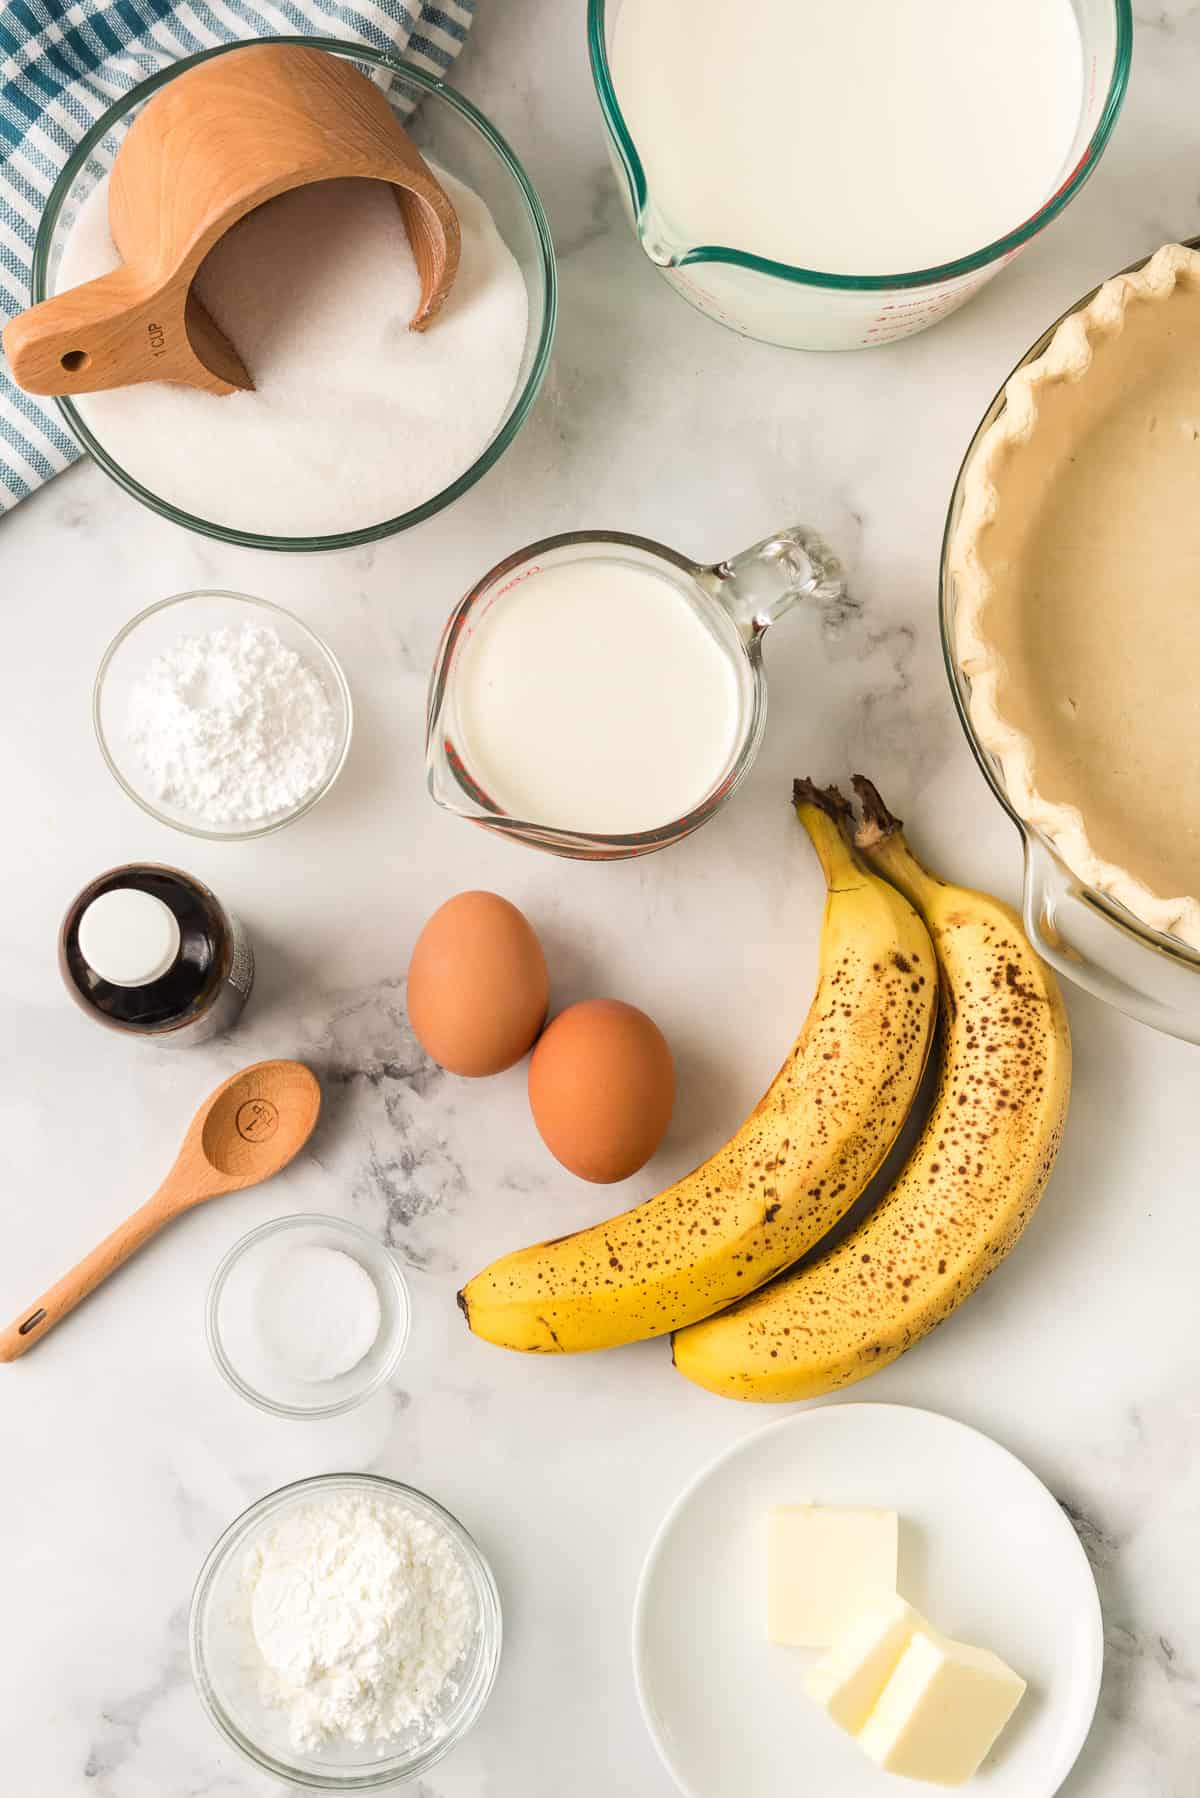
- Granulated sugar
- Cornstarch – To thicken the filling.
- Salt
- Milk – I use 2% milk.
- Large eggs
- Butter
- Pure vanilla extract
- Bananas – Ripe but firm bananas.
- Heavy whipping cream
- Powdered sugar
- Shredded sweetened coconut – Optional but it is a delicious and pretty garnish.
- Prepared pie crust – I use my Easy Food Processor Pie Crust but you can use store-bought pie crust, if you’d like. See more details below.
How to Blind Bake a Pie Crust
Banana Cream Pie is a no bake pie so you’ll need to bake your pie crust in advance of filling it. Blind baking a crust is an easy task once you know a few tips.
- Roll Out – Roll your dough out on a lightly floured board until it’s about an 1/8-inch thick. It should be large enough to fit your 9-inch pie plate, with about 1-inch of pastry going beyond the rim of the plate.
- Place and Trim – Press the pastry gently down into the plate and then evenly trim the edges to about 1/2-inch of the edge of the pan with a sharp knife. Tuck the top edge of crust over and under and crimp or flute the edges.
- Chill – Transfer the pie plate to the freezer for 30 minutes (no more) while you preheat the oven.

- Weight the Crust – Line the pie pastry with foil. Regular aluminum foil is more pliable and easier to shape into the unbaked pie crust than heavy duty foil or parchment paper. Press the foil down lightly and fill it with pie weights.
- Bake – Bake the weighted pie crust for 20 minutes at 400 degrees F. Remove the foil and pie weights and use a fork to prick the bottom surface of the crust all over. Reduce the oven temperature to 375 degrees F, and bake the crust for an additional 10 to 15 minutes or until entire crust is golden brown. Remove from the oven and allow the crust to cool completely before filling.
Pro Tip
Don’t have pie weights? You can use dry beans instead. When you’re done, allow the beans to cool and then store them in an airtight container in your pantry to use as pie weights over and over again.
Easy Homemade Custard
Tempering your eggs prevents them from starting to cook and ensures they will be smoothly incorporated into your custard. The traditional method of making custard involves whisking a portion of warmed milk or cream into the eggs and then adding this mixture back to the pan with the rest of the warmed dairy before continuing to cook and thicken the custard. If you’ve ever made custard from scratch, you’ve very likely used this method.
I have a slightly different technique that is far easier and works beautifully. This method has never failed me and results in a silky-smooth custard.
How to Make Banana Cream Pie
- Place the sugar, cornstarch, and salt in a medium sized saucepan off the heat.
- Whisk together the eggs and milk in a separate bowl until fully combined.
- Slowly pour the egg/milk mixture into the dry mixture in the saucepan (still off the heat), whisking constantly while pouring, until completely smooth.
- Place saucepan over medium heat and cook, whisking constantly, until the custard has thickened.
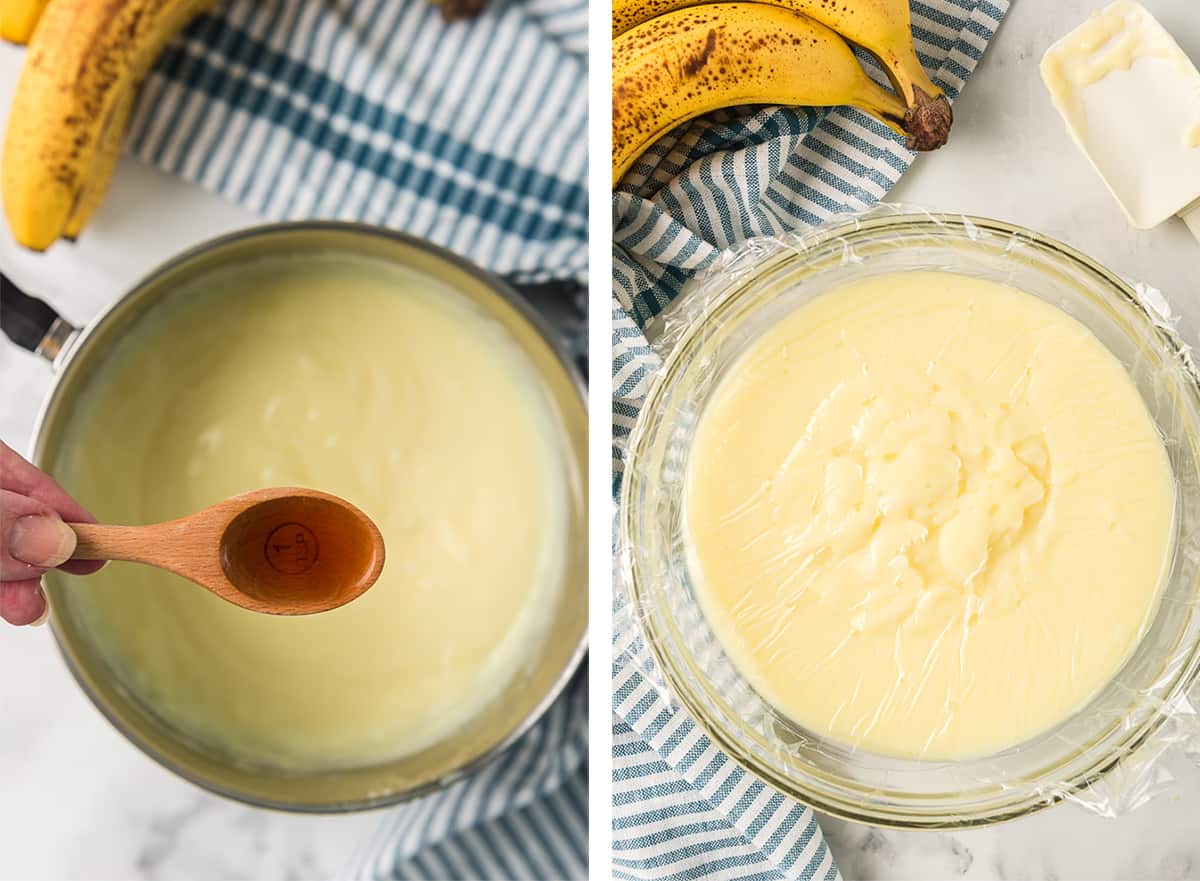
- Once off the heat a little butter and pure vanilla extract is stirred into the thickened custard.
- Pour the hot custard into a bowl and press plastic wrap on to the surface. Refrigerate for at least 1 hour or overnight. If you make the custard a day in advance, this pie is quick and easy to put together the next day.
Assemble the Pie
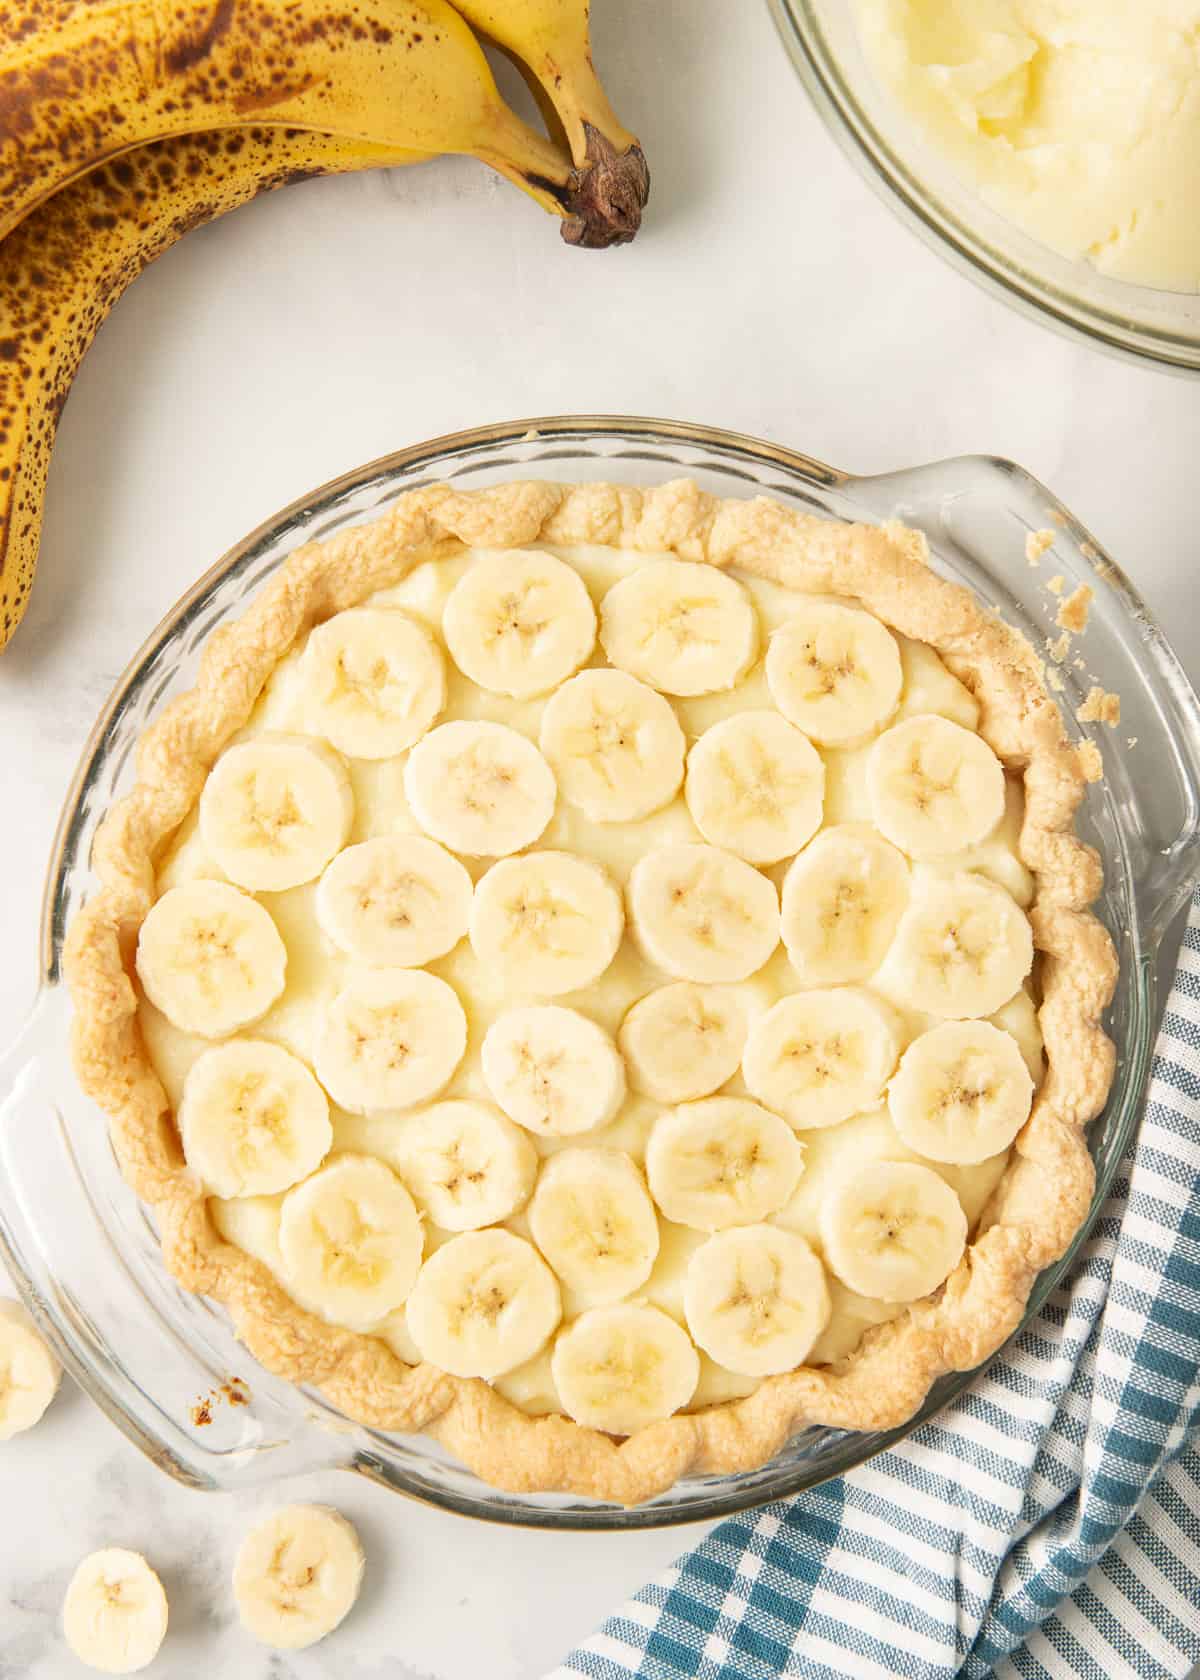
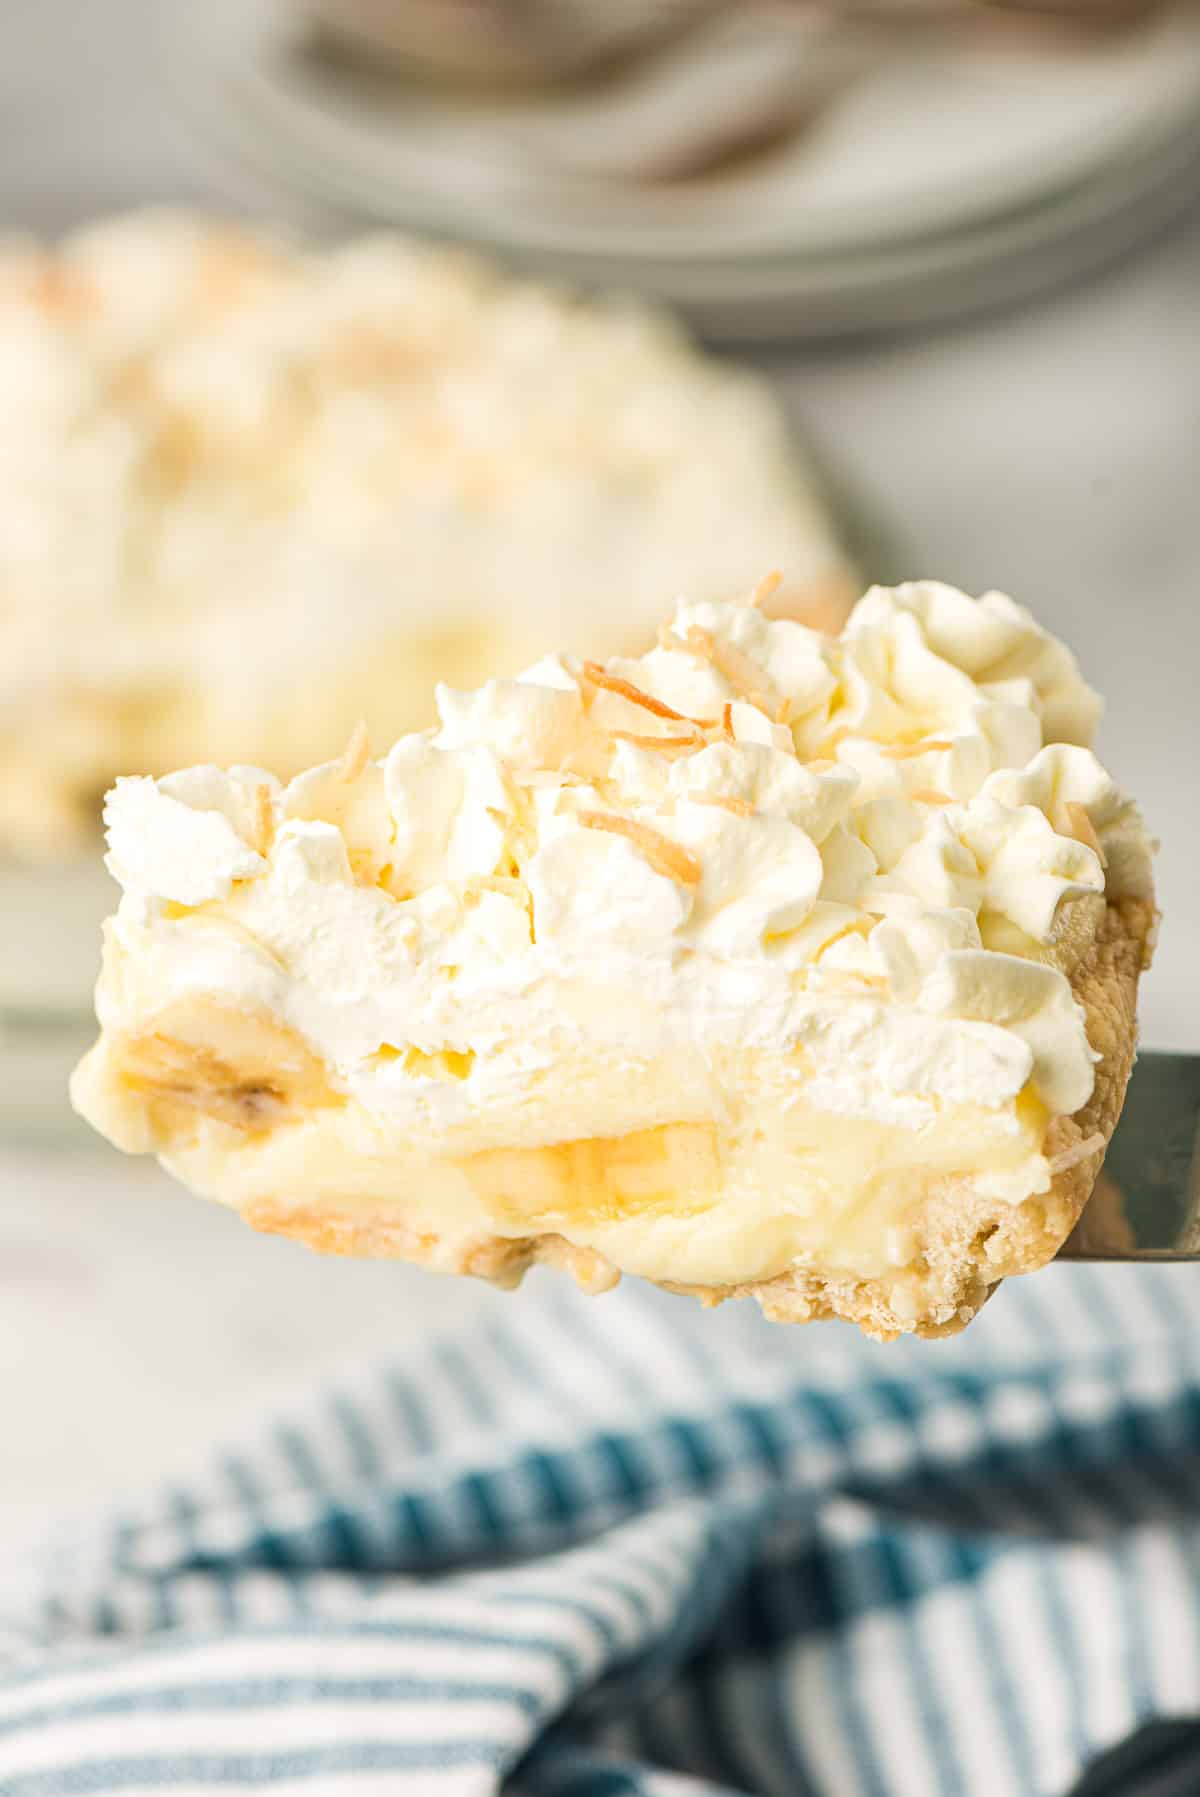
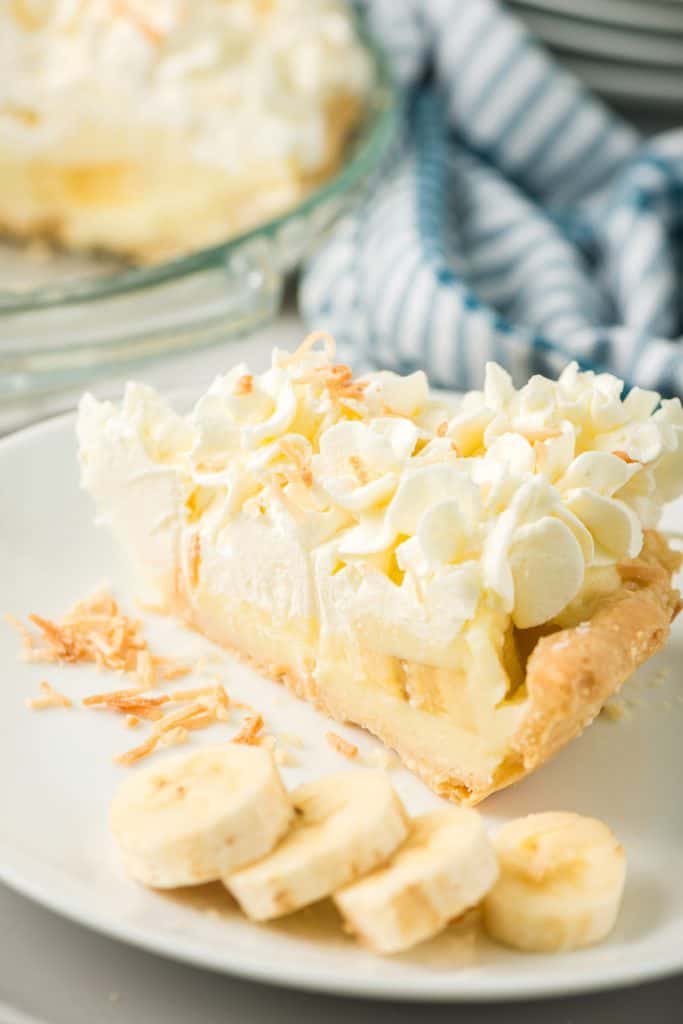
- Spread half of the custard into the blind baked crust.
- Slice the bananas about 1/2-inch thick and arrange them evenly over the custard layer.
Your bananas should be ripe but firm. Some black spots are okay but you want to save those seriously overripe bananas for recipes like banana bread.
- Spoon the remaining custard over the bananas and spread it out to cover them.
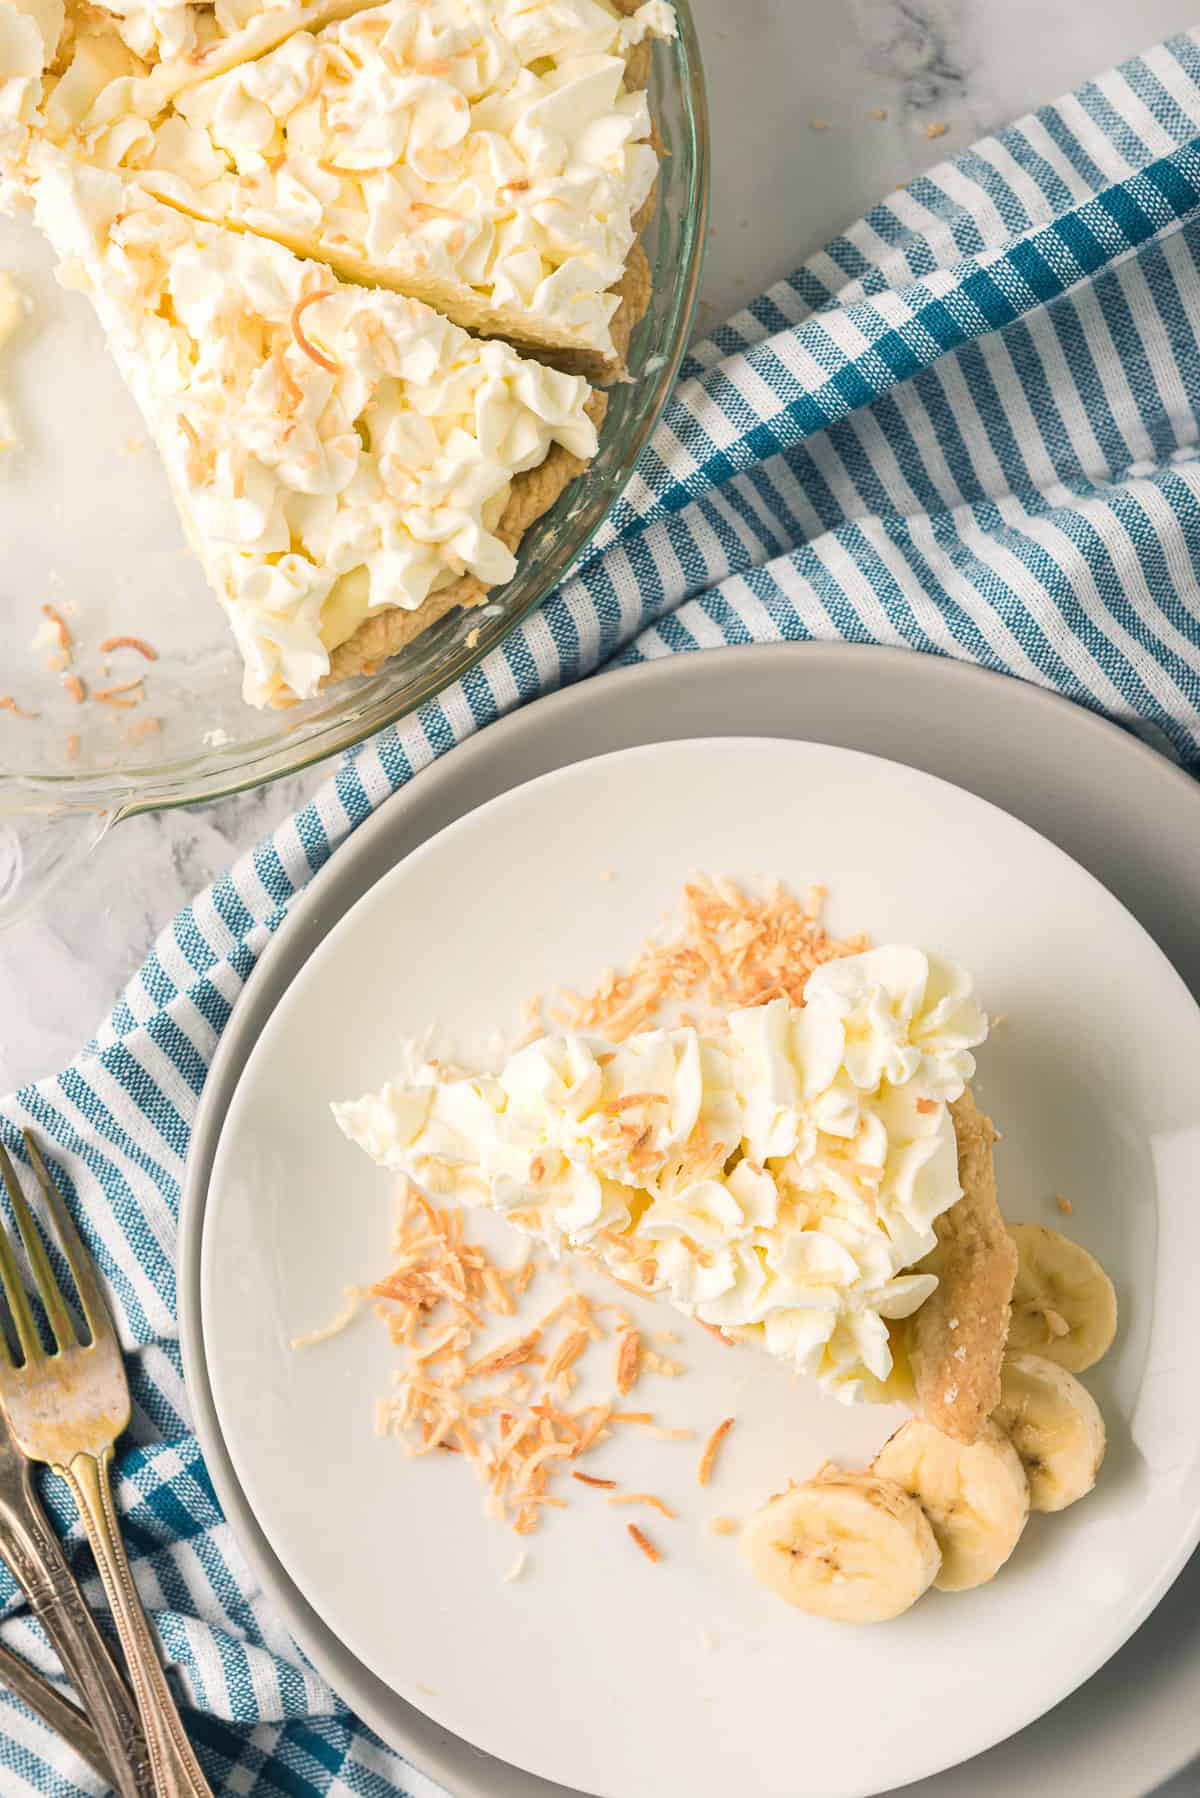
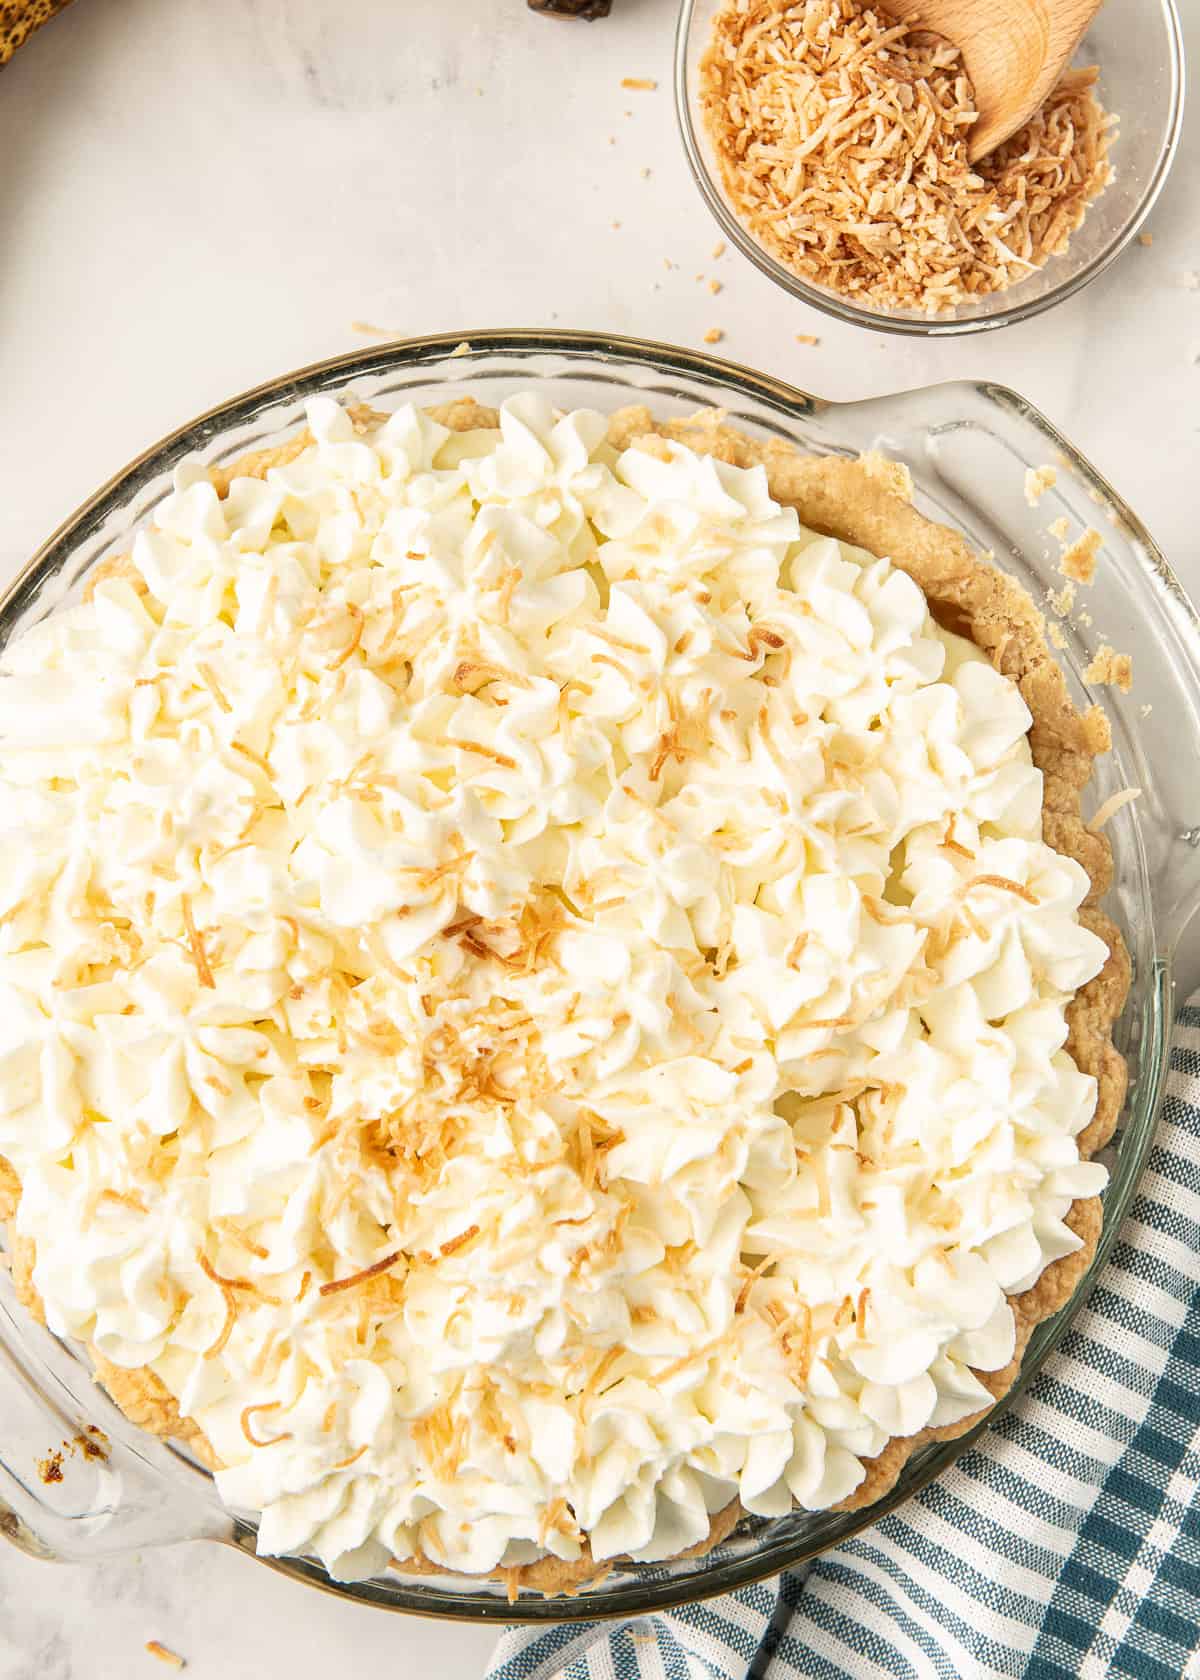
- If you’re feeling fancy, use a piping bag with a decorative tip to pipe the whipped cream over the top of the pie OR just dump the whipped cream in the center and spread it out. It will taste just as good!
- A sprinkling of toasted shredded coconut is optional but I just love the texture and flavor it adds.
Serving Tips
To ensure the pie will slice and serve cleanly I recommend refrigerating the assembled pie for a couple of hours before serving. If you slice and serve it immediately it might be a little messy, but still exceptionally delicious!
A beautiful dessert for a special occasion but a truly special way to treat your family any old day.
More Dessert Recipes You’ll Love
- Robert Redford Dessert
- Coconut Poke Cake
- Easy Blueberry Cheesecake Dessert
- Lemon Raspberry Bundt Cake
Sign up for my free newsletter for all the latest recipes and join me on Facebook, Instagram and Pinterest for more cooking inspiration!
Old Fashioned Banana Cream Pie
Ingredients
9-inch Single Crust Pie Pastry
- 1 ¼ cups all-purpose flour
- ¼ teaspoon salt
- ¼ cup unsalted butter,, very cold
- 3 tablespoons shortening regular or butter flavored,, very cold
- 1 ½ teaspoons apple cider vinegar
- 2 to 4 tablespoons ice water
Vanilla Custard
- 1 cup sugar
- ¼ cup cornstarch
- ½ teaspoon salt
- 3 cups 2% milk
- 2 large eggs, lightly beaten
- 3 tablespoons butter
- 1 ½ teaspoons vanilla extract
For the Rest
- 2 large firm bananas, sliced
- 1 cup heavy whipping cream
- 3 to 4 tablespoons powdered sugar, I use 3 for a less sweet whipped cream to offset the sweet custard
- ⅓ cup shredded sweetened coconut,, optional
Instructions
For the Pie Crust:
- Place the flour and salt in the bowl of a food processor. and pulse 4 or 5 times until combined.
- Cut butter and shortening into small pieces. Add to the flour and process about 20 seconds or until the mixture resembles coarse crumbs.
- Add the vinegar and 2 tablespoons water and pulse about 6 times. Add additional water a little at a time and pulse until mixture begins to hold together. You may not need to use all the water.
- Remove pastry from the food processor bowl, form into a ball and place it on a sheet of plastic wrap. Flatten the ball slightly with your hand and wrap the flattened pie pastry in the plastic wrap. Refrigerate for at least 1 hour or up to two days.
- When ready to roll out, remove the pastry from the refrigerator and let it rest on the counter for about 10 to 15 minutes. Lightly flour a large board and using a rolling pin, roll the pastry out in a circle about ⅛-inch thick until it is large enough to fit your pie plate, with about 1-inch of pastry going beyond the rim of the plate. Press the pastry gently down into the plate and then evenly trim the edges to about ½-inch of the edge of the pan with a sharp knife. Tuck the top edge of crust over and under and crimp or flute the edges.
- Transfer the pie plate to the freezer for 30 minutes (no more) while you preheat the oven.
Blind Bake the Pie Crust
- Move the rack to the center of the oven and preheat the oven to 400 degrees F.
- Remove the pie plate from the freezer. Line the pie pastry with foil (I like to use regular foil (not heavy duty foil or parchment paper) because it is pliable and easy to shape into the unbaked pie crust). Press the foil down lightly and right up to the fluted or crimped edges. Fill the foil-lined crust with pie weights or dry beans and bake for 20 minutes, or until the edges are light golden brown.
- Remove the dish from the oven and carefully lift and remove the foil and pie weights. Use a fork to prick the bottom surface of the crust all over. Reduce oven temperature to 375 degrees F, place the pie plate back into the oven, and continue baking an additional 10 to 15 minutes or until entire crust is golden brown.
- Remove from the oven and allow the crust to cool completely before filling.
For the Custard (No Tempering Method)
- Place the sugar, cornstarch, and salt in a medium sized saucepan off the heat (a heavy bottomed saucepan like enameled cast iron is best). Whisk together the eggs and milk in a separate bowl until fully combined. Whisk very well to be sure the eggs are completely incorporated. Slowly pour the milk mixture into the dry mixture in the saucepan (still off the heat), whisking constantly while pouring, until completely smooth.
- Turn heat under saucepan to MEDIUM, and cook the custard mixture, whisking constantly, until it is thickened, about 5 to 6 minutes. It will seem as if it isn’t going to thicken but once it starts, it happens quickly so be ready for it. The mixture will come to a bare simmer during this process (a few bubbles on the surface) but reduce the heat if it begins to boil. Once thickened, immediately remove the pan from the heat and stir in the butter and vanilla with a wooden spoon. Stir until the butter melts and is well incorporated into the hot custard.
- Pour the hot custard into a medium bowl and press plastic wrap on to the surface of the custard to prevent a film from forming. Refrigerate for at least 1 hour or until chilled. Can be made a day in advance and refrigerated overnight.
For the Whipped Cream
- Beat the heavy cream and 3 tablespoons powdered sugar until stiff peaks form. Taste and add additional powdered sugar if you feel it needs it.
Assemble the Pie
- Spread half of the custard into the crust. Slice bananas about ½-inch thick and arrange them evenly over the custard layer. Spoon the remaining custard over the bananas and spread it out to cover them. Spread with the whipped cream. Garnish with toasted coconut, if desired.
- Refrigerate for an hour or two or overnight before slicing and serving.
For Optional Toasted Coconut Topping
- Preheat oven to 350 degrees F. Place coconut in a small baking dish and bake for 5 to 6 minutes, stirring halfway through the cooking time, until golden brown and toasted.
- Remove from the oven and cool completely before sprinkling over the pie.
Notes
Nutrition
Nutrition information is automatically calculated using generic ingredients, and is an estimate not a guarantee. For more accurate results, please refer to the labels on your ingredients at home.
Like this? Please rate & comment below!


Making this for a future party, how long can I store this in the fridge or freezer? And what would you recommend doing to thaw it if it can go in the freezer?
Banana Cream Pie is best made and stored in the refrigerator, not the freezer. Once assembled, it will keep well in the fridge for about 24 to 48 hours. After that, the bananas tend to soften and release moisture, which can affect the texture of the filling.
I don’t recommend freezing the fully assembled pie. The custard and bananas don’t thaw well and can become watery or grainy. If you need to work ahead, you can bake the crust and prepare the filling a day in advance, then assemble the pie with fresh bananas and whipped topping closer to serving time.
Can I use this filling for vanilla wafer banana pudding ? I need to make it for a large crowd and thought doubling the recipe would work for the banana pudding. Has anyone tried doubling the recipe ?
Honestly, this custard would be delcious on its own so, yes, I think it would work well! I haven’t ever doubled it but it should work just fine.
This is the third time I’ve made this and it is perfect each time. Just follow step by step instructionsz
This was delicious and extremely easy to make. The hardest part was waiting till it was ready to cut ( I did sample off my spatula though ) lol
Sampling is required! Thanks, Rowena. 🙂