This tender and juicy Herb Roasted Turkey is coated with a flavorful butter and garlic-herb rub and roasted to golden brown perfection. This classic oven-roasted turkey is the perfect centerpiece for your holiday table!
It’s turkey time, friends, and I’m sharing my favorite method and recipe for a dependably juicy and flavorful oven roasted turkey. Let’s remove the fear, it’s not that hard! I’m going to take you through the entire process of roasting a whole turkey, step-by-step, from start to finish.
This Herb Roasted Turkey is a no nonsense, back to basics recipe that turns a fresh or frozen turkey into a gorgeous centerpiece for your Thanksgiving table.
Table of contents
Ingredient Notes
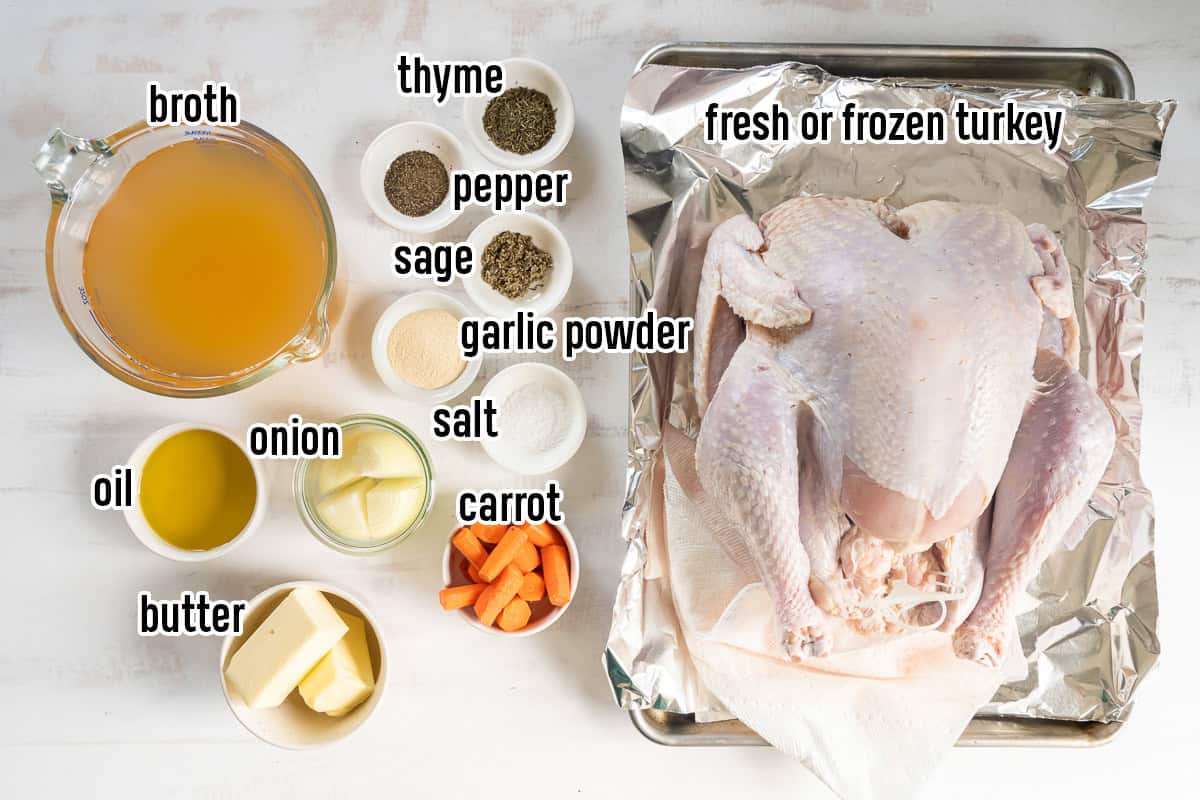
- Turkey: A 12 to 18 pound fresh or frozen whole turkey.
- Butter-Herb Rub: Olive oil softened salted butter, garlic powder, dried rubbed sage, dried thyme, salt, and freshly ground black pepper.
- Aromatics: A quartered yellow onion and a carrot scrubbed clean and cut into chunks.
- Broth: I use low-sodium chicken broth but many stores stock turkey broth over the holidays. Either will work just fine.
How to Make Herb Roasted Turkey
Prep the Turkey
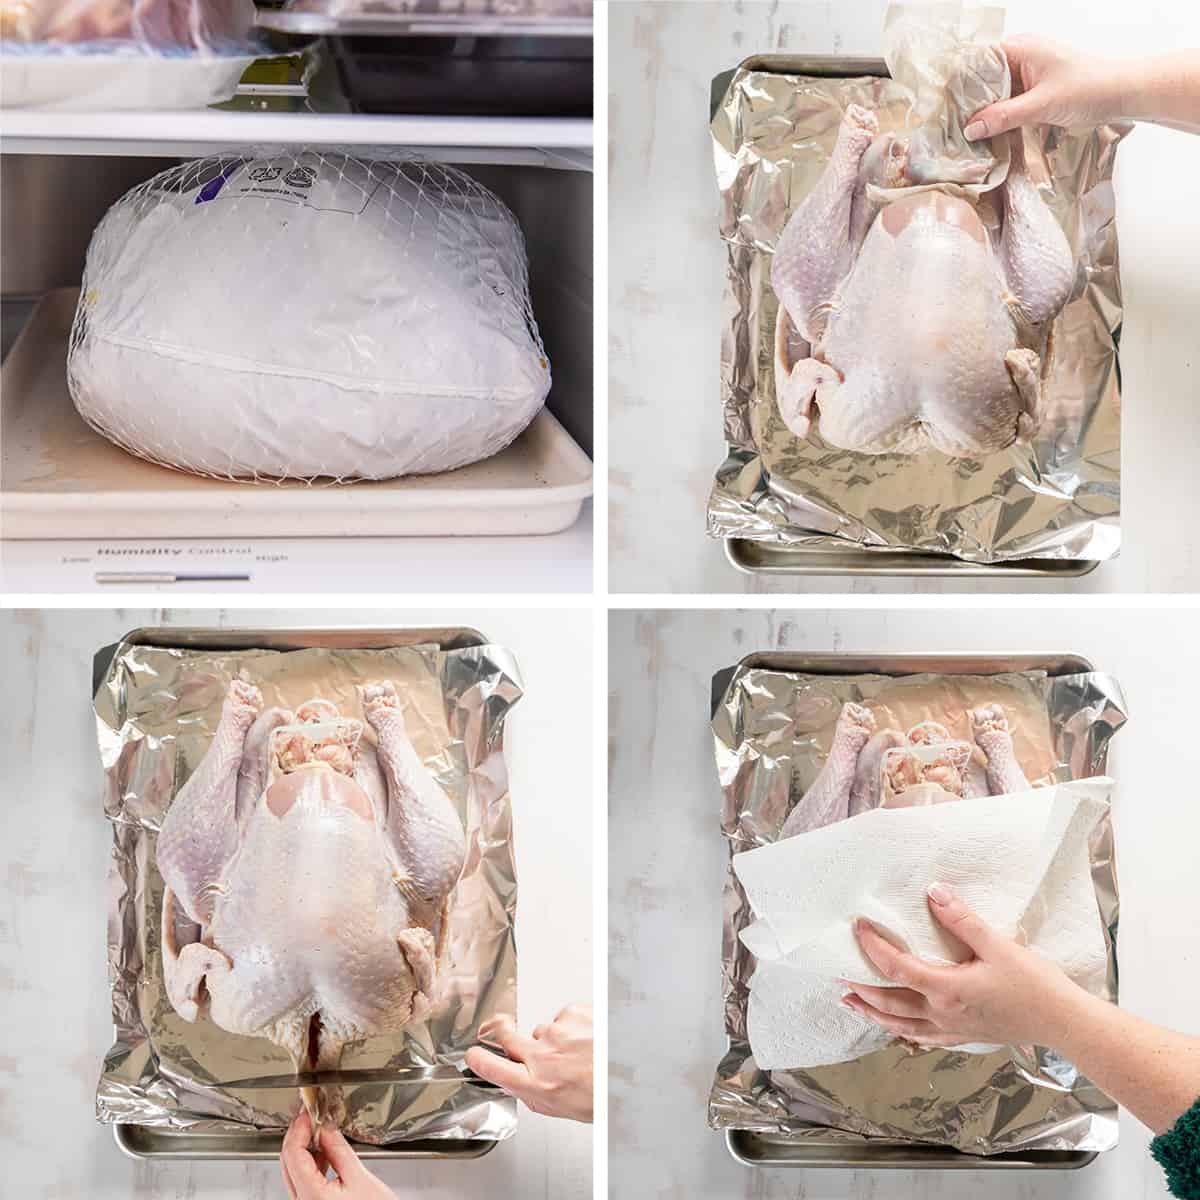
- Allow your turkey to thaw completely on a rimmed baking sheet in the refrigerator before beginning. See FAQ section below for thawing details.
- Check both the body and neck cavity and remove the packet of giblets and the neck. You can discard these unless you plan to use them for gravy.
- If there is a lot of excess skin at the neck cavity, use a sharp knife or kitchen shears to trim it, leaving at least 1-inch or more of overhang.
- Blot the surface of the turkey dry with paper towels.
There is a stronger risk of contamination in your kitchen if you rinse the turkey in your sink. The FDA recommends that you skip the bird bath. Instead, just use paper towels to blot it dry.
The Butter-Herb Rub
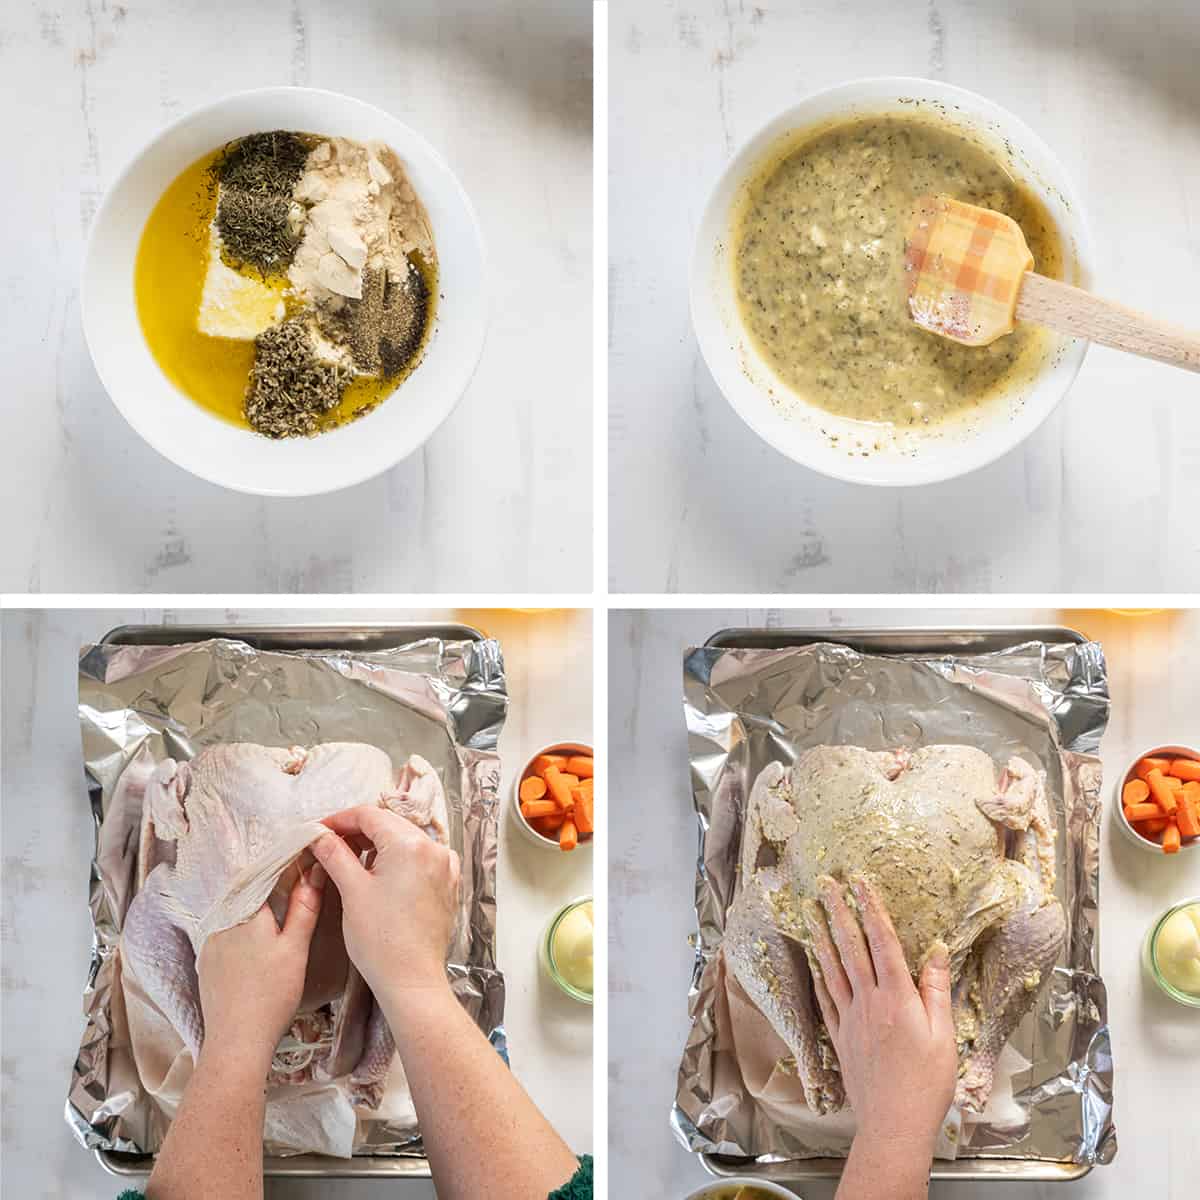
- Add the softened butter, olive oil, dried herbs, salt and pepper to a small bowl.
- Mix until well combined.
- Carefully lift the skin of the breast and push your hand inside, as far as it will go, being careful not to tear the skin. Scoop up some of the butter-herb mixture and spread it under the skin on both sides of the breast meat.
- Spread most of the remaining butter-herb mixture all over the outside of the turkey, reserving a small amount for later.
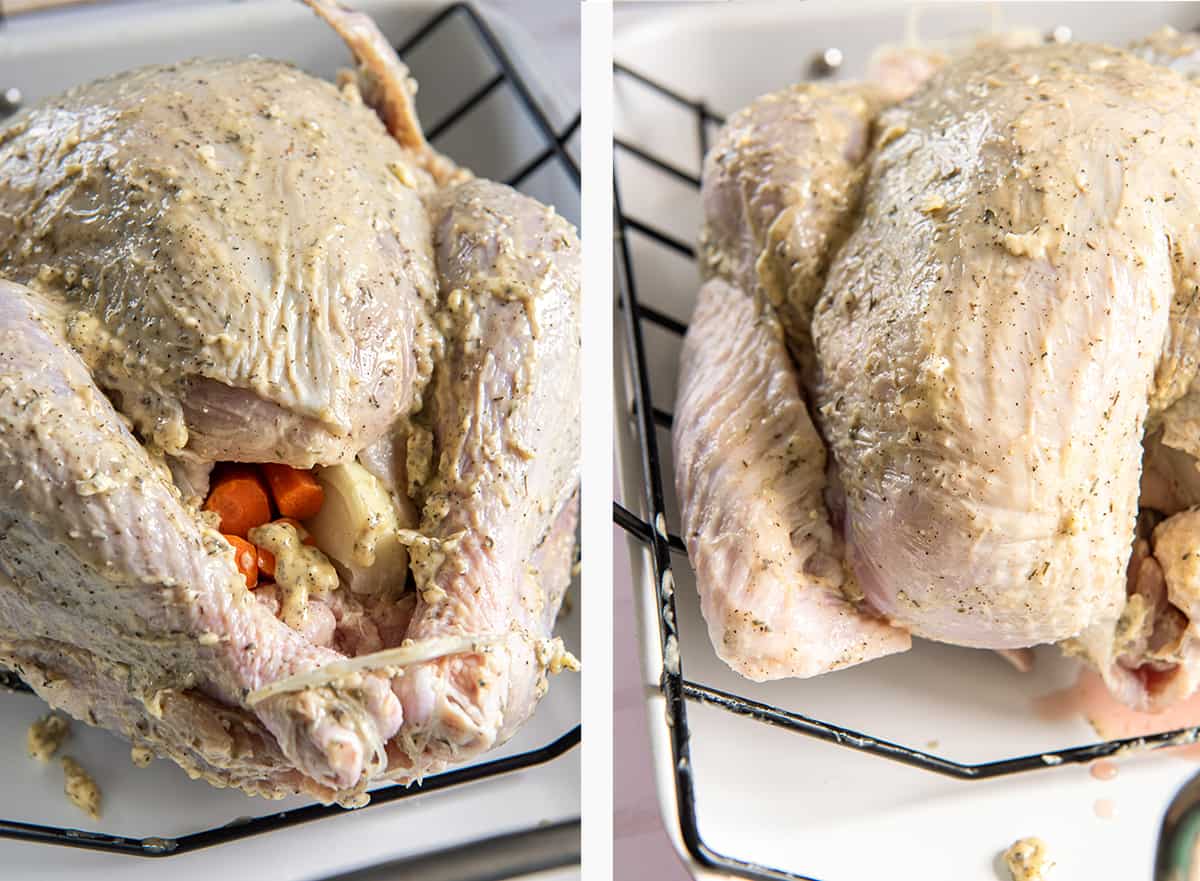
- Transfer the turkey to a sturdy rack in a large, oven and stove-safe roasting pan. Add the aromatics, in this case, chunks of onion and carrot, to the large cavity. Secure the legs with the embedded clip, if your turkey has one, or tie them with kitchen twine.
- Turn the roasting pan around and tuck the wings by pulling each wing back and then tucking it underneath the body. Spread the remaining butter/herb mixture over any part of the turkey that needs it.
Roast the Turkey
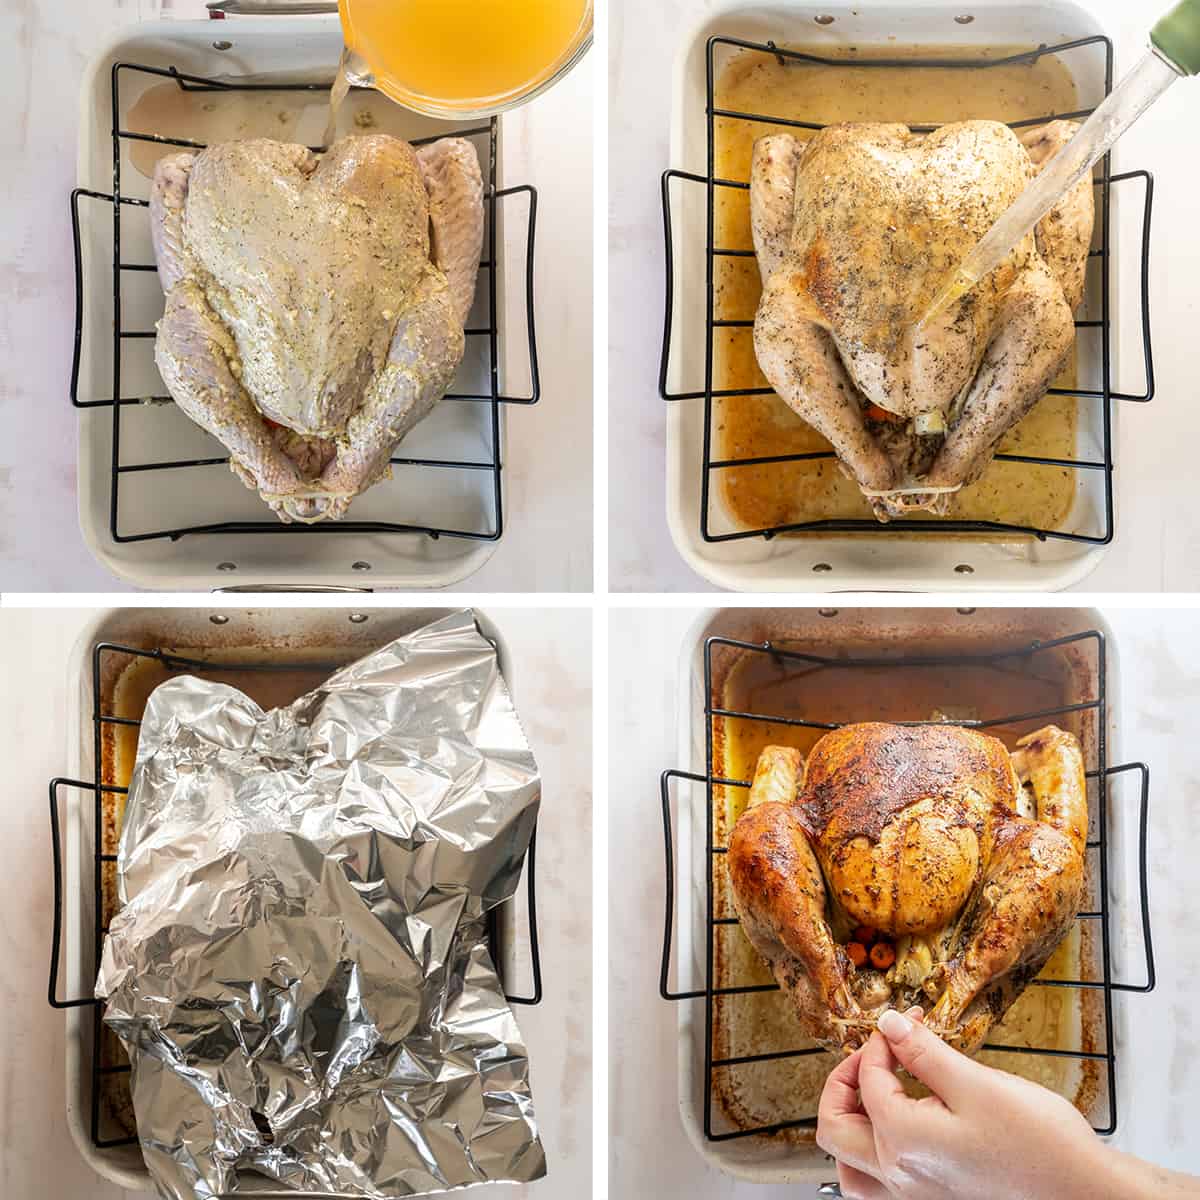
- Pour about 2 cups of chicken or turkey broth into the bottom of the roasting pan Transfer the roasting pan to a preheated 325 degree F oven.
- After 1 hour, baste the turkey with the broth and pan drippings. I like to baste the turkey about once every 30 to 40 minutes, adding additional broth, if needed. It’s a good idea to rotate the pan about halfway through the cooking time for more even roasting. Once the turkey has reached a beautiful golden brown, you can tent it lightly with a sheet of foil for the remainder of the cooking time, if desired.
- Remove the roasting pan from the oven when then internal temperature reaches 165 degrees F when measured with an instant read thermometer in the meatiest portion of the thigh. Loosely tent the turkey with foil and allow it to rest for 30 minutes.
- Before transferring the turkey to a cutting board to carve, tilt it up and allow any juices in the cavity to run out into the roasting pan. This will make the job of carving the turkey much neater. Reserve the drippings for the gravy.
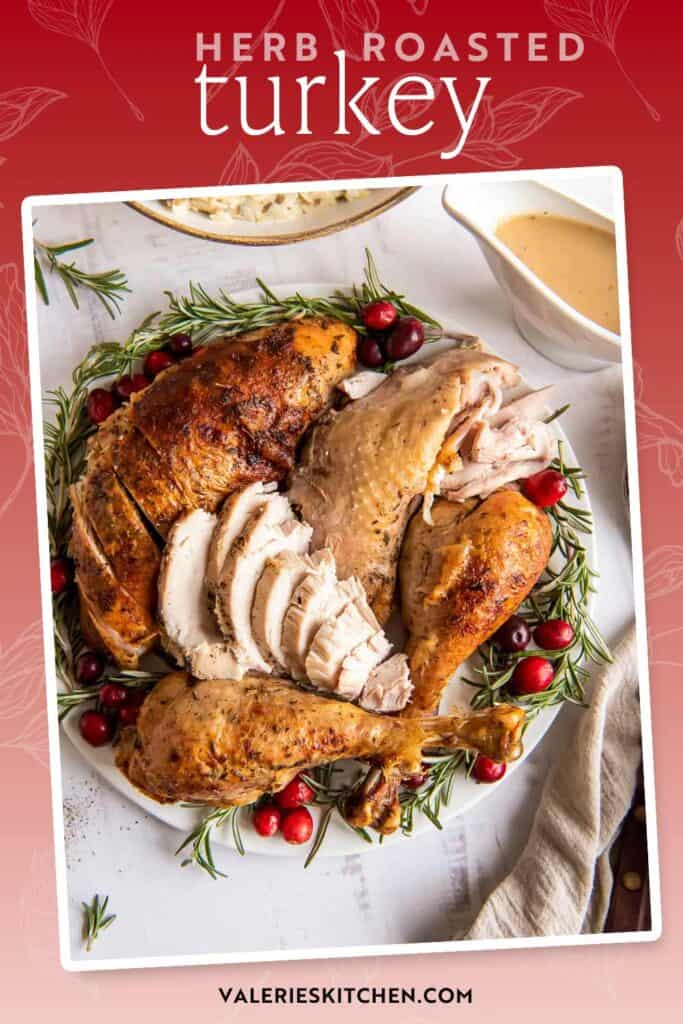
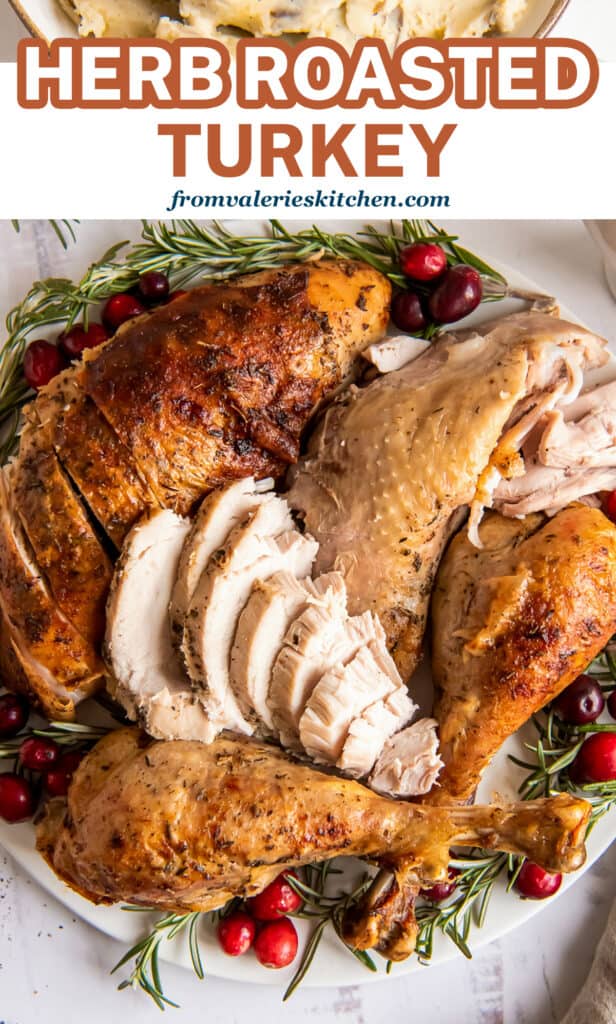
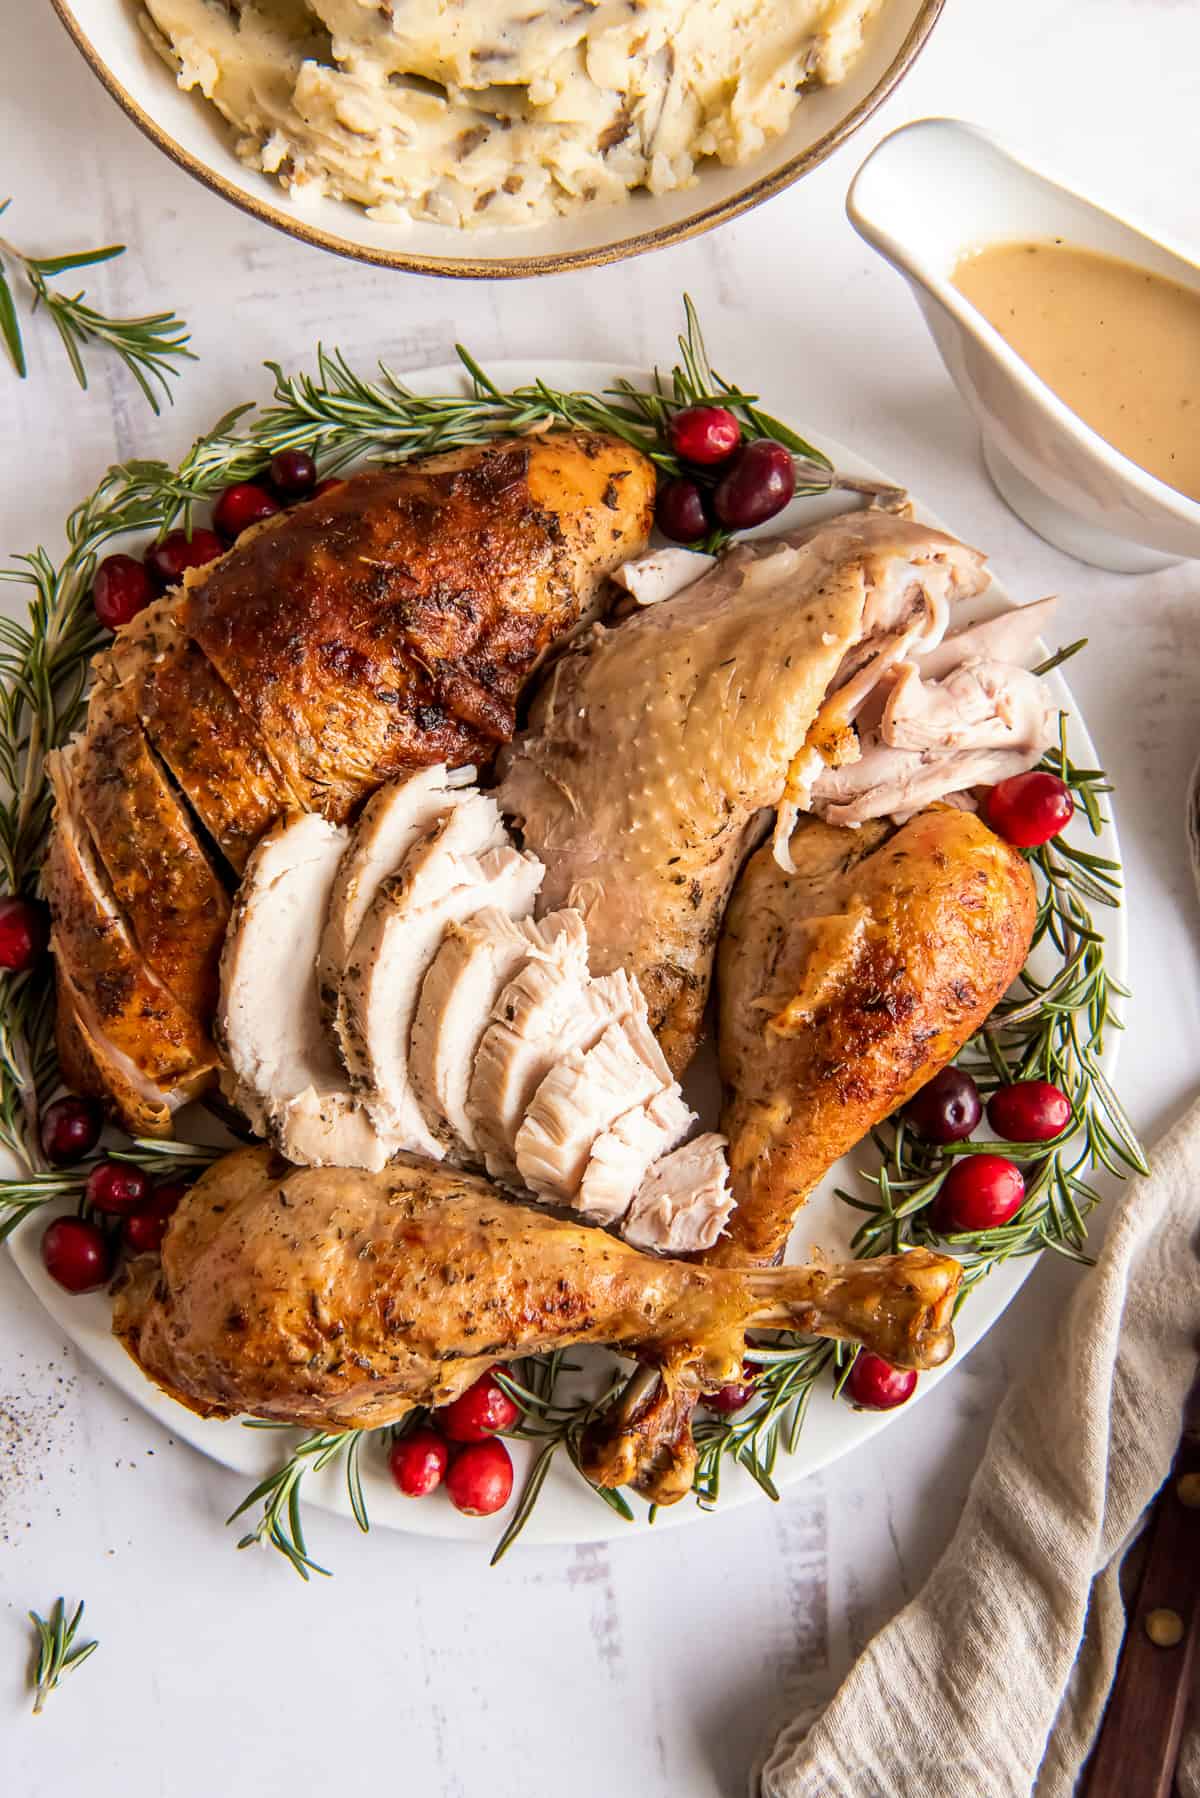
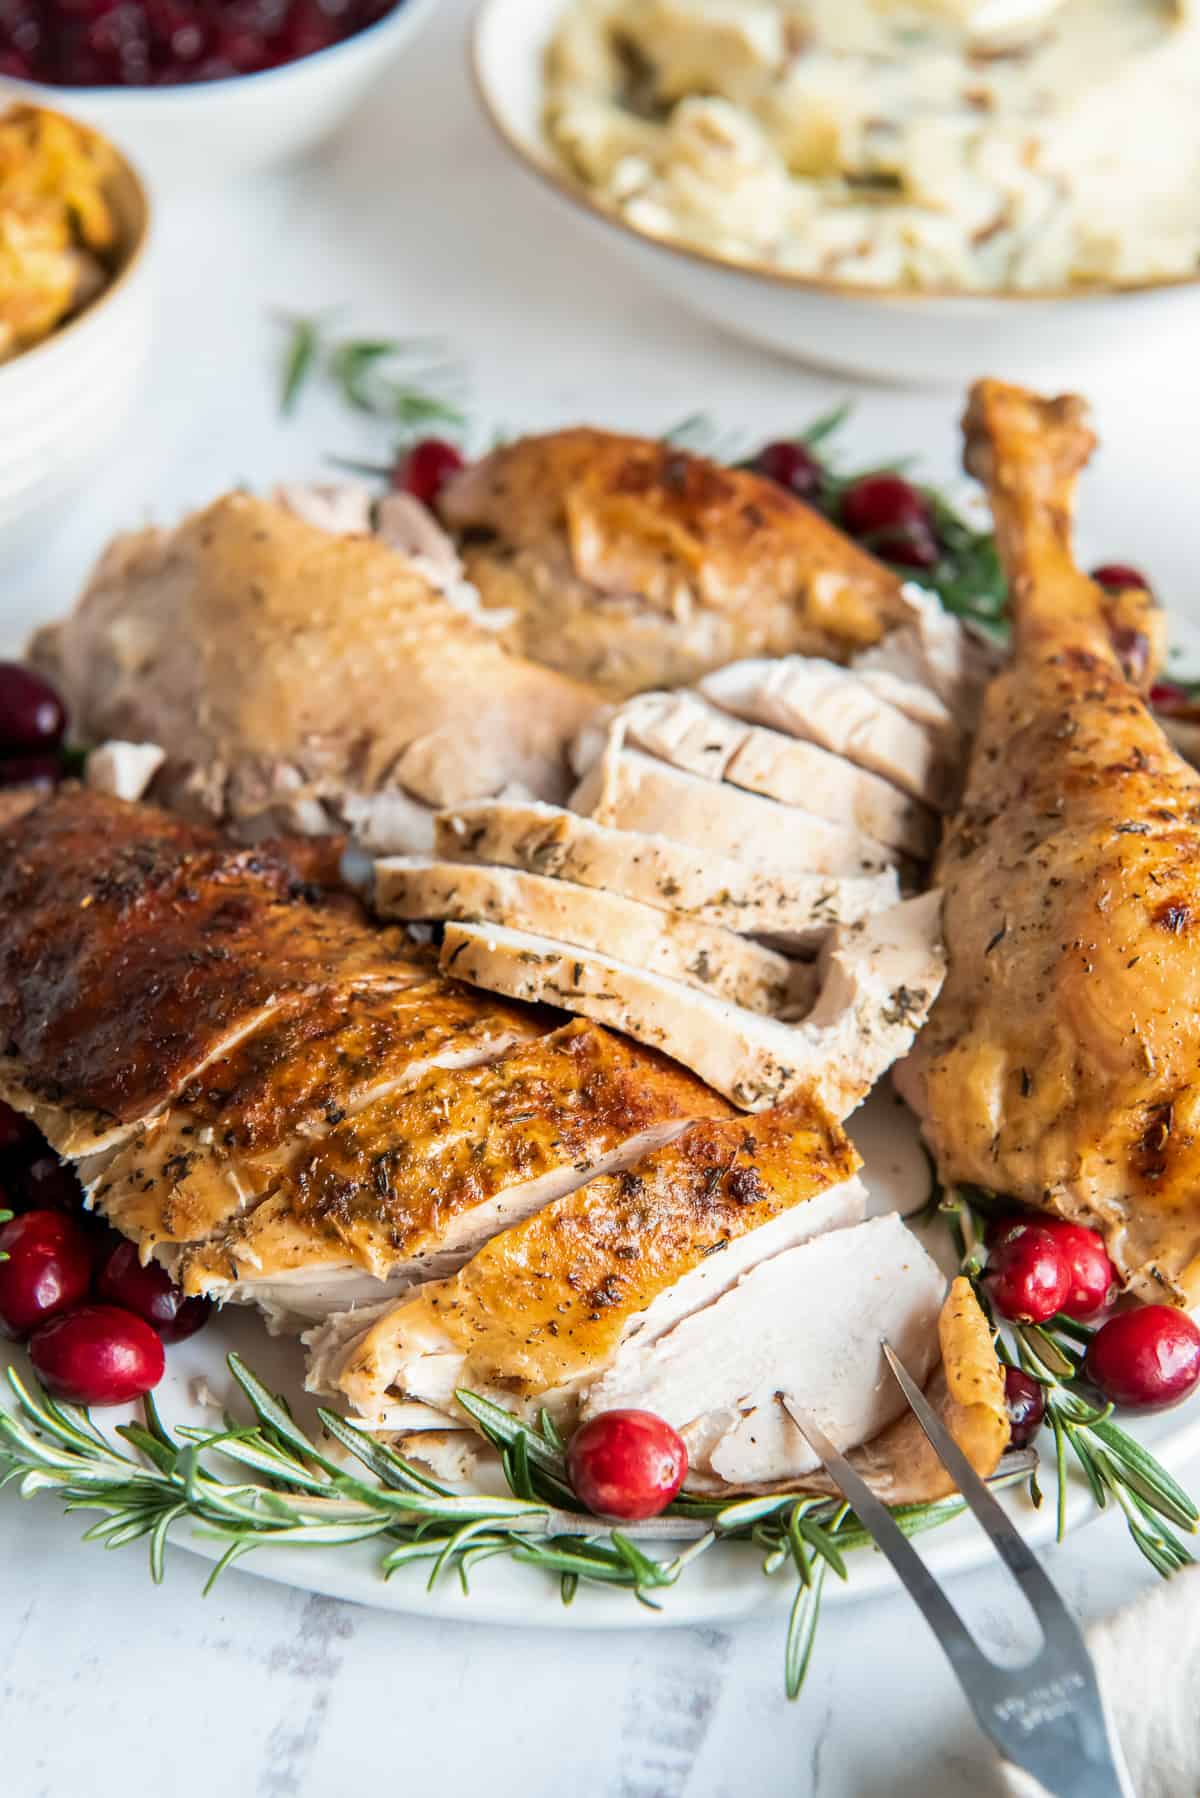
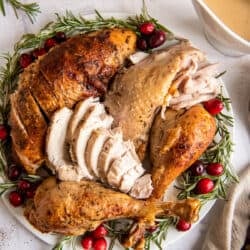
How to Carve a Turkey
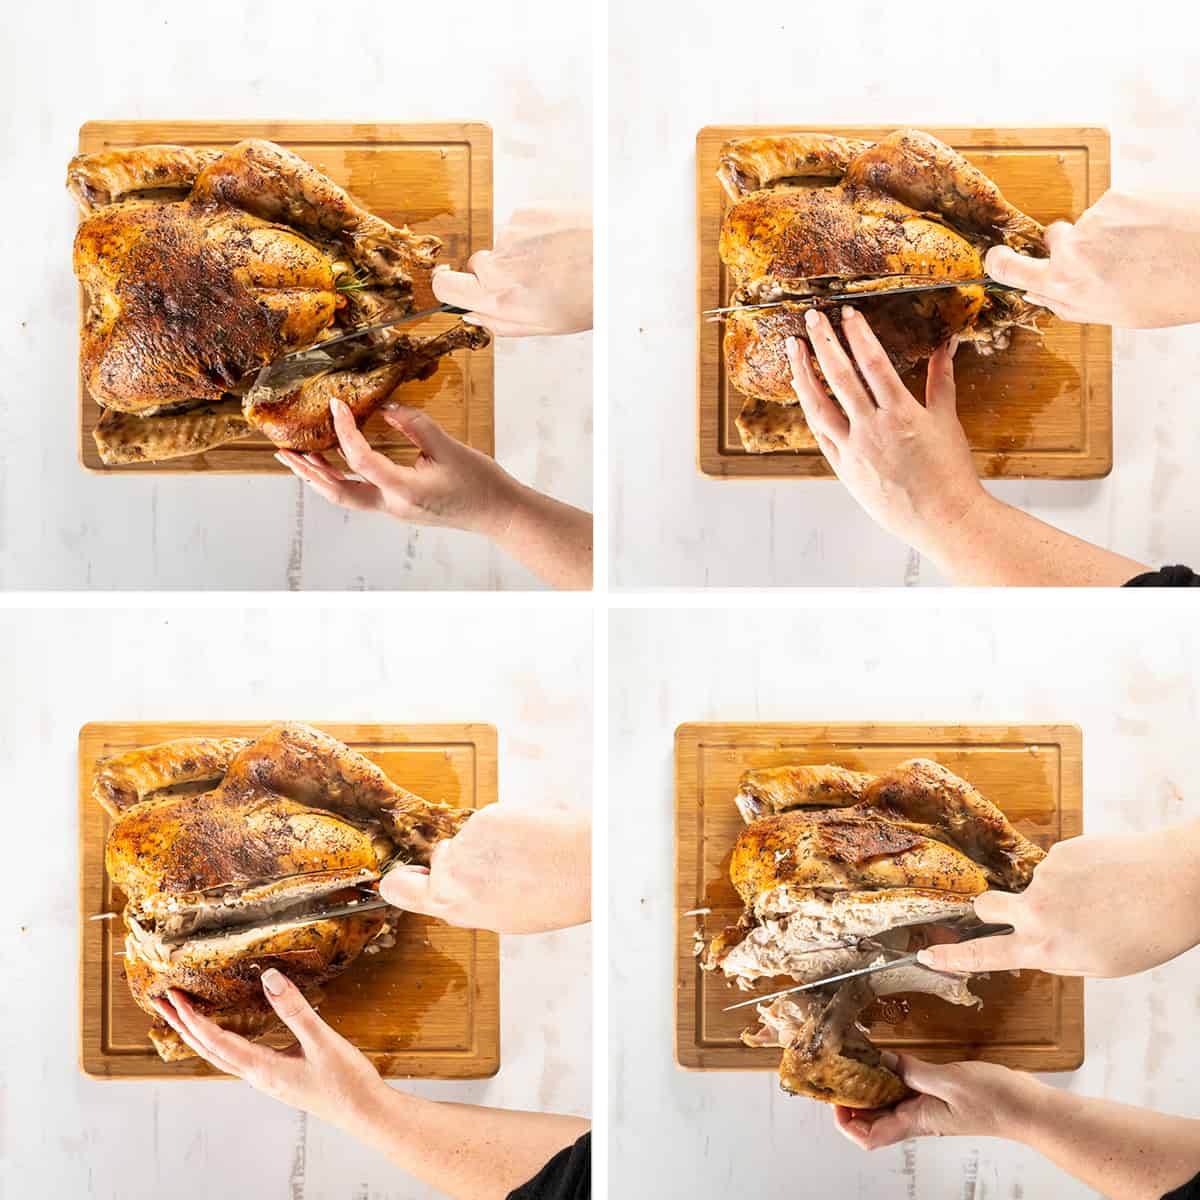
- Separate the leg and thigh from one side and separate the drumstick from the thigh bone.
- Slice down along either side of the breast.
- Slice again to remove the breast from one side.
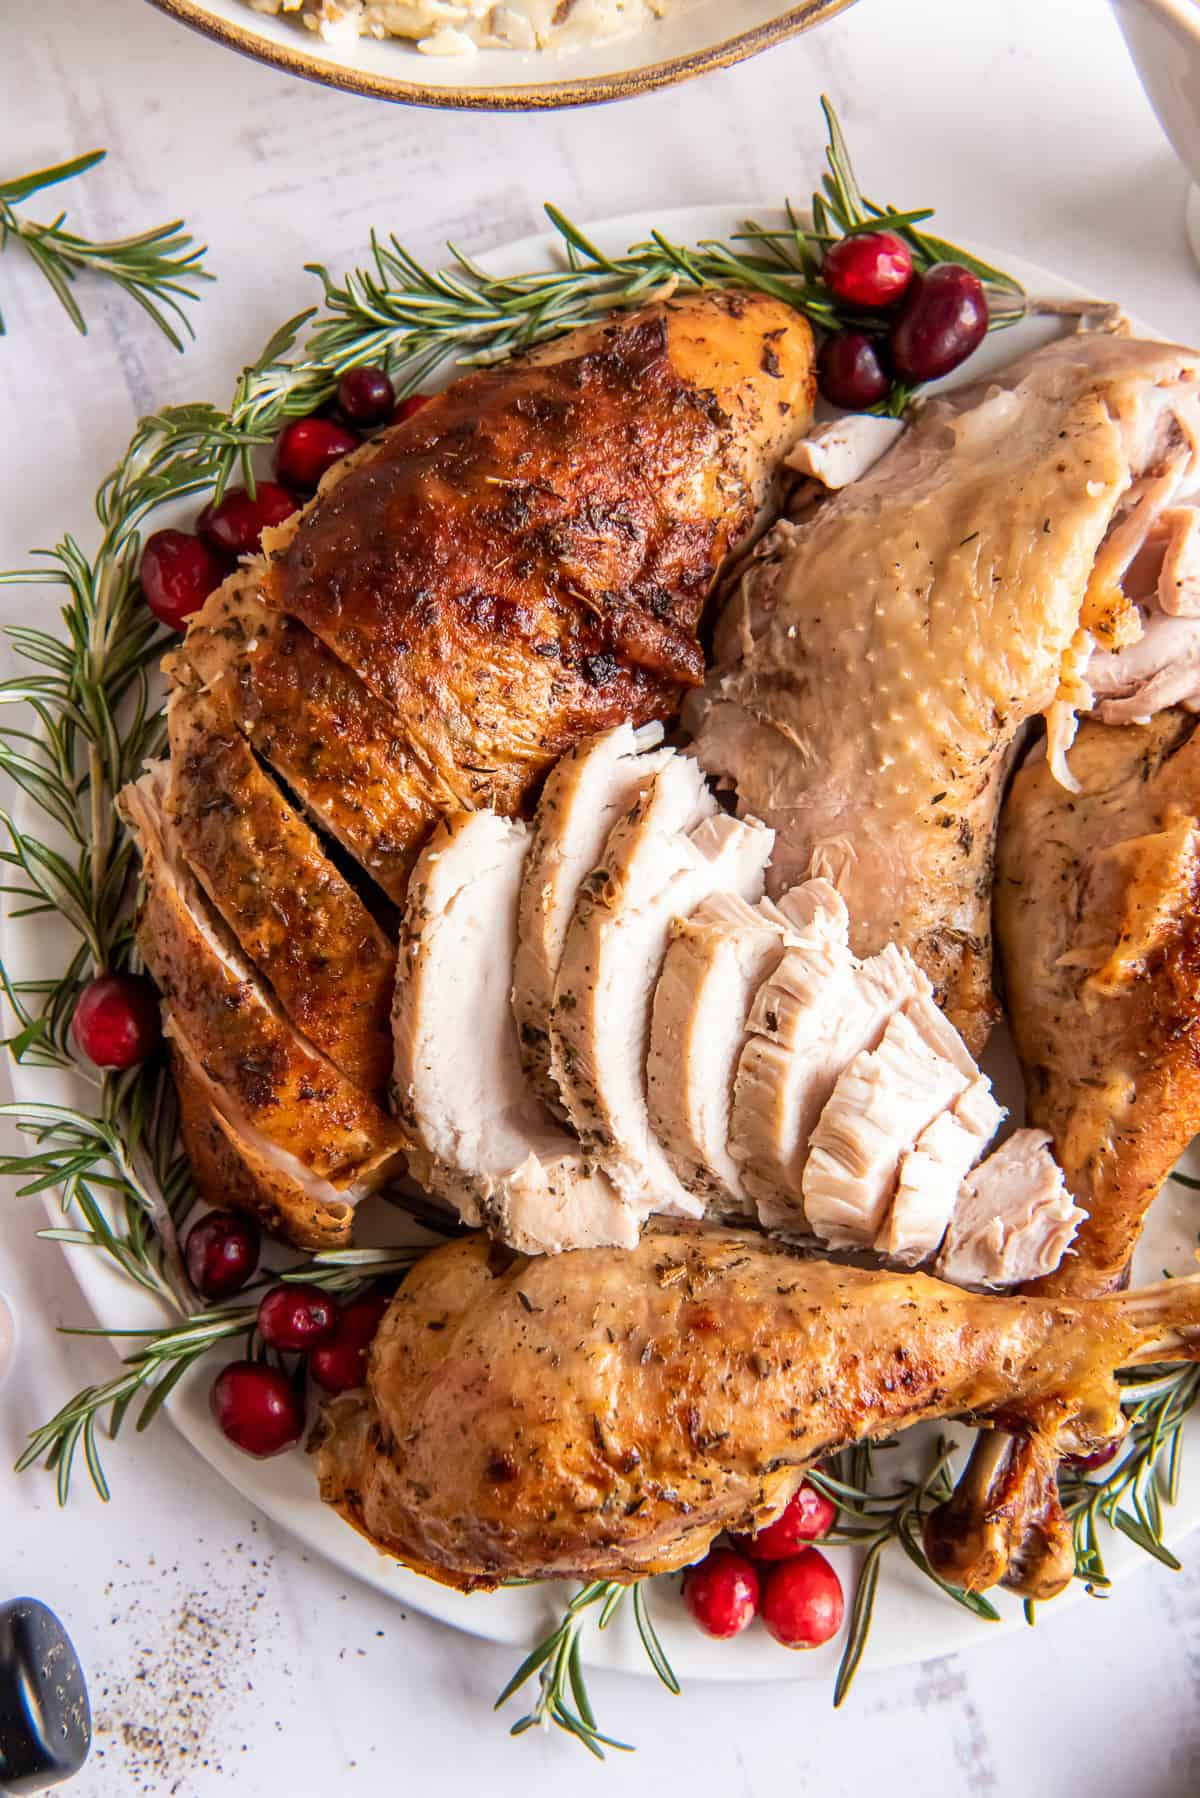
- Remove the wing from the same side. Repeat this process to remove the breast and wing on the other side. Slice the breast portions and transfer the turkey to a serving platter.
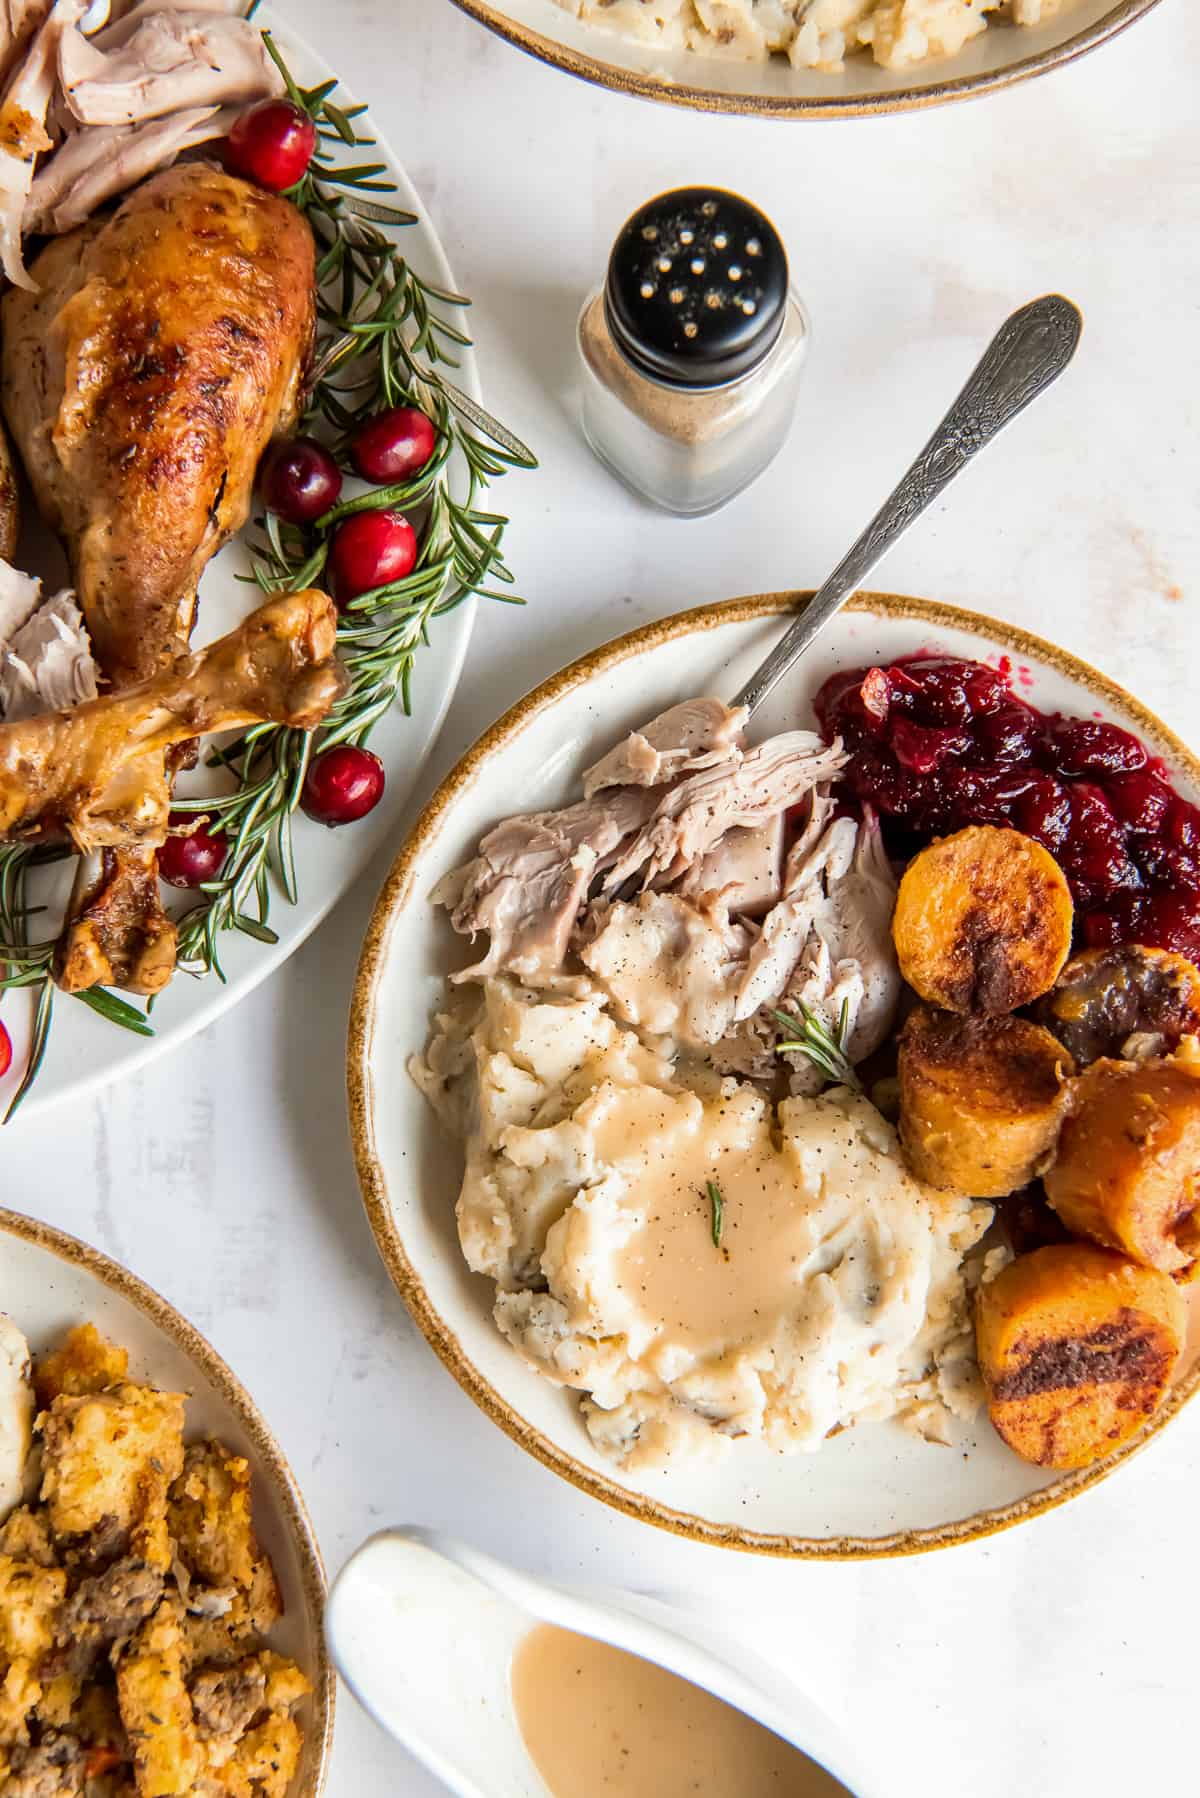
While the turkey is being carved, you can get started on the gravy. Check out my recipe for Easy Turkey Gravy. It is quick, easy, and SO delicious!
Valerie’s Tips
Easy Clean-up: To keep things sanitary, remove the turkey from the packaging and transfer it to a foil-lined baking sheet or cutting board. When you’re done, you can toss the foil for easier clean-up.
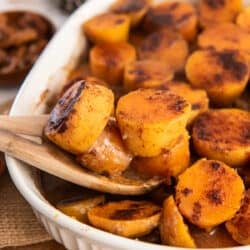
The Aromatics: The aromatics help add flavor to the turkey drippings and flavorful drippings equal yummy gravy. Feel free to substitute other items like fresh sprigs of rosemary or other fresh herbs, chunks of apple, or lemon wedges.
Resting Time: Don’t be tempted to rush the resting time once the turkey has been removed from the oven. Resting helps the turkey retain it’s juices and makes it easier to carve.
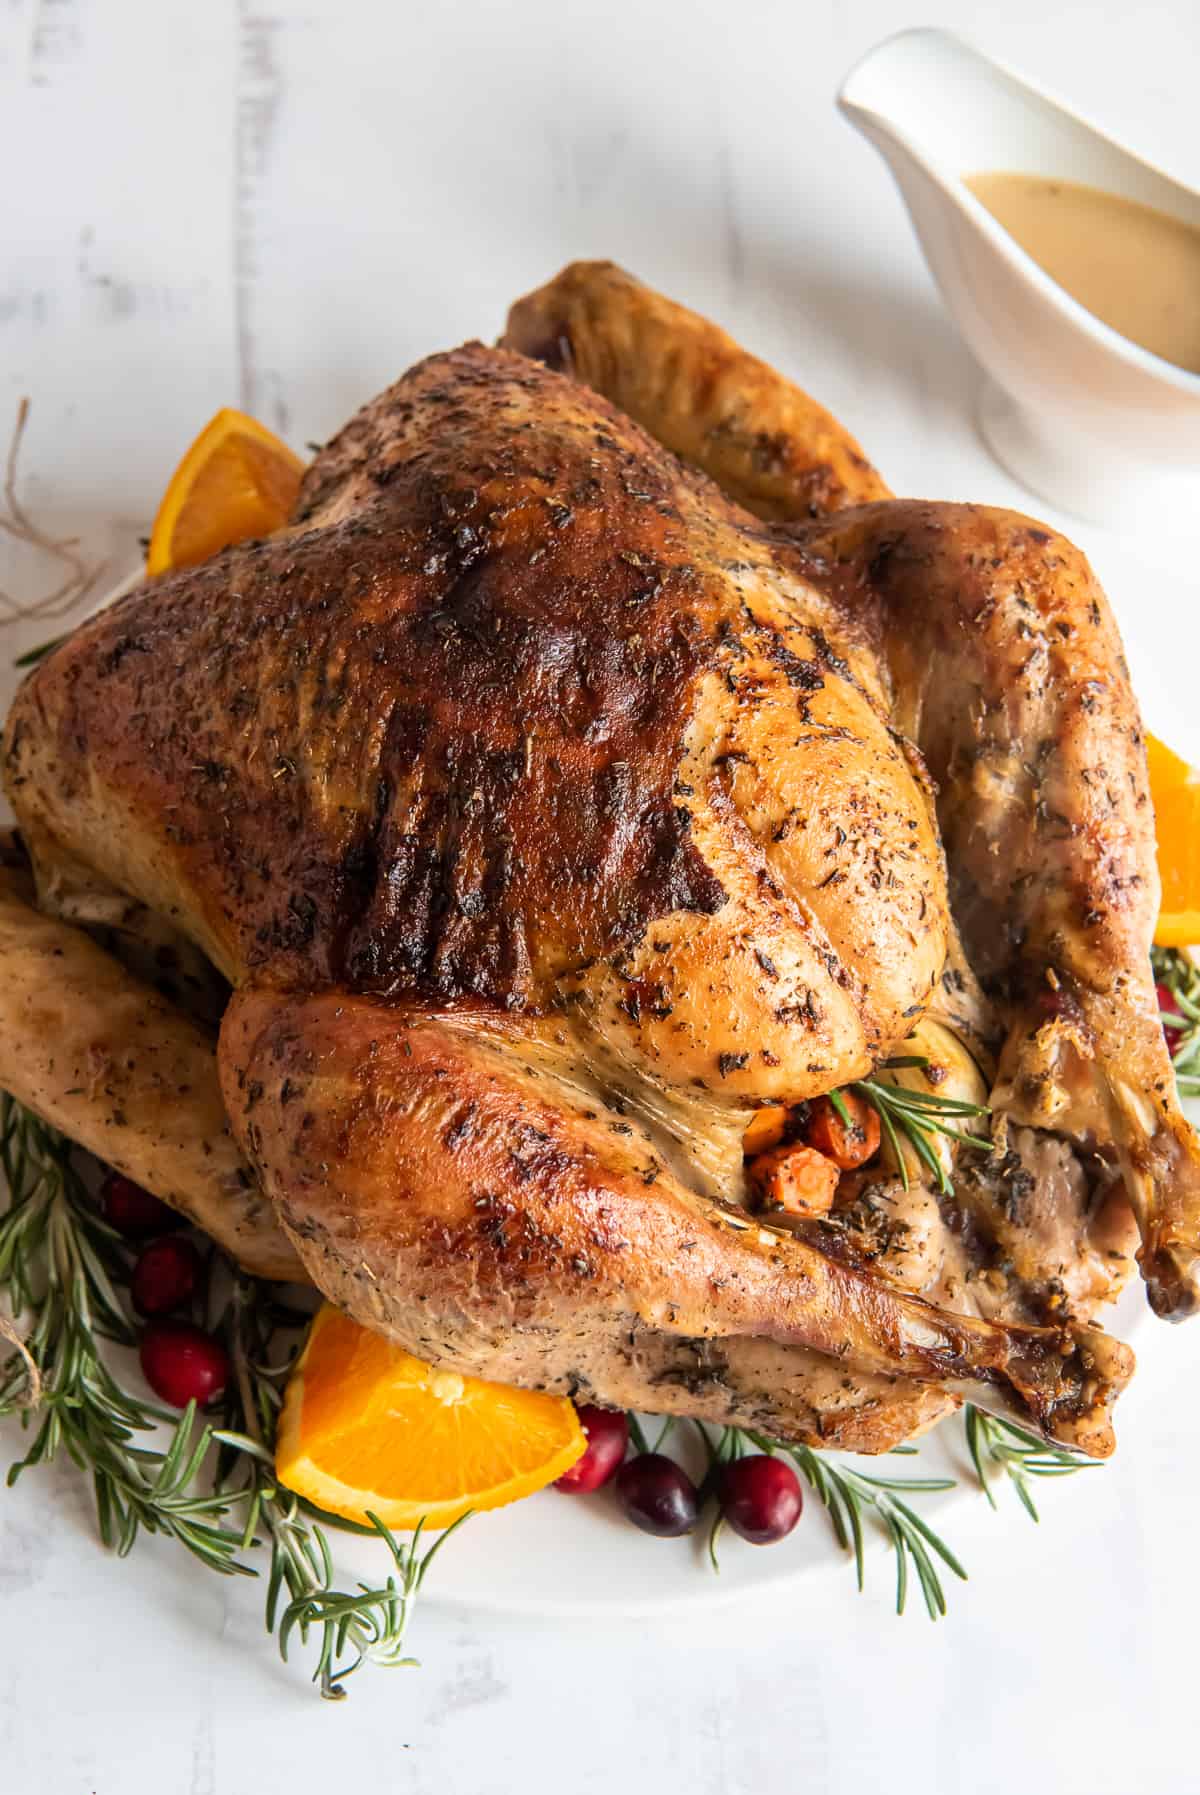
Garnish for Pretty Presentation: I added a festive touch to my platter of turkey with fresh sprigs of rosemary and some fresh cranberries. I have a rosemary plant in the backyard and had an open bag of fresh cranberries in my fridge so this worked for me. Use what you have to pretty it up. Oranges, lemons, and other fresh herbs are also great choices.
FAQ
If your turkey came with a plastic leg clip, it is most likely heat-safe. Check the instructions on the packaging and if it does not instruct you to remove it, it is fine to roast the turkey with the clip in place. Some brands include a metal clip and some, like Butterball, have a leg holder made of turkey skin. If there is no clip, you can secure the legs with kitchen twine.
It takes approximately 24 hours per 4 pounds for a whole turkey to thaw in the refrigerator. Place the turkey on a rimmed baking sheet to capture any juices that may escape the packaging during the thawing process. A fully thawed turkey should be cooked within 1 or 2 days. For more safe thawing tips visit the USDA website.
Approximate thawing times:
4 to 12 pounds — 1 to 3 days
12 to 16 pounds — 3 to 4 days
16 to 20 pounds — 4 to 5 days
20 to 24 pounds —5 to 6 days
Dried herbs are more potent and hold up better with long roasting times. They are also less expensive than fresh herbs. You can substitute fresh, if you prefer. When converting amounts, 1 teaspoon of dried herbs is equal to one tablespoon fresh.
If you want plenty of leftovers, plan for 1½ pounds per adult and ¾ pound per child. You can go with a little less if you don’t want a lot leftover.
A sturdy roasting rack is essential and worth buying if you don’t already have one. The bird should be elevated in order for the heat and air to circulate around it as it roasts.
More Thanksgiving Turkey Recipes
- Dry Brine Turkey with Garlic Butter Rub
- Roasted Turkey Breast with Gravy
- Slow Cooker Turkey Breast with Gravy
- Roasted Turkey Drumsticks
I hope your holiday is filled with everything that makes it such a special time. Friends, family, and of course, amazing food.
For more turkey tips, be sure to check out How To Choose, Prep, and Roast Your Turkey
Sign up for my free newsletter for all the latest recipes and join me on Facebook, Instagram and Pinterest for more cooking inspiration!
Herb Roasted Turkey
Ingredients
- 1 (12 to 18 pound) fresh or frozen whole turkey, fully thawed
- ¼ cup olive oil
- ½ cup butter, softened
- 1 tablespoon garlic powder
- 1 teaspoon dried rubbed sage, or 1 tablespoon fresh
- 1 teaspoon dried thyme, or 1 tablespoon fresh
- 1 teaspoon salt
- ½ teaspoon black pepper
- 1 small yellow onion, peeled and quartered
- 1 carrot, scrubbed clean and cut into chunks
- 4 cups low sodium chicken or turkey broth, divided
- 1 recipe Easy Turkey Gravy
Instructions
- Preheat oven to 325 degrees F. Remove the turkey from its packaging and place it on a foil-lined baking sheet or cutting board. Check both turkey cavities and remove and discard the giblets and neck (or reserve if using for another purpose). Pat the turkey dry with paper towels.
- In a small bowl, combine softened butter, olive oil, garlic powder, sage, thyme, salt, and black pepper. Carefully lift skin on the breasts of the turkey and push your hand in, lifting the skin from the breast. Scoop up some of the butter mixture with your hand and spread it under the skin of both turkey breasts. Spread most of the remaining butter mixture over the outside of the turkey, reserving a little for later. Stuff the onion and carrot into the larger turkey cavity. Transfer the turkey to a rack in a large roasting pan. Tuck the wings securely under the body. Spread the remainder of the butter mixture over the turkey in places that might have been missed. Pour about 2 cups of the broth into the bottom of the roasting pan.
- Transfer the roasting pan to the preheated oven. Allow the turkey to roast for an hour and then baste it once every 30 to 40 minutes throughout the remainder of the baking time, adding additional broth if needed. After two hours, rotate the pan in the oven to ensure even browning. Tent with foil once skin is browned to your liking. Roast until the internal temperature of the meatiest portion of the thigh registers a solid 165 degrees F. The roasting time should range from 3 to 4-½ hours for a 12 to 18 pound turkey.
- Remove the turkey from the oven, tent it loosely with foil, and allow it to rest for at least 30 minutes before carving.
- After transferring the turkey to a cutting board, get started on the Easy Turkey Gravy.
Carving Instructions
- Separate the leg and thigh from one side and separate the drumstick from the thigh bone.
- Slice down along either side of the breast.
- Slice again to remove the breast from one side. Remove the wing from the same side.
- Repeat this process to remove the breast and wing on the other side. Slice the breast portions and transfer the turkey to a serving platter.
Notes
- 4 to 12 pounds — 1 to 3 days
- 12 to 16 pounds — 3 to 4 days
- 16 to 20 pounds — 4 to 5 days
- 20 to 24 pounds —5 to 6 days
Nutrition
Nutrition information is automatically calculated using generic ingredients, and is an estimate not a guarantee. For more accurate results, please refer to the labels on your ingredients at home.
This post was originally published November 12, 2013. It has been updated with new text and images.
Complete your Thanksgiving Menu


It may have been beginner’s luck. but this is the first turkey recipe I have ever made and is the best thanksgiving turkey I have ever had. I made it the weekend before Thanksgiving for a small dinner with just my family. I picked this recipe because I did not have any fresh herbs and most recipes seem to call for that. I tried baking at 325 but my oven runs hot so I think it cooked closer to 350 and my 12 pound turkey was done around 2.5 hours. but seemed pretty foolproof. and the most tender turkey i have ever had, reminded me more of rotisserie chicken in texture. so impressed and thankful for this recipe. i did add a cut up apple to aromatics because i had one sitting around, but otherwise followed it exactly.
Fantastic! I’m so happy to hear that it turned out so well for you. Thanks so much for taking the time to leave a comment and rating and Happy Thanksgiving!
I tried this recipe about five years ago just to do something different with a turkey. Long story short for the last five years I’ve gotten tasked to do the turkey with the secret recipe as its called. Family and friends love the taste.
So glad to hear this! Thanks, Mark. 🙂
I have always used a turkey roasting bag and wonder if this will work using one of those. I like them because you seem to get more juice, makes more gravy.
Sure! This recipe would work great with a roasting bag.
Valerie… This Herb Roasted Turkey is
To die for!!! Many comments on the flavor and moistness is the BEST… making this every year😋
Wonderful! Happy Thanksgiving, Deb 🙂